Configure Webhooks for ServiceNow and Zapier Applications in RUCKUS One
On the Navigation bar, click . The Webhooks page is displayed.
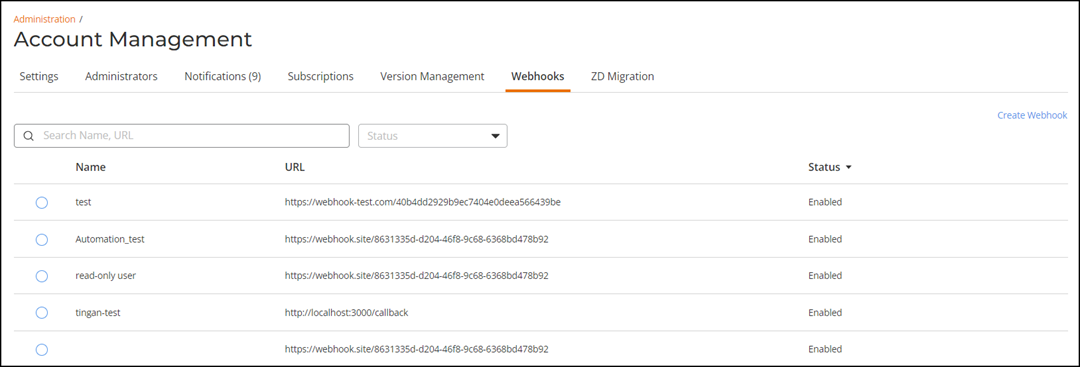
The Webhooks page displays all the created webhooks in a table.
The webhooks table has the following attributes:
- Name: Displays the name of the webhook.
- URL: Displays the webhook URL created by appending the domain URL and the base API path from the other application.
- Status: Displays green color if webhook URL is enabled or grey color if it is disabled.
Under each attribute is a search field to limit the webhooks list based on the search criteria.
Select a webhook and click Edit to edit the webhooks information and click Delete to delete the webhooks.
You can select the number of webhooks displayed in the table from the Show rows drop down at the bottom of the table. The range is from five webhooks per table to 100 webhooks per table.
To create a webhook and integrate it with ServiceNow, refer to Integrating RUCKUS One Incident Webhook with ServiceNow Application.
To create a webhook and integrate it with your email, refer to Creating Email Notification for RUCKUS One Incidents using Zapier Application.
To create a webhook and integrate it with Zapier, refer to Create a New Salesforce Case for RUCKUS One Incident using Zapier Application.
To update a webhook that is integrated with Zapier, refer to Updating an Existing Salesforce Case for RUCKUS One Incident using Zapier Application.
Integrating RUCKUS One Incident Webhook with ServiceNow Application
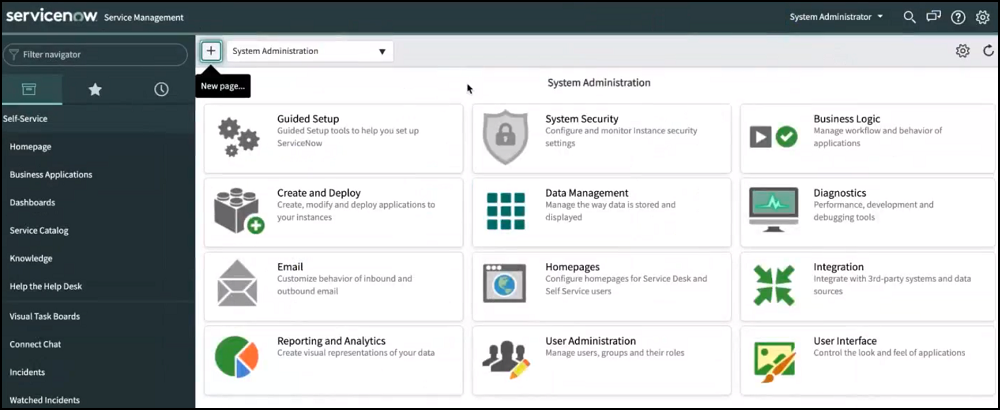
- Login to the ServiceNow instance.
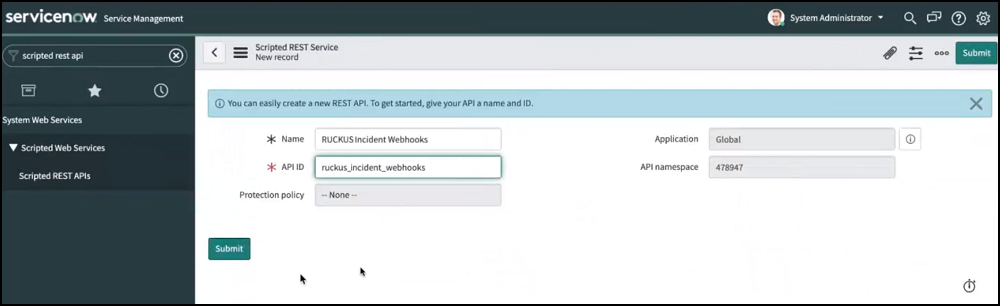
- Under System Web Services, select Scripted Rest APIs.
- Click Submit.The service is created and listed.
- Click the service. Under Resources, click New to provide the endpoint for the service.
- Select the HTTP method as POST.
- In Script, enter this
code for the endpoint to process the request:Note: Ensure that the spacing is retained when you copy and paste the code.
(function process(/*RESTAPIRequest*/ request, /*RESTAPIResponse*/ response) { // Secret shared between Ruckus One and ServiceNow // to ensure the authenticity of data received. var secret = "<secret>"; // Change value to assign incident to specific group, // leave as is to not assign to any group var assignment_group = "<assignment_group>"; // Change value to assign incident to specific person, // leave as is to not assign to any person var assigned_to = "<assigned_to>"; // Mapping of ROne incident severity to // ServiceNow incident Impact and Urgency field var impactAndUrgencyMap = { P1: { impact: 1 /* High */, urgency: 1 /* High */ }, P2: { impact: 2 /* Medium */, urgency: 1 /* High */ }, P3: { impact: 2 /* Medium */, urgency: 2 /* Medium */ }, P4: { impact: 3 /* Low */, urgency: 3 /* Low */ } }; // Mapping of ROne incident status to // ServiceNow incident State field var stateMap = { 'new': 1 /* New */, 'ongoing': 1 /* New */, 'finished': 6 /* Resolved */ }; var data = request.body.data; // 1. Ensure request uses correct shared secret key if (data.secret == secret) { var mode; // insert or update var event = data.payload; var inc = new GlideRecord('incident'); // 2. Check if incident exists inc.addQuery('number', event.id); inc.query(); if (inc.hasNext()) { inc.next(); mode = "update"; } else { inc.initialize(); mode = "insert"; } // 3. Add/update fields inc.number = event.id; inc.state = stateMap[event.status]; inc.impact = impactAndUrgencyMap[event.severity].impact; inc.urgency = impactAndUrgencyMap[event.severity].urgency; inc.short_description = event.title; inc.description = getDescription(event); // 4. Assign incident to specific group or person if (assigned_to != "<assigned_to>") { inc.assigned_to = assigned_to; } if (assignment_group != "<assignment_group>") { inc.assignment_group.setDisplayValue(assignment_group); } // 5. Insert/Update the incident inc[mode](); var status = mode + (mode == 'insert' ? 'ed' : 'd'); gs.info('incident ' + event.id + ' ' + status); } else { gs.warn("Invalid secret to run Ruckus One webhook"); } // Respond to the Webhook response.setStatus(200); /** * Generate description for incident */ function getDescription (event) { return [ 'Incident URL: ' + event.link, '', 'Details:', '------------------------------------------------', 'Client Impact Count: ' + event.impactedClientCount + ' of ' + event.clientCount + ' (' + event.impactedClientPercentage + ')', 'Incident Category: ' + event.category, 'Incident Sub-Category: ' + event.subCategory, 'Type: ' + event.impactedAreaType, 'Scope: ' + event.impactedAreaName, 'Hierarchy: ' + event.impactedAreaHierarchy, 'Duration: ' + event.duration, 'Event Start Time: ' + event.startTime, 'Event End Time: ' + event.endTime, '', 'ROOT CAUSE ANALYSIS:', '------------------------------------------------', event.rootCauses, '', 'RECOMMENDED ACTION:', '------------------------------------------------', event.recommendations ].join('\n'); } })(request, response); - In
var secret, set the secret value for data authentication. - In
var
                        assignment_group
, assign the RUCKUS One incident to a specific group within ServiceNow. - In the Security tab, uncheck Required Authentication.
- Click Submit.
- Log in to the RUCKUS One account.
- On the Navigation bar, click . The Webhooks page is displayed.
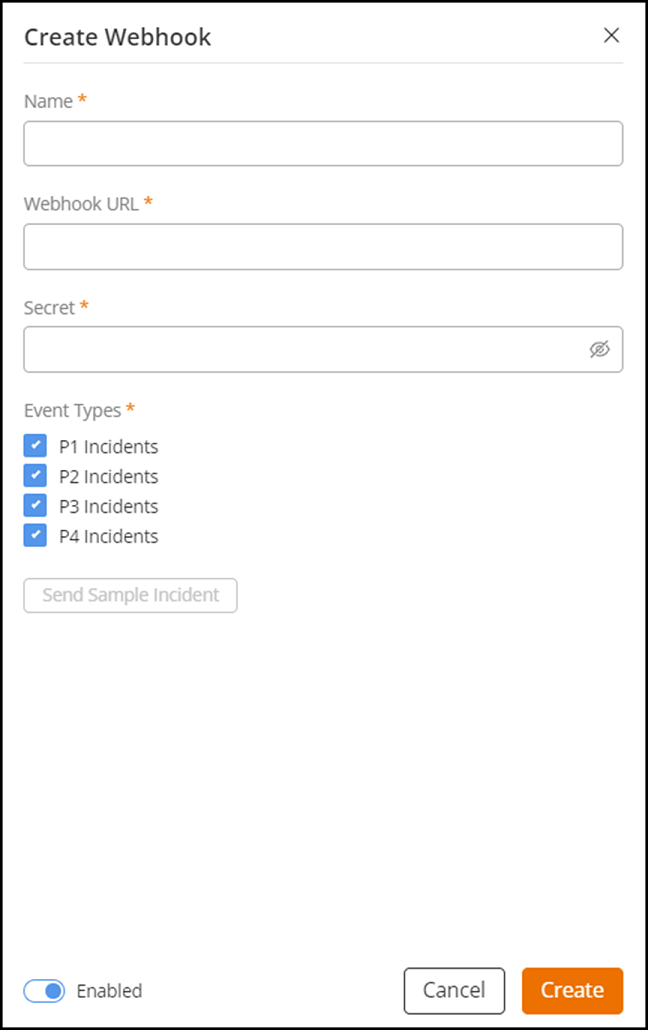
- Click Create Webhooks.
- Complete the following
fields:
- Name: Enter the name of the webhook.
- Webhook URL: Enter the URL by appending the domain URL (for example, https://dev-123.service-now.com) and the Base API Path from the ServiceNow record (for example, /api/93874/ruckus_one_incidents).
- Secret: Enter the secret key generated for authentication from the service record.
- Event Types: Select the event types from severity P1 to P4.
- Enable: If webhook URL is enabled, ServiceNow will receive notifications about the incidents.
- Click Create. The new webhook is added to the Webhook page. This URL will establish communication between ServiceNow and RUCKUS One and reflect incidents generated within resource groups, in real-time.
Creating Email Notification for RUCKUS One Incidents using Zapier Application
Complete the following steps to set up the automation to trigger email notification for RUCKUS One incidents using Zapier:
- Go to the Zapier website and sign up for an account, or log in if you already have a Zapier account and access the Zapier web interface by clicking https://zapier.com/app/zaps.
- Click Create and select New Zap to start creating a new automation.
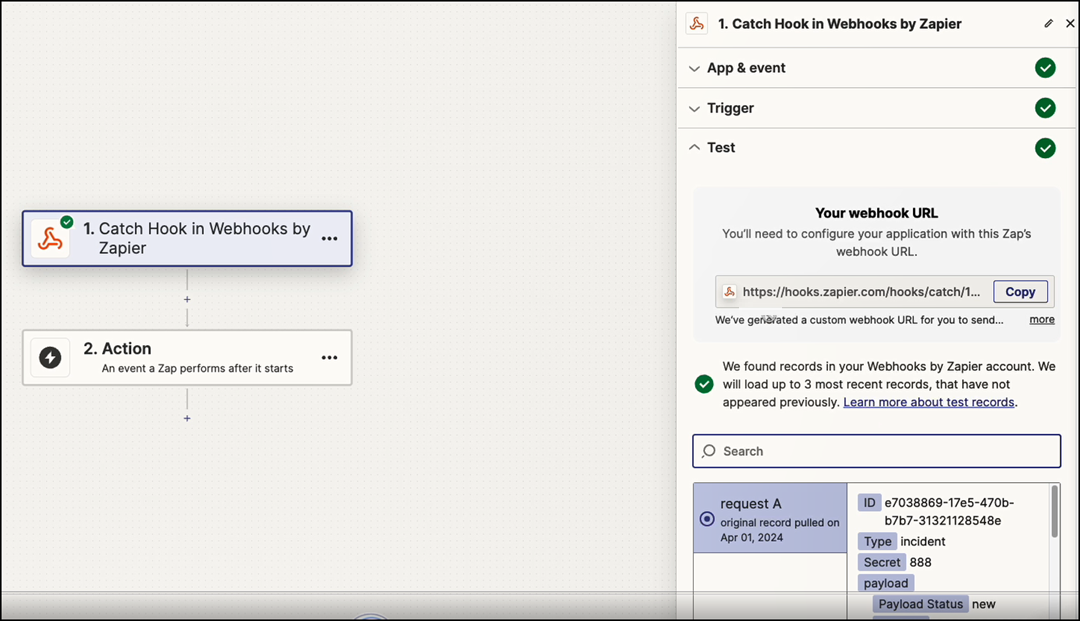
- Click Trigger and search and select Webhooks by Zapier as the trigger application. The Catch Hook in Webhooks by Zapier window is displayed.
- Select Catch Hooks as the trigger event and click Continue to configure Catch Hook trigger settings.
- Log in to the RUCKUS One account.
- On the Navigation bar, click . The Webhooks page is displayed.
- Click Create Webhooks. The Create Webhook dialog box is displayed.
- Complete the following fields:
- Name: Enter the name of the webhook.
- Webhook URL: Enter the webhook URL from the Zapier interface.
- Secret: Enter secret key for data authentication between RUCKUS One and Zapier.
- Event Types: Select the event types from severity P1 to P4.
- Enabled: If webhook URL is enabled, Zapier will receive notifications about the incidents.
- Click Send a Sample Incident to continue integration on the Zapier application. When the incident sample has reached Zapier, a success message is relayed on the Create Webhook dialog box in the RUCKUS One web interface.
- Click Create to save the configuration.The new configuration is listed in the Webhooks page.
- Go back to the Catch Hook in Webhooks by Zapier window in the Zapier web interface and click Test Trigger .
- Click Continue with the selected record to continue configuring your Zap by adding additional steps, such as choosing an action application and setting up the desired action.
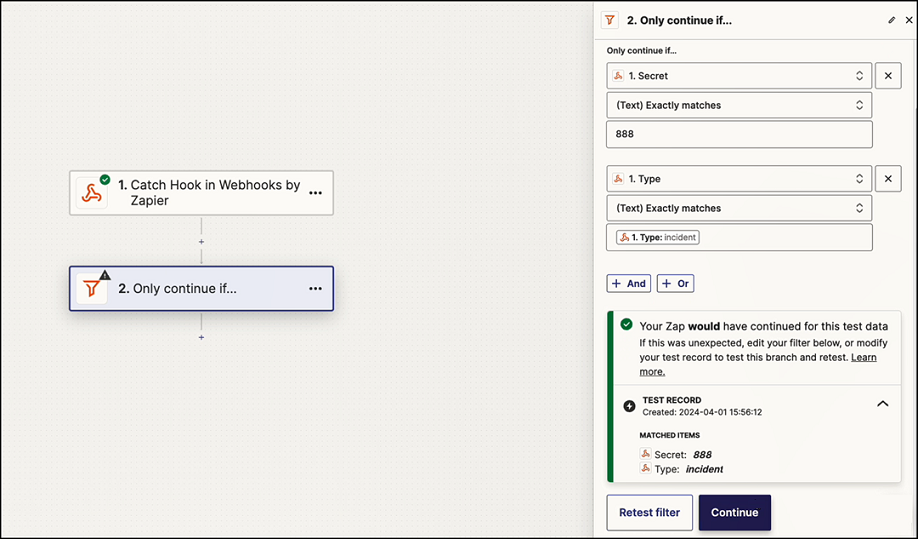
- Click Action and search and select Filter by Zapier as the action application. The Only Continue if... window is displayed.
- Click the Filter setup & testing tab and specify the conditions that incoming data must meet to proceed further in the Zap workflow. Options such as "field," "condition," and "value" are displayed to define the filtering criteria.
- Click Continue
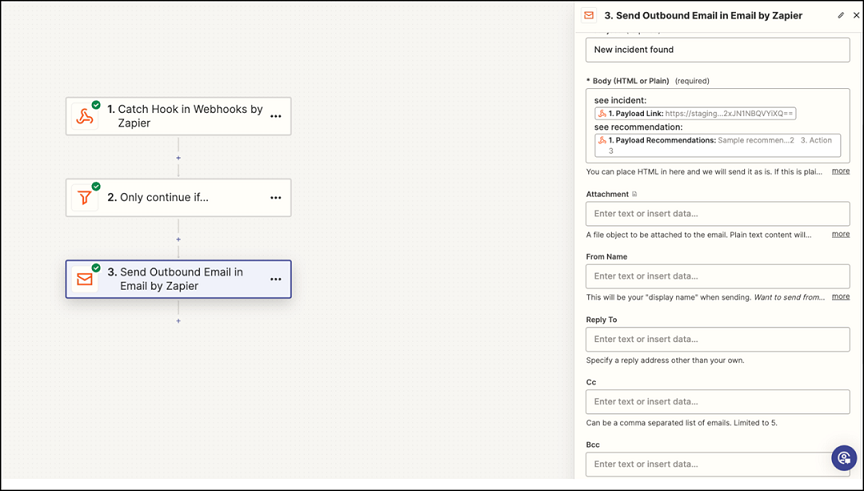
- Add Email by Zapier as the action application.
- Select Send Outbound Email as the action event you want to perform with Email by Zapier and click Continue.
- Configure the settings for the selected action event by specifying the recipient's email address, subject line, body content, and any other required parameters.
- Click Test Step to verify that Zapier can successfully send the email according to the configured settings.
- Click Publish. The newly created zap is listed in the My Zap window.
- Turn on the toggle button to activate zap and start automating the process of sending emails based on webhook triggers.
Create a New Salesforce Case for RUCKUS One Incident using Zapier Application
- Login to the Zapier web interface by clicking https://zapier.com/shared/0ec3d66a9a6889681fdb83248838d6ca161c90c6.
- Click Try this Zap.
- Log in to the RUCKUS One account.
- On the Navigation bar, click . The Webhooks page is displayed.
- Click Create
Webhooks. The Create Webhook dialog box is displayed.
- Complete the following
fields:
- Name: Enter the name of the webhook.
- Webhook URL: Enter the webhook URL from the Zapier interface.
- Secret: enter secret key for data authentication between RUCKUS One and Zapier.
- Enable: If webhook URL is enabled, Salesforce will receive notifications about the incidents.
- Click Send a Sample Incident to continue integration on the Zapier application. When the incident sample has reached Zapier, a success message is relayed on the Create Webhook dialog box in the RUCKUS One web interface.
- Click Create to
save the configuration.The new configuration is listed in the Webhooks page.
- In the Zapier web interface, In Catch Hook, click Test Trigger .
- Click Continue.
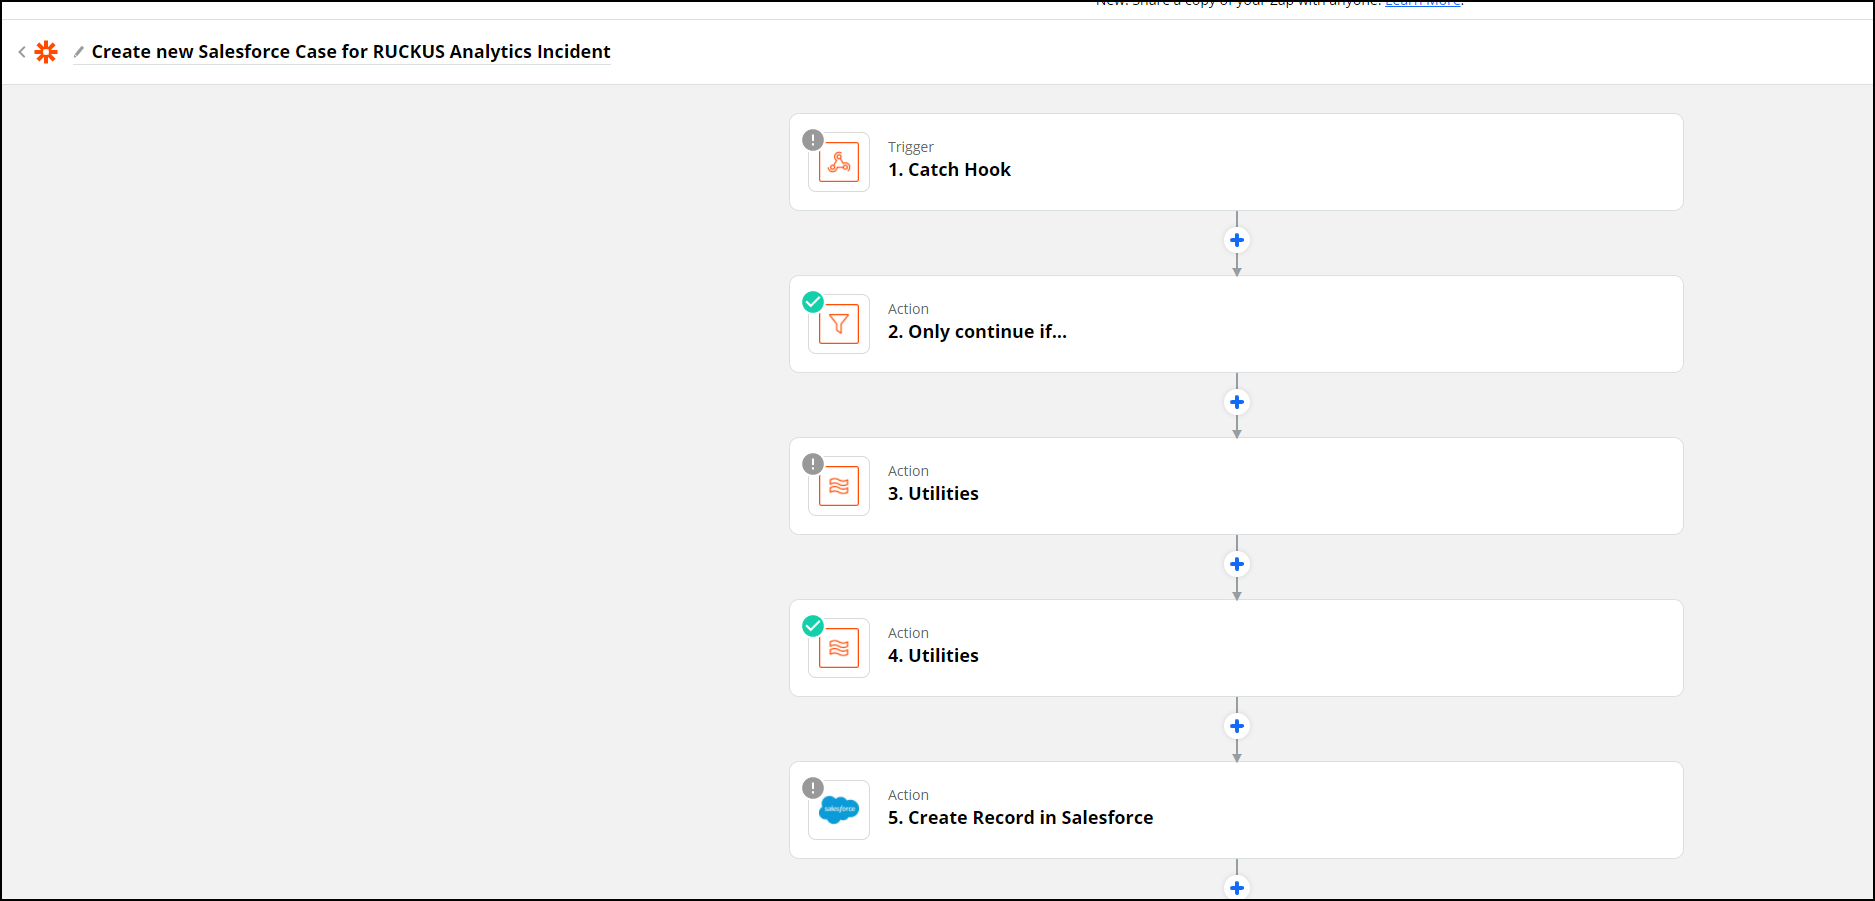
- In Only Continue if... , go to Filter setup & testing and enter the same secret key that was included in the RUCKUS One web interface for data authentication.
- Click Continue.
- In Utilities, go to Set up action and in the lookup table, map the RUCKUS One incidents status with the Case status in Salesforce.
- Click Test & Continue.
- In Utilities, go to Set up action and in the lookup table, map the RUCKUS One incidents severity with the priority of cases in Salesforce. For example, P1 incidents will be marked High priority, P2 and P3 as Medium and P3 as Low priority incidents.
- Click Test & Continue.
- In Find Record by Query in Salesforce, go to Choose account, and select your Salesforce account or login to your account and authorize Zapier to manage records in Salesforce on your behalf. This step ensures no new cases are recorded when existing cases are present.
- Click Continue.
- Under Setup Action, select Case as the Salesforce object.
- Click Skip Test.
- Click Close.
- Click Continue.
- Under Only continue if... , go to Filter setup and testing and click Continue.
- In Create Record in Salesforce, go to Choose account and select your Salesforce account.
- Under Setup Action,
select Case as the Salesforce object. Set the other fields
as necessary. Modify the fields as required, such as changing the
description or assigning the Salesforce case to a particular person or
group. Note: Do not change the "Subject" as it is used when updating a case.
- Click
Continue.A Salesforce recorded is now created.
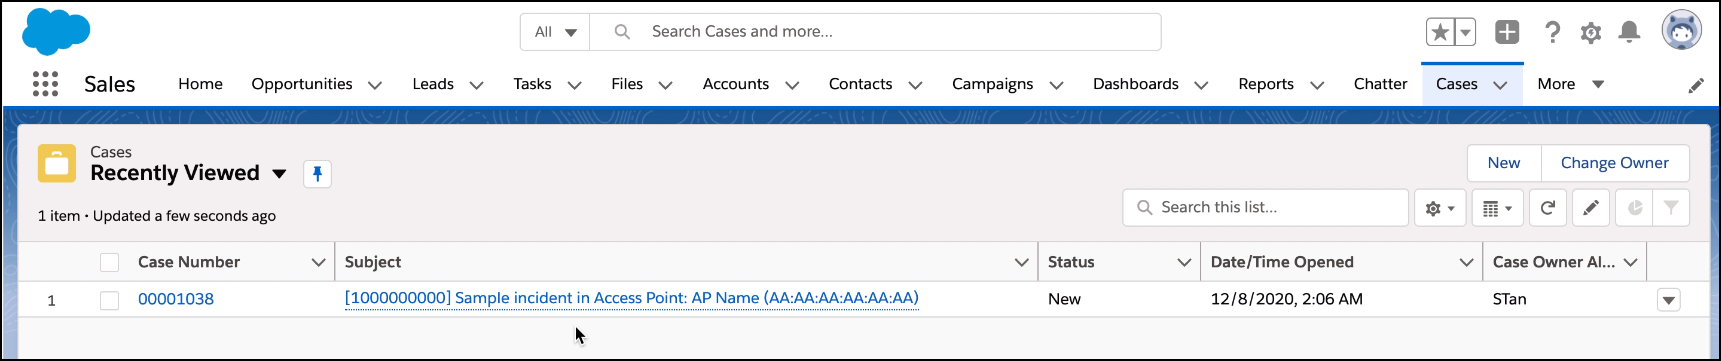
- Login to Salesforce Web interface. A new case is created as shown.
- In the Zapier web interface,
click Turn on
Zap.You can also update existing cases in Salesforce by following the same steps mentioned in the next section.
Updating an Existing Salesforce Case for RUCKUS One Incident using Zapier Application
- Setup incident update by clicking https://zapier.com/shared/6bb3dc515e23d86796c3c70bfcc4121f0d41ae59.
- Repeat Step 2 to Step 25 from the Create a New Salesforce Case for RUCKUS One Incident using Zapier Application section.