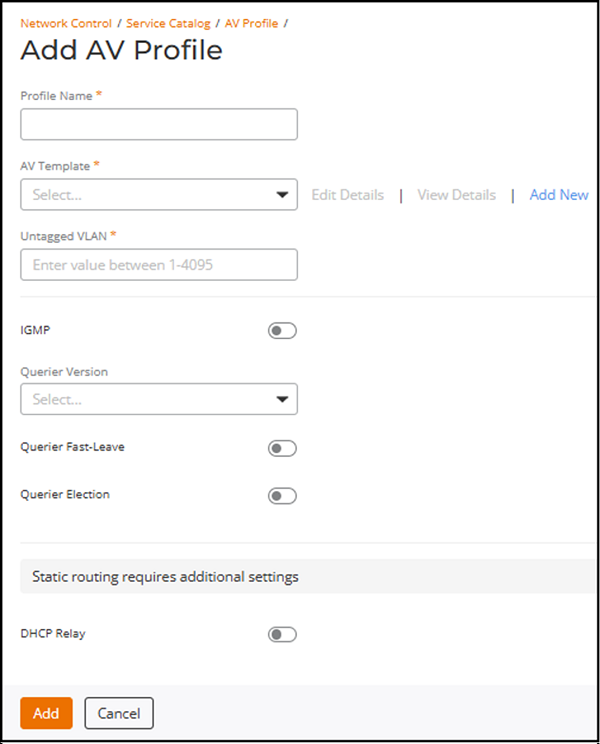
Adding an AV Profile
Complete the following steps to create an AV Profile:
- Add the AV Profile service to your tenant account. From the navigation bar, select . Alternatively, you can select , then click Add Service.
- Find the AV Profile tile and click Add.
- Enter a Profile Name.
- Select an AV Template from the
drop-down list.
If you are unsure of an existing template’s configuration, you may select the template and click View Details to see its configuration. The View AV Template sidebar displays the Template Name, Multicast Version, Description, and the PTPv2 status. It also includes a Quality of Service table showing the QoS Type, Value, and Queue.
If a template having the necessary configuration is not available, click Add New to create a new AV template. The Add AV Template sidebar is displayed. Refer to Adding and Managing AV Templates for configuration details.
- Enter a value between 1 and 4095 in the Untagged VLAN field.
- Toggle the
IGMP switch on to enable multicast settings.
IGMP is disabled by default.
- Querier Version: Select the IGMP protocol version (V2 or V3) that the switch should use on this VLAN. Choose the version required by your AV devices.
- (Optional) Querier Fast-Leave: Enable Querier Fast-Leave to stop multicast forwarding immediately when a device sends a leave message.
- (Optional) Querier Election: Enable Querier Election to allow the switch to act as the IGMP querier on the VLAN if needed.
- Querier IP
Address: This field appears only when Querier Election
is enabled. Enter the IP address the switch should use as the source for
IGMP queries.
Keep an eye on JIRA bug ACX-104802, these UI field names may change.
- Toggle the DHCP Relay switch on to configure DHCP relay. When enabled, enter the following details:
- Click Add.The new AV Profile is added to the AV Profile page.