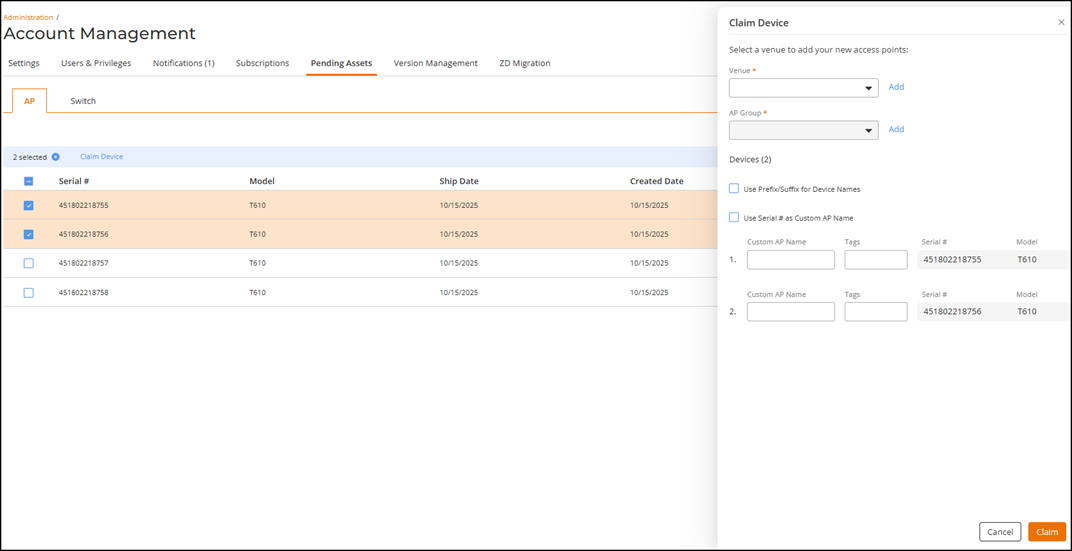
Managing Pending AP Assets
- From the navigation bar, select
.The Pending Assets page is displayed.
- On the AP
sub-tab, review the following details:
You can use the Search option to display only the entries matching a specific Serial # or Model. Additionally, you can filter the list by selecting a model from the Model drop-down or by choosing a date range from the Created Date calendar. The available date options are Last 24 Hours, Last 7 Days, Last 30 Days, and All Time. The Clear Filters option appears when a Serial #, Model, or the Show Hidden Devices checkbox is selected. Click Clear Filters to remove the applied filters. The Created Date filter then resets to All Time if it was changed to another date option.
You can customize which fields appear in the AP table by clicking the
 icon and selecting or deselecting the desired column names. Optionally,
you can click Reset to default to restore the default subset of
columns.
icon and selecting or deselecting the desired column names. Optionally,
you can click Reset to default to restore the default subset of
columns. - Claim one or more devices by
clicking the associated checkbox(es) and then clicking Claim
Device.Note: You can claim up to 256 devices at a time.The Claim Device sidebar is displayed.
- Select the Venue
from the drop-down menu.
If the venue is not yet defined, you can create a new venue: click Add, complete the fields in the Add Venue sidebar, and click Add. You are then able to select the new venue from the Venue drop-down. Refer to Adding a Venue for information on how to add a new venue.
- Assign the device(s) to
an AP Group. The drop-down contains a default
setting that is populated based on whether the selected Venue already
has an AP Group.
You may optionally create a new AP Group by clicking Add, completing the fields in the Add AP Group sidebar, and clicking Add to close the sidebar. You may then select the newly added AP Group from the AP Group drop-down. Refer to Adding an AP Group for information on how to add a new AP Group.
- (Optional) Select the
checkbox Use
Prefix/Suffix for Device Names and enter the
Prefix and Suffix
fields.
The system will name the device by placing the prefix at the beginning, the custom name in the middle, and the suffix at the end.
- (Optional) Select the
checkbox Use
Serial # as Custom AP Name and enter the following
details:
Note: The system auto-populates the Serial # and Model.
- Click Claim.
You can view the claimed device on the AP List page. For detailed page content descriptions, refer to AP List Overview.
- Select the Venue
from the drop-down menu.
- (Optional) Hide one or more devices by clicking the associated checkbox(es) and then clicking Hide Device.
- (Optional) To view hidden devices, select the Show Hidden Devices checkbox.