Adding and Managing a Regular Switch Configuration Profile
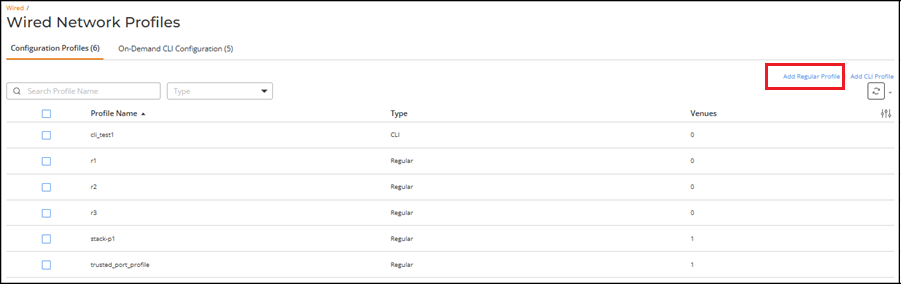
- On the navigation bar, select .
- Click Add Regular
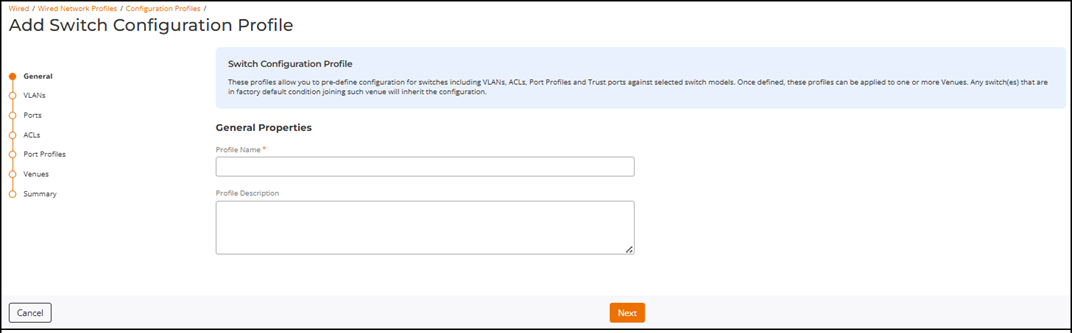
Profile.The Add Switch Configuration Profile page is displayed, defaulting to the General tab.Note: These profiles allow you to pre-define configuration for switches including VLANs, ACLs, Port Profiles and Trusted ports against selected switch models. Once defined, these profiles can be applied to one or more venues. Any switch(es) that are in factory-default condition when joining such a venue will inherit the configuration.ACX-102491 - ICX Configuration and CLI Profiles + On Demand CLI - This message is retained exactly as provided in the user interface according to subject‑matter expert (SME) review requirements.
- Enter the Profile Name and Profile Description in the General tab.
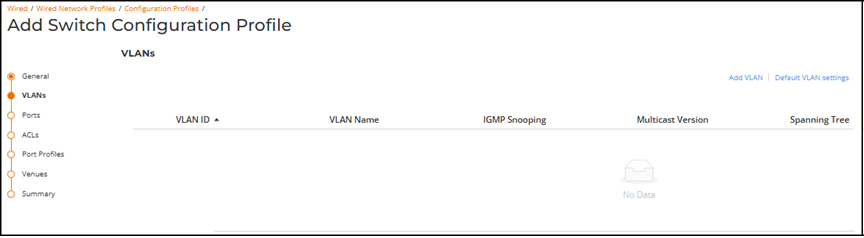
- Click Next to proceed to the VLANs tab.
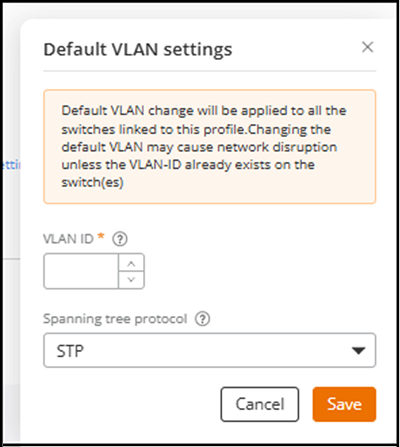
- (Optional) Click Default VLAN settings.
- Modify the VLAN ID.
- (Optional) Select the Spanning tree protocol from the drop-down list.
- Click Save.Note: The default VLAN change is applied to all the switches linked to this profile. Changing the default VLAN may cause network disruption unless the VLAN ID already exists on the switches.Note: Beginning with RUCKUS FastIron 10.0.20a and later, if the Spanning tree protocol is set to STP, RUCKUS One will automatically apply RSTP to the device.
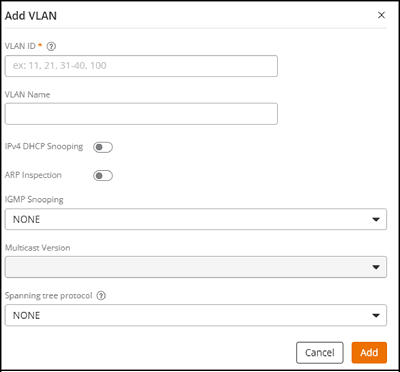
- Click Add VLAN.
- Specify a VLAN ID.The VLAN ID values range from 1 through 4095, except for 4087 and 4090 through 4094. One or more VLAN IDs can be entered in the following ways:These alternatives allow you to create multiple VLANs simultaneously while applying common configurations. After establishing these VLANs, you can customize settings for each VLAN individually. Additionally, you can edit VLAN IDs within a range while ensuring that the original VLAN is included.
- (Optional) Enter a VLAN Name.
- (Optional) Toggle the IPv4 DHCP Snooping switch on to enable this feature.
- (Optional) Toggle the ARP Inspection switch on to enable this feature.
- (Optional) Select IGMP Snooping from the drop-down list. The options are NONE, Active, and Passive. This setting is disabled by default (drop-down option set to NONE). If Active or Passive is selected, then the Multicast Version option becomes active.
- (Optional) Select Multicast Version from the drop-down list depending on which version is supported by your network and the network devices with which it is compatible. The options are Version 2 or Version 3. The default value is Version 2.
- (Optional) Select Spanning tree protocol from the drop-down list. The options are NONE, RSTP, and STP.
- Click Add. The VLANs are created and listed on the VLANs page.
- Select the radio button next to the VLAN ID to edit or delete the configured VLAN.
- Specify a VLAN ID.
- Click Next to proceed
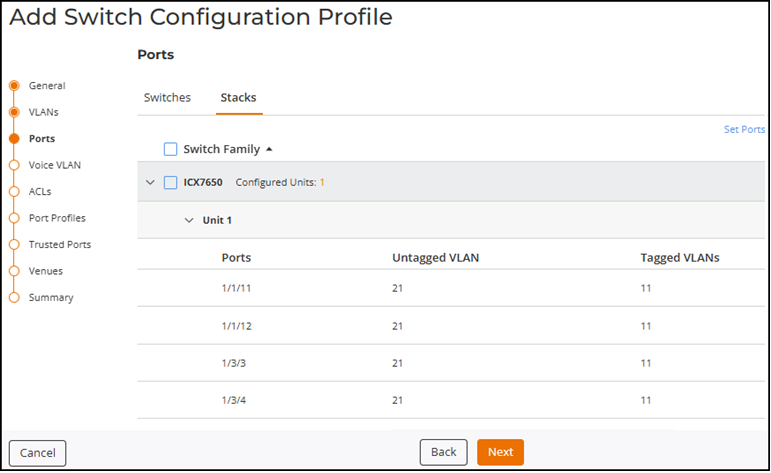
to the Ports tab.The page displays the Switches and Stacks sub‑tabs.ACX-113520 - [Document] Support Stack Unit in Regular Profile
- On the
Ports tab, click Set Ports on the
Switches sub-tab.
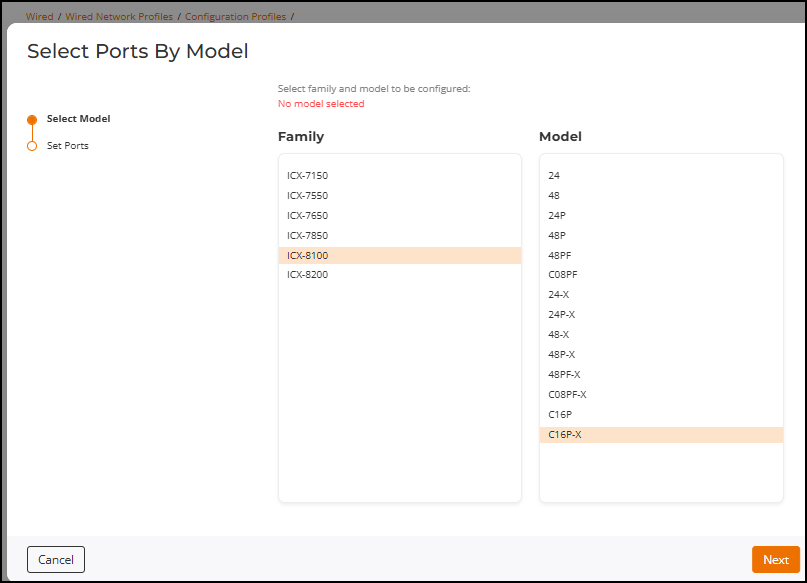
- Select the device
details:
- Family
- Model
- Note:
- Support is available for ICX 8100 and ICX 8100‑X
switch models, including AV‑capable models. You can
select these models from the ICX 8100 family list
when creating configuration profiles such as VLANs,
Trusted Ports, and Port Profiles.
ACX-93833 Support ICX8100-X - Stacking on R1
- Support is also available for the ICX 8200 family,
including AV‑capable models. ICX 8200 models appear
in the ICX 8200 family list, and you can configure
their port layouts in the Set Ports
step.
ACX-108409- R1 support for Phase 1 AV Switches
- Support is available for ICX 8100 and ICX 8100‑X
switch models, including AV‑capable models. You can
select these models from the ICX 8100 family list
when creating configuration profiles such as VLANs,
Trusted Ports, and Port Profiles.
- Module
- Click Next.Note: On ICX 8200‑AV switches, some port capabilities differ by model and by port range, and the ports shown in Set Ports reflect those differences.ACX-108409- R1 support for Phase 1 AV Switches
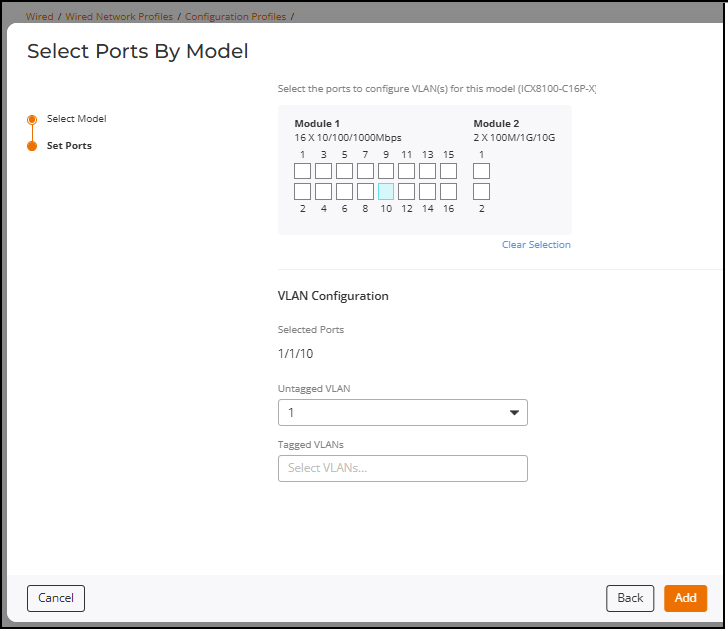
- Select the ports to configure VLANs for the selected model.
- Select the Untagged
VLAN and Tagged
VLAN from the drop-down lists. If multiple ports are
selected, enable the corresponding Untagged
VLAN and Tagged
VLAN checkboxes for selecting the VLAN values.Users can now add multiple tagged VLANs to a port using the Select All and Deselect All checkboxes, eliminating the need to choose each VLAN individually.Note: Select All applies only to the VLANs currently visible in the web interface. VLANs added after using this option are not automatically selected.Note: The ability to select a specific range of VLANs is not supported.
- Click Add to save the port configuration.
- Select the device
details:
- On the
Ports tab, click Set Ports on the
Stacks sub-tab to add a new configuration.
- Select the Family you want to configure and click Next.
- On the Set
Ports page, review the unit layout.
- Unit 1 is displayed by default.
- Click Add
Unit to include additional units.
Note: Units must be configured in sequence. If you add Unit 3, Unit 2 must also be present.Note: At least one port must be configured in any unit.
- To remove a unit,
click the
 next to the unit label. Removing a
unit discards all VLAN selections associated with that
unit.
next to the unit label. Removing a
unit discards all VLAN selections associated with that
unit.
- Select ports in the
template to configure VLAN assignment.The port layout uses a standardized 48‑port model for the selected family. When switches in the stack use different models from the same family, VLANs are applied only to ports that exist on each switch.
For Modules 2 and 3, the system will display the maximum number of ports supported across all models within the selected family.
- In the VLAN Configuration panel:
- Click Save.The Stacks sub‑tab now lists the configured entry, showing units, selected ports, untagged VLAN, and tagged VLANs. The configuration becomes part of the switch profile and is applied to stack‑capable switches during provisioning.ACX-113520 - [Document] Support Stack Unit in Regular Profile
- Click Next to proceed
to the Voice VLAN tab. The page displays the Switches and Stacks sub‑tabs.
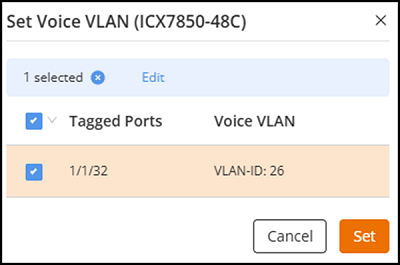
- On the Voice
VLAN tab, click Set Voice VLAN on
the Switches sub-tab. The Set Voice VLAN sidebar is displayed.
- On the Voice
VLAN tab, click Set Voice VLAN on
the Stacks sub-tab. The Set Voice VLAN sidebar is displayed.
- Click Next to proceed to the ACLs tab.
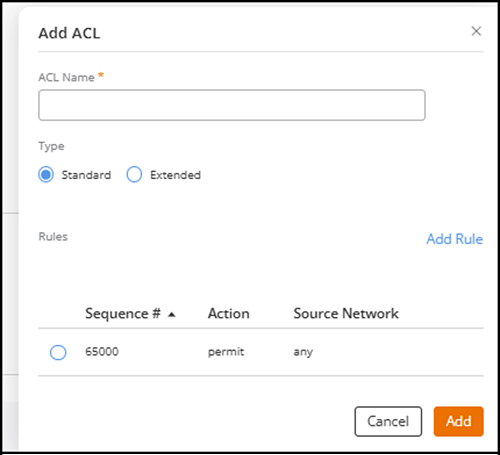
- Click Add ACL.
- Enter an ACL Name.
- (Optional) Select Standard or Extended in the Type field.
- (Optional) Click
Add
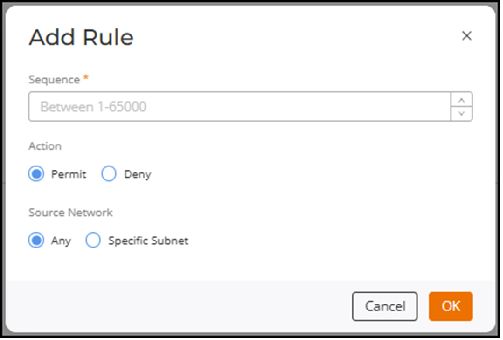
Rule.The Add Rule dialog box is displayed.
- Enter a valid Sequence or use the arrows to select a value from 1 through 65,000 and perform the following settings, based on the ACL type you have selected.
- Action: Select an action. The options are Permit or Deny.
- Source
Network: Specify the source network as Any or Specific
Subnet. If you select Specific
Subnet, then enter the specific subnet IP
address.
The following fields are displayed only if you select the type Extended.
- Protocol: Select IP, TCP, or UDP from the drop-down list.
- Destination Network: Select the destination network, Any or Specific Subnet. If you select Specific Subnet, then enter the specific subnet IP address.
- Source Port: Specify the source port. This option is activated only if the TCP or UDP protocol is enabled.
- Destination Port: Specify the destination port. This option is activated only if the TCP or UDP protocol is enabled.
- Click OK to add the rule.
- Click Add to add the ACL configuration to the ACLs table.
- Click Next to proceed to the Port Profiles tab.
- (Optional) Click Add Port Profile
to apply an ICX port profile to one or more switch families and switch
models.The Add Port Profile dialog box is displayed to configure the following settings:
- Note:
- You cannot create ICX port profiles here, meaning that you must have already configured the ICX port profile and associated MAC OUI and LLDP TLV settings. Refer to Adding and Managing an ICX Port Profile and Adding MAC OUI and LLDP TLV Matching Entries for more information.
- Configure the global ICX port profile, MAC OUI, and LLDP TLV settings from the tab. Refer to Adding and Managing an ICX Port Profile and Adding MAC OUI and LLDP TLV Matching Entries for more information.
- Locally modified port profiles are overridden if their names match the global settings and are already applied to the related regular switch configuration profile.
- Support has been
added for ICX 8100 and ICX 8100-X switch models. You can select
these models from the ICX 8100 family list, including variants such
as 24, 48, 24P, 48P, 48PF, C08PF, C16P, and their “–X” versions.
Once selected, the available configuration parameters are displayed
dynamically based on the model.
ACX-93833 Support ICX8100-X - Stacking on R1
- An ICX port profile
is supported on the following RUCKUS ICX model families: ICX 7550,
ICX 7650, ICX 7850, ICX 8200, and ICX 8100. For detailed
information, refer to the RUCKUS FastIron
Management Configuration Guide.
Add "ICX 8100" to be GA'ed by Feb 28
- Select one or more RUCKUS ICX switch families and the required models on the Select Models page, and then click Next.
- Select one or more ICX port profiles from the drop-down list on the Port Profiles page, and then click Add to assign them to the selected switch models.
The selected ICX port profiles are associated with the profile.- Note:
- After completing the remaining steps of the Add Switch Configuration Profile wizard, you will have to apply the ICX port profile to individual ports on a per-switch basis (refer to Editing a Switch Port for details). Subsequently, you can view the list of ICX port profiles assigned to a specific switch by clicking the Port Profiles sub-tab on the Overview tab for the switch.
- Updates to an ICX port profile are automatically applied to all the switch ports that are using it.
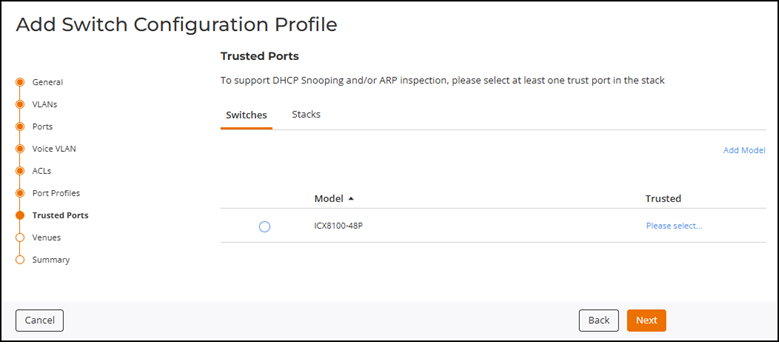
- Click Next to proceed
to the Trusted Ports tab.The page displays the Switches and Stacks sub‑tabs.ACX-113520 - [Document] Support Stack Unit in Regular Profile
- On the Trusted
Ports tab, click Please Select..
on the Switches sub-tab.
- Select up to four ports
that should be treated as trusted ports for the selected switch
model.Note: For stacked switches, Trusted Ports are configured on each unit based on the unit’s switch model. Port numbers are automatically expanded to include the unit number in the stack.
- Click Apply to apply the trusted port configuration for the selected switch model.
- (Optional) Click Add Model if your deployment includes different switch models or if you did not define switch ports on the Ports page in the wizard. Each switch uses the trusted ports configured for its model. Select the required switch Family and Model on the Select Ports by Model page, click Next, select up to four Trusted Ports, then click Add.
- (Optional) To modify trusted ports for an existing model entry, select the model and click Edit.
- (Optional) To remove a model, select the model and click Delete.
- Select up to four ports
that should be treated as trusted ports for the selected switch
model.
- On the Trusted
Ports tab, click Please Select..
on the Stacks sub-tab.
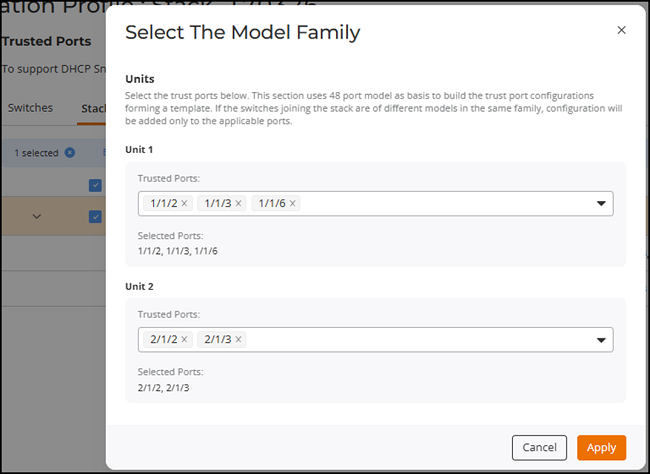
The Select The Model Family dialog box is displayed. The dialog displays units based on a standardized 48‑port template.
- Configure trusted ports
for each listed unit.All units are displayed one below the other. Configure at least one trusted port per stack if DHCP Snooping or ARP Inspection is enabled.
- Select one or
more ports from the Trusted
Ports drop‑down list.
The Selected Ports field displays the chosen ports for that unit.
Trusted port availability depends on the switch family template. If a switch in the stack has fewer ports, the trusted ports are applied only to ports that physically exist on that device.
The Trusted Ports configuration panel displays the selected units and available ports.
- Select one or
more ports from the Trusted
Ports drop‑down list.
- Repeat trusted port selection for additional units, if needed.
- Click Apply.The selected ports are marked as trusted ports for the configured family and are displayed on the Trusted Ports page.
- (Optional) To modify trusted ports for an existing family entry, select the family and click Edit.
- (Optional) To remove a
family entry, select the family, and click Delete.Note: If an untagged port associated with a trusted port is removed, the trusted port assignment may also be removed automatically. To delete an entire trusted port unit in the Stacks sub‑tab, you must first remove all untagged ports assigned to that unit.ACX-113520 - [Document] Support Stack Unit in Regular Profile
- Configure trusted ports
for each listed unit.
- Click Next to proceed
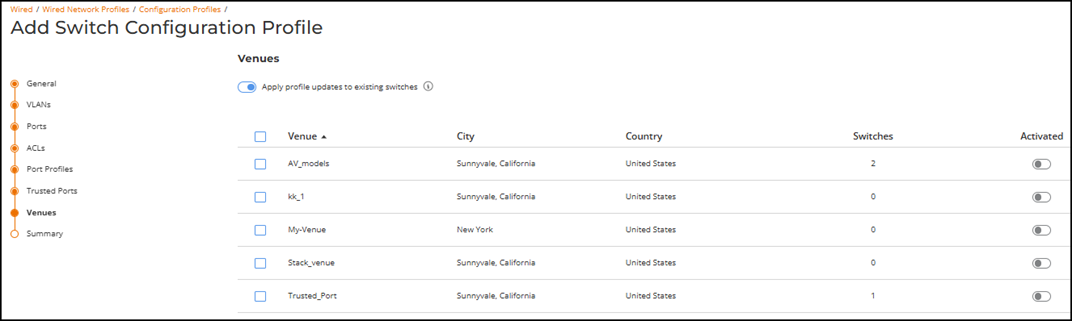
to the Venues tab. The Venues page is displayed.
- (Optional) Toggle the Apply profile updates to existing switches switch on to apply the profile to both existing switches and newly installed Greenfield switches, or toggle it off to apply the profile only to newly installed Greenfield switches. For more information, refer to Apply Switch Configuration Profile Changes.
- Select one or more checkboxes in the Venues column, and then click Activate, or toggle the switch in the Activated column on to activate the switch configuration profile for the selected venues.
- Click Next to proceed to the Summary tab.
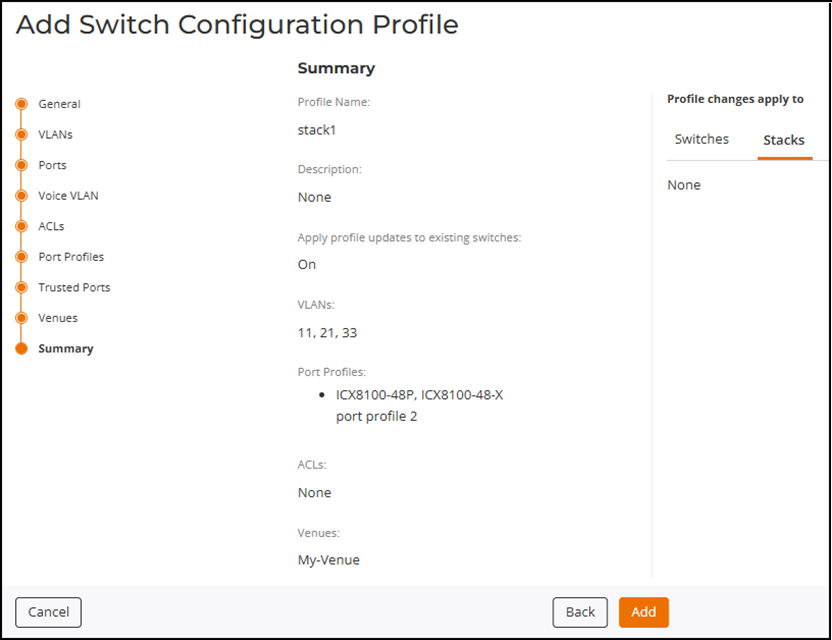
- Review the
Summary page. Note: The Summary page displays a limited preview of configuration details. VLANs are shown up to a maximum of 20 entries, Port Profiles up to 3 models, ACLs up to 10 entries, Venues up to 10 entries, and the Profile changes apply to list shows up to 25 switches.ACX-102491 - ICX Configuration and CLI Profiles + On Demand CLI - Warning message when overwriting current configurationsNote: Additionally, the page includes Switches and Stacks sub‑tabs in the Profile changes apply to section.
- Click Add to add the switch configuration profile.
- Select the checkbox next to the Profile Name to display the Edit and Delete options.
- (Optional) Click Edit if you want to modify the configuration
profile.
- Navigate through each tab (for example, VLANs, Ports, ACLs, Port Profiles, or Venues), select the required entry using the radio button, and then click Edit or Delete to modify or remove the configuration.
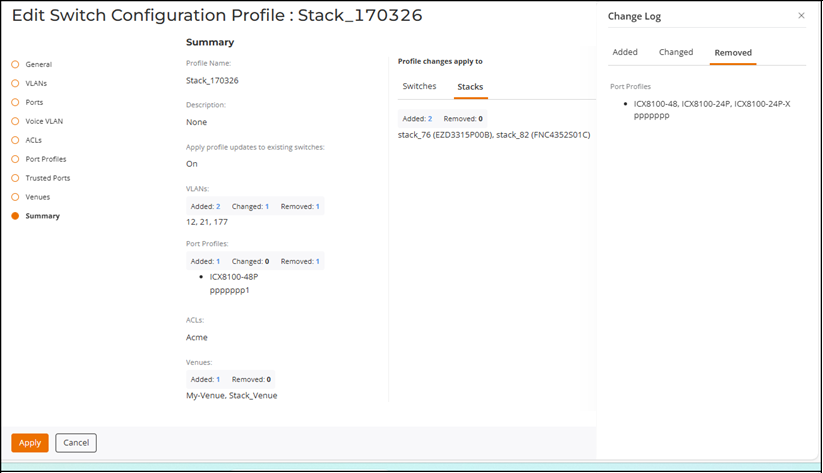
- Review the Summary page.
- The Added, Changed, and Removed change summary counters appear only when configuration differences exist; if there are no changes, these counters are not shown.
- (Optional) Click
the numeric count next to Added, Changed, or Removed to open the Change
Log sidebar, which includes the Added, Changed, and Removed tabs listing the corresponding
configuration changes.
Additionally, the Profile changes apply to section includes both Switches and Stacks sub‑tabs. These tabs show which standalone switches or stack units will receive the updated configuration. If no changes apply to either type, the tab displays None.
- Save the edited profile.Note: A confirmation dialog appears only if the Apply profile updates to existing switches option is enabled on the Venues page and the changes affect one or more existing switches.Note: If trusted ports are updated and the Apply profile updates to existing switches option is enabled, then when the profile is saved, the changes are automatically applied to all units in the switch stack.ACX-102491 - ICX Configuration and CLI Profiles + On Demand CLI - Warning message when overwriting current configurations
- (Optional) Click Delete to remove the configuration profile.
To search for a specific configuration profile, enter the partial or full configuration profile name in the Search field. All matching configuration profiles are displayed. You can filter the list of configuration profiles by Type.
You can sort the list of configuration profiles by profile name, type, or venues by clicking the associated column header.
You can navigate to to view entries for these actions, such as the date and time, and whether each action succeeded or failed.