Applying a Configuration Template Bundle
You can use configuration template
bundles to organize and manage related templates in a hierarchical view, where each
top-level (root) template is linked to one or more downstream templates. The feature
supports multiple viewing modes and provides top-level (root) actions to apply, monitor,
or
manage configuration templates efficiently across the network.
Note: Template hierarchies are initially displayed in a collapsed
format, improving the user experience for accounts having numerous or complex
template hierarchies. Expand each template name within a given hierarchy to view its
associated downstream templates.
- From the navigation bar, select
.The Configuration Templates page is displayed.
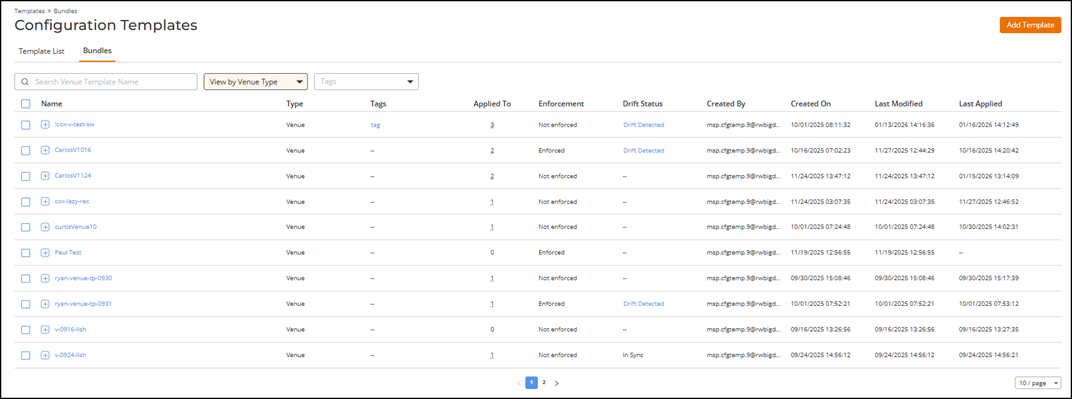
- Select the Bundles tab to view all configuration bundles.
- (Optional) Choose a view mode
from the View
by drop-down list:
- View by Venue Type: Displays bundles organized by venue templates. This is the default view mode.
- View by Network
Type: Displays bundles organized by network templates.
You can use the Search option to display only the table entries matching the specified template Name for the specified Type; enter a minimum of two characters. You can sort the list by clicking the associated column header.
Note: Search and sort apply only to top-level templates.
- Expand the bundle by clicking
the
 icon next to the template name to view the
downstream templates.
icon next to the template name to view the
downstream templates. - Select the radio button next to the Name column to display and access the following options:
- Click Apply Bundle. The Apply Template dialog box is displayed with a message indicating that it will apply the selected template(s) and create new configuration instance(s).
- (Optional) Click Override Template
to modify the selected venue template values before applying the
configuration.The Override Venue Template dialog box is displayed.Note: An override allows you to change specific values for the configuration instance without modifying the original template definition.
- Enter or update the
required details in the Override Venue Template
dialog box:
- Venue Name: Displays the current template name.
- Description: (Optional) Enter a brief description of the purpose or customization of the override.
- Address: Enter or edit the address. Include the city and country details. The embedded map automatically updates based on the entered location.
- Wi-Fi Country
Code: This is a read-only field. The country
code can only be added when creating a Venue
Template. Refer to Adding a Venue for configuration details.
The Wi-Fi country code defines the Wi-Fi channels and power levels available for access points at the venue. In most cases, it matches the venue’s location and does not need to be changed.
- Click Override.
- Click Apply.
- Enter or update the
required details in the Override Venue Template
dialog box:
- Click Apply to apply the selected configuration template bundle and create the required configuration instances.
- (Optional) Click Show Drifts to
open the Drifts Report sidebar. Alternatively, click the
Drift
Detected status in the table to view drift details.The sidebar displays the configuration drifts that are detected and allows you to reapply templates for correction. Refer to Viewing and Syncing Configuration Template Drifts for more information.
- (Optional) Click the template
Name to view the Template Details. The Template Details sidebar is displayed with the following information: Template Name, Type, Drift Status, Enforcement, Created By, Created On, Last Modified, Last Applied, Configuration Details, Active on Networks (if the template category is Venues), Active on Venues (if the template category is Wi-Fi Network), and Applied To.
- Drift Status: Displays the current drift status. If a drift is detected, a Drift Detected hyperlink appears. Clicking the hyperlink opens the Drifts Report sidebar. Refer to Viewing and Syncing Configuration Template Drifts for more information.
- Configuration Details: The View Configuration hyperlink opens the configuration details page for the selected template and displays all defined parameters and values. When a template is enforced, the instances appear in read-only mode. For non-enforced templates, click Configure to modify editable fields. The View Configuration hyperlink appears only for templates that contain saved configuration data; the hyperlink is inactive when no configuration is available.
- (Optional) Click Add Template to
create a new configuration template. Refer to Adding and Managing Configuration
Templates for more
information.
V1 – Editorial Review completed by Laurie
 to view the modified configuration
details.
to view the modified configuration
details.