Adding and Managing a Recipient for System Notifications
- From the navigation bar, click
.The Notifications tab is displayed with the following information:
- Recipient Name: Displays the name of the administrator.
- Recipient Type: Displays the type of the notification recipient (Global or Privilege Group).
- Delivery Preference: Displays the preferred method to receive notifications (Email or phone, or both).
- Email: Displays the email address of the administrator.
- Mobile Phone: Displays the phone number of the administrator in this format: +(country code)-(area code)-(mobile number).
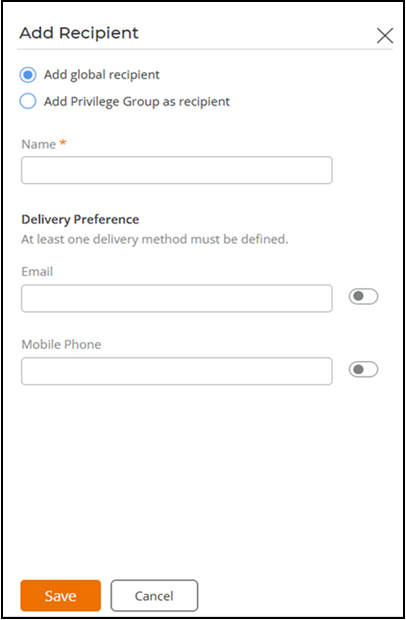
- Click Add Recipient.
- Select one of the recipients and
fill in the details:
- Add global
recipient: All the associated admins will get notifications
over email or phone number based on the preferences.
- For name, enter the name of the recipient in the Name field.
- For Delivery
Preference, select one or both of the following:
- Enter a valid email address in the Email Address field and toggle the switch to ON.
- Enter a valid
mobile number in the Mobile Number
field and toggle the switch to ON.
Note: The mobile number must follow this format: +(country code)-(area code)-(mobile number). For example, you can enter: +1-502-688-886.
- Add Privilege Group as
recipient: All the associated admins for the selected
Privilege Group will receive notifications over email or phone number based
on the preferences.
Admins will receive notifications as per their Role Based Access Control (RBAC) settings. For example, an admin belonging to a privilege group restricted to a venue will not receive the notifications.
The notification preferences set from the User Group setting overrides the tenant level notification preferences.
- Add global
recipient: All the associated admins will get notifications
over email or phone number based on the preferences.
- Click Save to save the changes.
You can filter the list of notification recipients by selecting a specific recipient type from the Recipients Types drop-down list. You can sort the list notification recipients by clicking the associated column header.
You can use the Search Recipient Name, Email Address, Mobile Phone search bar to find a recipient by entering their name, email address, or mobile phone number.
You can edit or delete the recipients by using the Edit or Delete options, respectively.
When you delete an admin, the associated notification entries also are deleted.