Managing Switch Backup Configurations
You can use the Restore
& Backup page to create a switch configuration backup, as well as view,
restore, download, compare, and convert existing configuration backups, as needed.
These
options help you quickly recover switch settings, maintain consistent configurations,
and
minimize downtime when configuration changes are applied.
- On the navigation bar, select
.The Switches page is displayed, defaulting to the Switch List tab.
- Click a switch name in the
list.The details page for the selected switch is displayed, defaulting to the Overview tab.
- Select the Configuration tab. The Restore & Backup tab view opens by default, displaying the list of configuration backups with details such as Name, Date, Type, and Status.
You can customize which fields appear in the Restore & Backup table by clicking the
 icon and selecting or deselecting the desired column names. Optionally,
you can click Reset to default to restore the default subset of
columns.
icon and selecting or deselecting the desired column names. Optionally,
you can click Reset to default to restore the default subset of
columns. - Click Backup Now to create a new switch configuration backup.
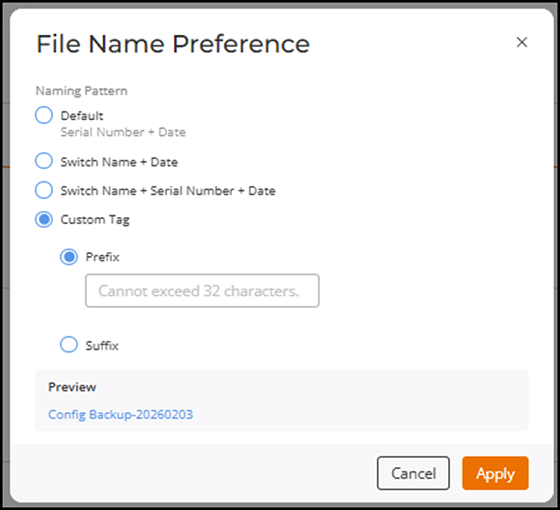
- (Optional) Click File Name
Preference to configure the file name syntax for newly generated
backup files; names of existing files are not impacted.
- Select a Naming
Pattern. The available options are:
- Default (Serial number + Date)
- Switch Name + Date
- Switch Name + Serial Number + Date
- Custom
Tag: Select and complete one of the following
options:
- Prefix: Enter a prefix value (maximum 32 characters).
- Suffix: Enter a suffix value (maximum
32 characters).
Note: You can use either a prefix or a suffix, but not both at the same time.
- Review the Preview bar to see how the configuration backup file name will appear based on your current selection.
- Click Apply.Note: When you change the file naming pattern, the updated pattern applies only to configuration backups created after the change. Existing backups retain their original names and naming patterns.
- Select a Naming
Pattern. The available options are:
- Click the checkbox next to the Name column to display and access the following options:
- (Optional) Click View to view the contents of a configuration backup file.
- (Optional) Click Compare to
compare two configuration backups and identify differences between versions.
Select two configuration backups to enable the Compare
option.The Compare Configurations window is displayed, showing two side-by-side panels. Each panel displays the configuration details (provided as CLI output in read-only mode) for the selected configuration file.
- The Configuration Name drop-down menus reflect the two selected configuration backups, but you may select different backups without leaving the Compare Configurations window.
- Enabled by default, the Synchronized scrolling option facilitates line-by-line review of both configurations simultaneously. Disable this option so that the scrolling works on only one panel at a time.
- Review the differences between the two configurations (differences are highlighted) and click Close when finished.
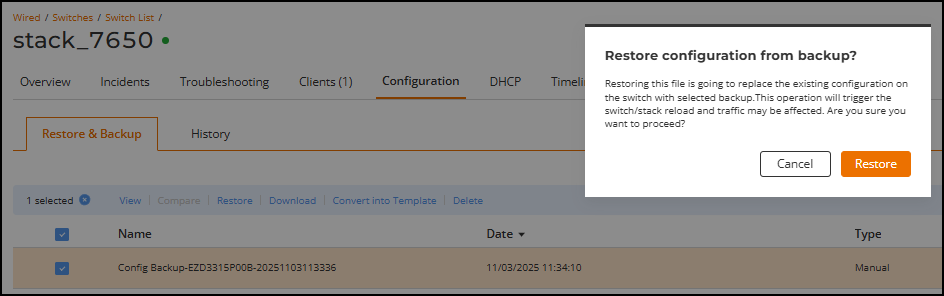
- (Optional) Click Restore to
replace the current configuration on the switch.A confirmation message is displayed, indicating that restoring a configuration replaces the existing configuration on the switch with the selected backup. This operation triggers the switch or stack to reload, which may temporarily affect network traffic.
- Click Restore
to proceed.
- The switch reboots automatically after the configuration restore, resulting in brief network downtime. After the reboot, the switch resumes forwarding traffic.
- After connecting to the HTTPS-based cloud servers, the switch status is displayed as Operational once the backed-up configuration and all necessary synchronizations are complete.
- Click Restore
to proceed.
- (Optional) Click Download to save a configuration backup file to your local device (laptop, PC, or mobile device).
- (Optional) Click Delete to delete a configuration backup.
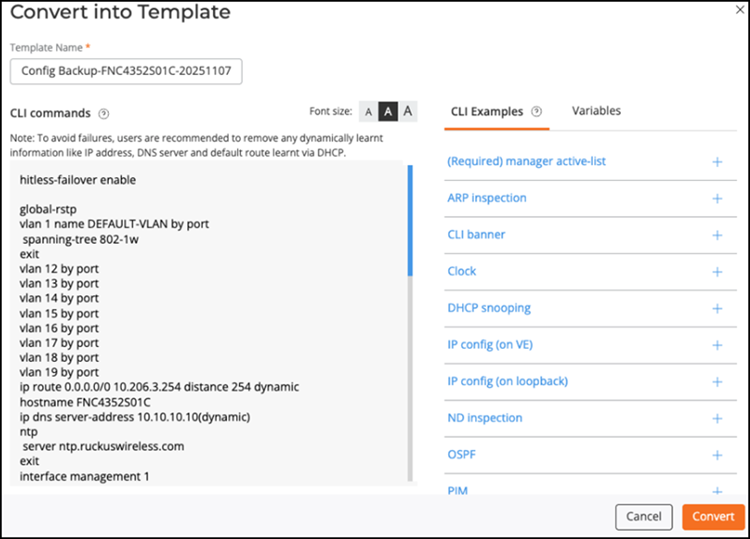
- (Optional) Click Convert into Template to convert a
configuration backup into a reusable CLI template.Note: You can use this feature to simplify network management by reusing switch configuration backups as templates, ensuring consistency and reducing configuration errors across multiple devices.
- (Optional) Enter a Template Name. The default template name is the same as the backup name but with -Template appended to the end.
- Review the CLI Commands displayed.Certain configuration details such as firmware version, usernames, and passwords are automatically excluded.
- Click the CLI Examples tab.The CLI Examples tab displays a categorized list of common CLI command examples that can be inserted into the configuration. Hover your cursor over each command category to display a pop-up containing all the associated commands. You can place your cursor anywhere in the CLI commands panel, then click the
 icon to insert all commands associated with
the selected CLI Example category into the CLI editor panel. Note that
when using a command from the CLI Examples list,
you must replace any command input field that is enclosed in < >
and displayed in orange with the desired value (after which the color
changes to black).
icon to insert all commands associated with
the selected CLI Example category into the CLI editor panel. Note that
when using a command from the CLI Examples list,
you must replace any command input field that is enclosed in < >
and displayed in orange with the desired value (after which the color
changes to black). - Click the Variables tab to view and define dynamic fields that can be reused when applying the CLI template to multiple switches.
- Click Convert.The backup is converted into a CLI template and is displayed in the On-Demand CLI Configuration page.