Adding and Managing a Hotspot Service
In addition to the Unleashed APs, you will need the following to deploy a Hotspot service:
- Captive Portal: A special web page, typically a login page, to which the users that are associated with your Hotspot will be redirected for authentication purposes. Users will need to enter a valid user name and password before they are allowed access to the Internet through the Hotspot. Open source captive portal packages, such as Chillispot, are available on the Internet. For a list of open source and commercial captive portal software, visit https://en.wikipedia.org/wiki/Captive_portal#Software_Captive_Portals.
- RADIUS Server: A Remote Authentication Dial-In User Service (RADIUS) server through which users can authenticate.
For installation and configuration instructions for the captive portal and RADIUS server software, refer to the documentation that was provided with them. After completing the steps below, you will need to edit the WLAN(s) for which you want to enable Hotspot service, as described in Assigning a WLAN to Provide Hotspot Service.
Unleashed supports up to 32 WISPr Hotspot service entries, each of which can be assigned to multiple WLANs.
Complete the following steps to create a wireless Hotspot service.
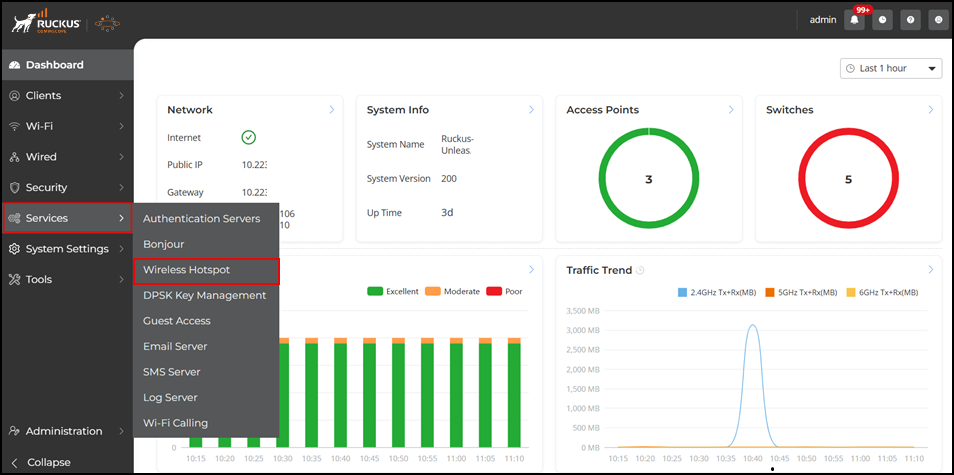
- Select Services > Wireless Hotspot. Alternatively, you can create a new Hotspot service from the Create Wi-Fi Network wizard () and select Hotspot Service as the Usage Type.
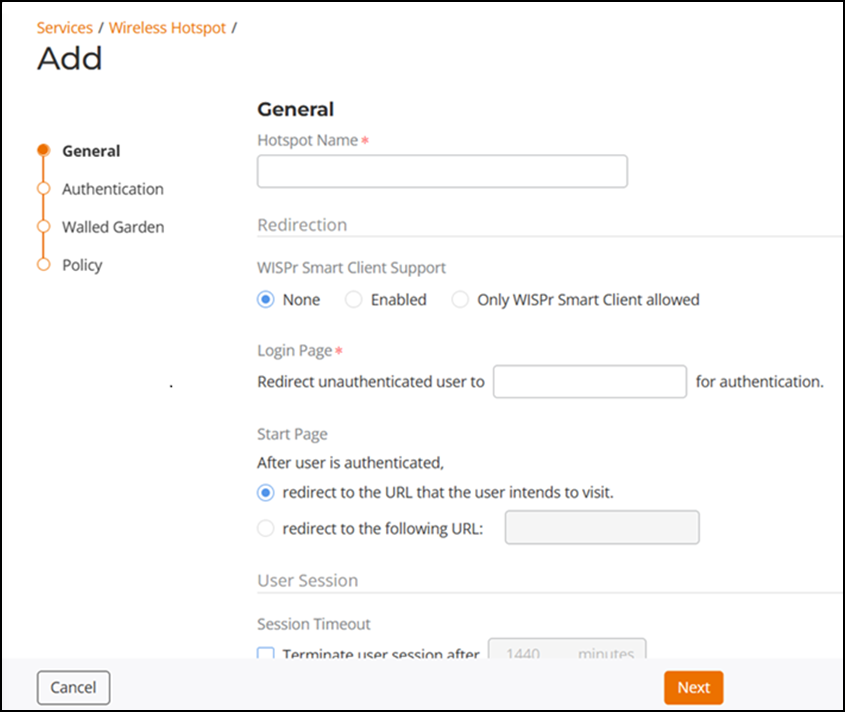
- Click Add. The Add window appears.
- From the General tab, in Hotspot Name field, enter a name for this Hotspot service.
- Under
Redirection, complete the following steps:
- For WISPr
Smart Client Support, select whether to allow WISPr
Smart Client support. Based on your selection, different fields
appear.
- None (default)
- EnabledNote: The WISPr Smart Client is not provided by RUCKUS, you will need to provide Smart Client software or hardware to your users if you select this option.
- Only WISPr Smart Client allowed: Choose this option to allow only clients that support WISPr Smart Client login to access this Hotspot. If this option is selected, a login instructions field appears in which you can enter instructions for clients attempting to log in using the Smart Client application.
- For Smart Client HTTP Secure, if Smart Client is enabled, choose whether to authenticate users over HTTPS or HTTP.
- In Login Page, type the URL of the captive portal (the page where Hotspot users can log in to access the service).
- (Optional) In Start Page, configure where users will be redirected after successful login (for example, your company website).
- (Optional) In User Session, configure session timeout and grace
period, both disabled by default.
- Session Timeout: Specify a time limit after which users will be disconnected and required to log in again.
- Grace Period: Allow disconnected users a grace period after disconnection, during which clients will not need to re-authenticate. Enter a number in minutes, between 1 and 144,000.
- Intrusion Prevention: Temporarily block the Hotspot clients with repeated authentication attempts. This option is enabled by default.
- For WISPr
Smart Client Support, select whether to allow WISPr
Smart Client support. Based on your selection, different fields
appear.
- (Optional) In the Authentication page, select the AAA server to
authenticate users from the Authentication
Servers and Accounting Server drop-down
lists.
- Options include Local
Database (default) and any AAA servers that you
configured on the page. Click
 to add any new AAA server. Refer to Adding and Managing AAA Servers for
more information.
to add any new AAA server. Refer to Adding and Managing AAA Servers for
more information. - Enable MAC authentication bypass (no redirection): Enabling this option allows users with registered MAC addresses to be transparently authorized without having to log in. A user entry on the RADIUS server needs to be created using the client MAC address as both the user name and password. The MAC address format can be configured in one of the formats listed in MAC Authentication with an External RADIUS Server.
- Accounting
Server: If you have an accounting server set up, select
the server from the list or click to add any new AAA server, and configure
the frequency (in minutes) at which accounting data will be retrieved.
By default, Accounting Server is disabled. Refer to Adding and Managing AAA Servers for
more information.
- In Wireless Client Isolation: Choose whether clients connected to this Hotspot WLAN must be allowed to communicate with one another locally. Refer to Configuring Advanced Wi-Fi Options for a description of the same feature for non-Hotspot WLANs.
- Location Information: Enter Location ID and Location Name WISPr attributes (as specified by the Wi-Fi Alliance) for this location if using RUCKUS Smart Positioning location services.
- Options include Local
Database (default) and any AAA servers that you
configured on the page. Click
- (Optional) In the Walled Garden page, select the network destinations (URL or IP address) that users can access without going through authentication, or create a walled garden by clicking Add, select the order, enter the destination address, and click Add. A Walled Garden is a limited environment to which an unauthenticated user is given access for the purpose of setting up an account. After the account is established, the user is allowed out of the Walled Garden.
- (Optional) In the Policy page, define the L3/L4 IP address subnet access control rules for the Hotspot service to allow or deny wireless devices based on their IP address, port, or protocol.
- Click Add to save the
Hotspot settings. The page refreshes and the Hotspot service you created appears in the Wireless Hotspot list. You may now assign this Hotspot service to the WLANs that you want to provide Hotspot Internet access, as described in Assigning a WLAN to Provide Hotspot Service.
Optionally, you can clone, edit, or delete a Hotspot service by selecting a specific Hotspot service checkbox and clicking the Clone, Edit, or Delete options.