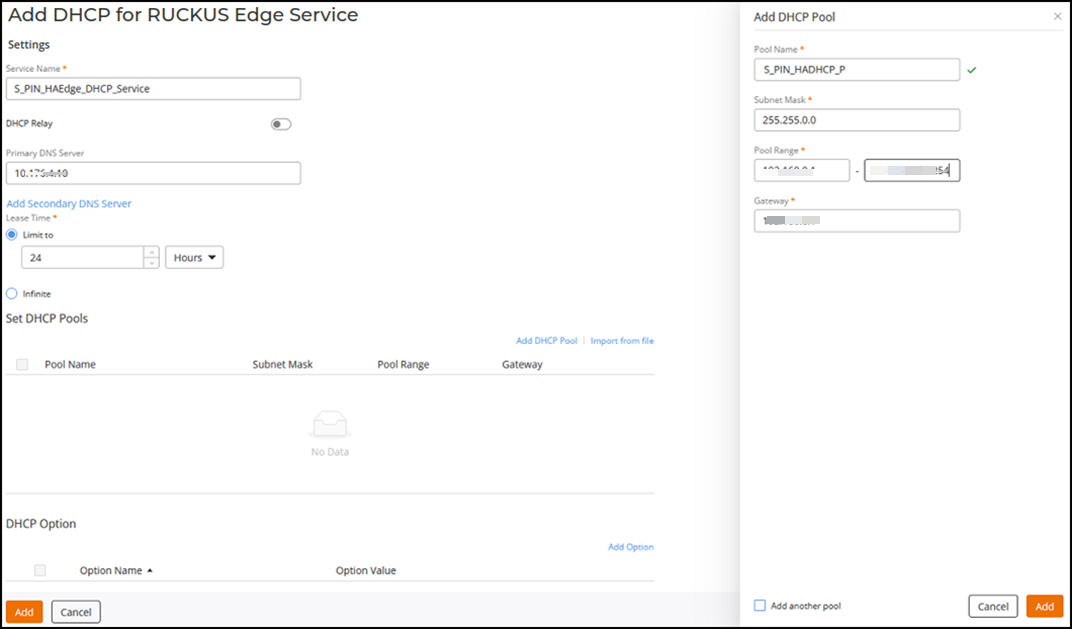
Configuring DHCP for RUCKUS Edge Service
Dynamic Host Configuration Protocol (DHCP)
is a network management protocol used to automatically assign IP addresses and other
communications to the devices connected in the network.
When DHCP relay is enabled, there is a property called ‘For Personal Identification Network. If you enable this property, you need to enter the pool information, excluding the gateway.
To configure DHCP service for RUCKUS Edge, perform the following steps.- On the RUCKUS One navigation bar, hover on Network Control and click My Services or Service Catalog.
- Access the Add DHCP for RUCKUS Edge Service page using one
of the following methods:
-
On the My Services page: Click the DHCP tile. From the DHCP page, select the RUCKUS Edge tab and then click the Add DHCP for Edge service button.
- On the Service Catalog page: Click the Add button in the DHCP tile. This displays Add DHCP Service page. Select the RUCKUS Edge option and click Next.
This displays the Add DHCP for RUCKUS Edge Service enter all the details in the sections listed below.- Service Name - Enter a valid service name for the DHCP service.
- DHCP Relay - By default, this option is disabled. Enable this option for DHCP clients to communicate with DHCP servers.
- Primary DNS Server - Enter primary DNS server details. This is an optional field. To add a secondary DNS server, click Add Secondary DNS Server link and the field is displayed below.
- Lease Time - There are two options:
- Add DHCP Pool - To add a DHCP pool, click the Add DHCP Pool link. This displays Add DHCP Pool window. Enter the details of the DHCP and click Add. The newly added DHCP details are displayed in the section.
- Import from file - To import a file from the local computer, click Import from file link. This displays Import from file window. Click Browse or Drag and drop the file from local computer and click Import. Make sure the file format is .csv, file size should be less or equal to 5MB and the file may have only 128 entries.
- Add Option - To
add DHCP option, click Add
Option link. This displays the Add
Option window, select the Option
Name from the drop-down list. The option supported are
-
- Domain Server
- Domain Name
- NTP Server
- vendor-encapsulated-options
- vendor-class-identifier
- NETBIOS Scope
- Server Name
- Bootfile-Name
-