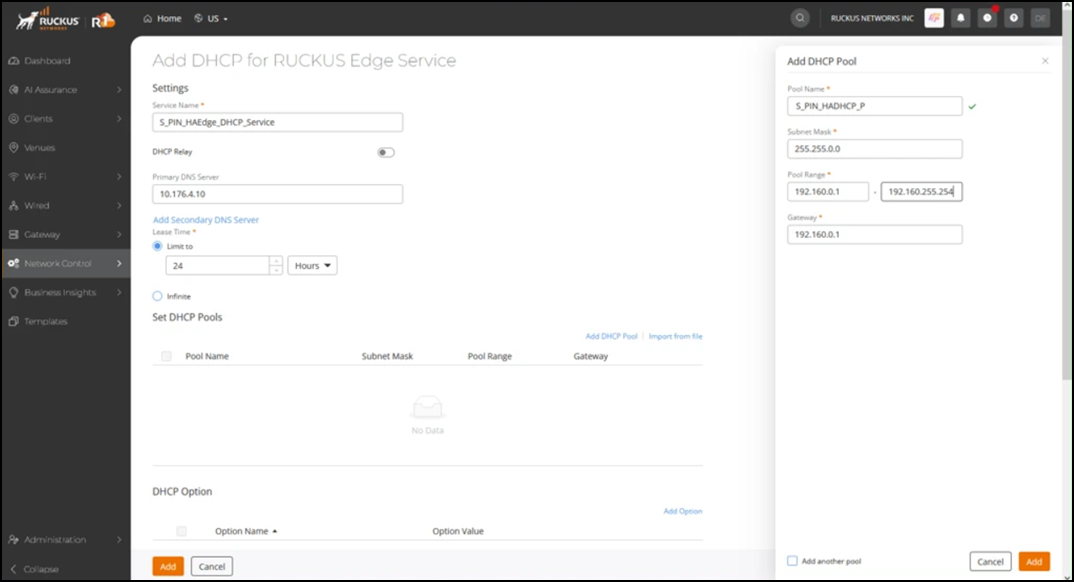
Configure Internal DHCP RUCKUS Edge
- Add the DHCP service to your tenant account. From the navigation bar, select .
- Find the
DHCP tile and click Add. The
Add DHCP Service page is displayed. This displays Add DHCP Service page.
- Select RUCKUS Edge and click Next. The Add DHCP for RUCKUS Edge Service page is displayed.
- For Service Name, enter a DHCP profile name.
- For Primary DNS Server, enter the IP address of the
primary DNS server. Note: A secondary DNS Server can be added by clicking the Add Secondary DNS Server. Configuring both a primary and a secondary DNS server ensures continuous name resolution by providing automatic failover if the primary DNS server becomes unavailable.
- For Lease Time, select a lease time.
- Set the DHCP Pool. To set DHCP
pools, click Add DHCP
Pool. In the Add DHCP Pool
sidebar, enter the following details:
- Pool Name - Add a pool name.
- Subnet Mask - Defines the range of IP addresses, it has two parts network bits and host bits. Enter a valid subnet mask.
- Pool Range - Is a sequential range of IP addresses within a network. Enter a valid pool range.
- Gateway - Is a node that connects one protocol to another protocol. Enter a valid gateway IP address.
- (Optional) Click Add another pool to create multiple pools before finalizing the service configuration.
- Click Add. The DHCP pool configuration is displayed on the Add DHCP for RUCKUS Edge Service page. If Add another pool is selected, the sidebar remains open and ready for your next pool configuration. If Add another pool is not selected, then the sidebar closes.
UEs connect to the switches and APs, and the authentication is completed. The UEs are associated with the PAN and are online.