Generating Certificate Signing Request (CSR) FIPS
To obtain a valid SSL certificate,
generate a certificate signing request (CSR) and submit it to a certificate authority
(CA).
- From the main menu, navigate to .This displays the CSR screen.
- In the CSR
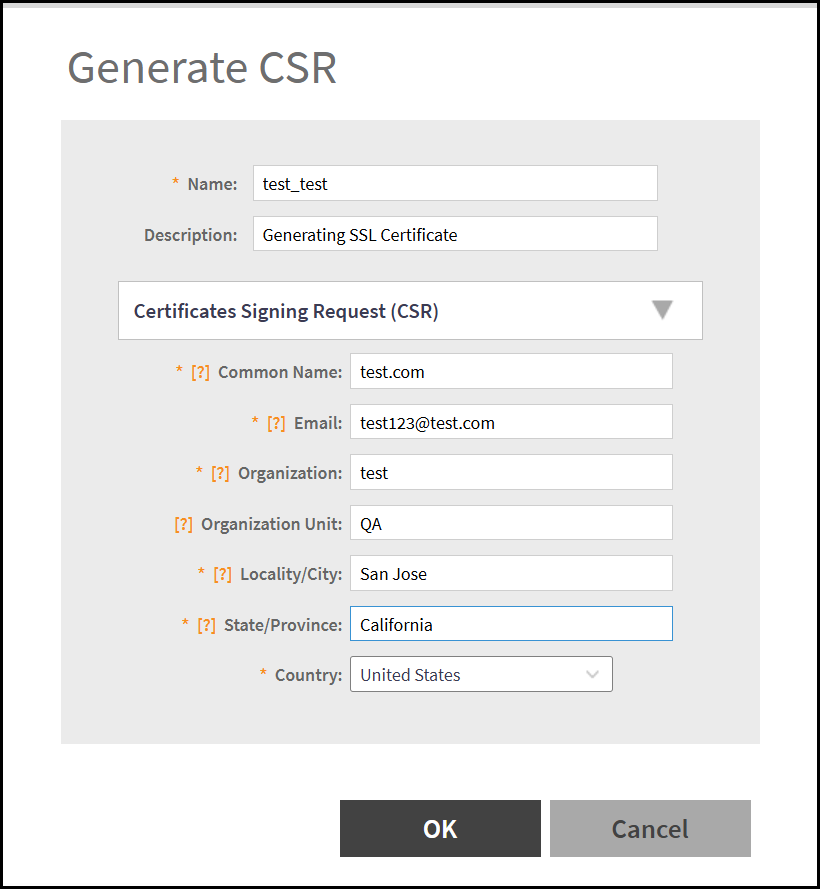
screen, click Generate.This displays the Generate CSR window.
- In the Generate
CSR window, enter the following -
- Name - Enter a unique name to reflect the purpose of the CSR.
- Description - Enter a short description for the certificate.
- Certificate
Signing Request - Enter the details in this section to
define the identity and purpose of the certificate.
- Common Name - Enter the Fully Qualified Domain Name (FQDN).
- Email - Enter the Email address to contact for certificate-related notifications.
- Organization - Enter the organization's legal name.
- Organization Unit - Enter the subdivision of the organization, for example, department or unit.
- Locality/City - Enter the location details of the organization.
- State/Province - Enter the state or province where the organization is located.
- Country - Select the country from the drop-down list.
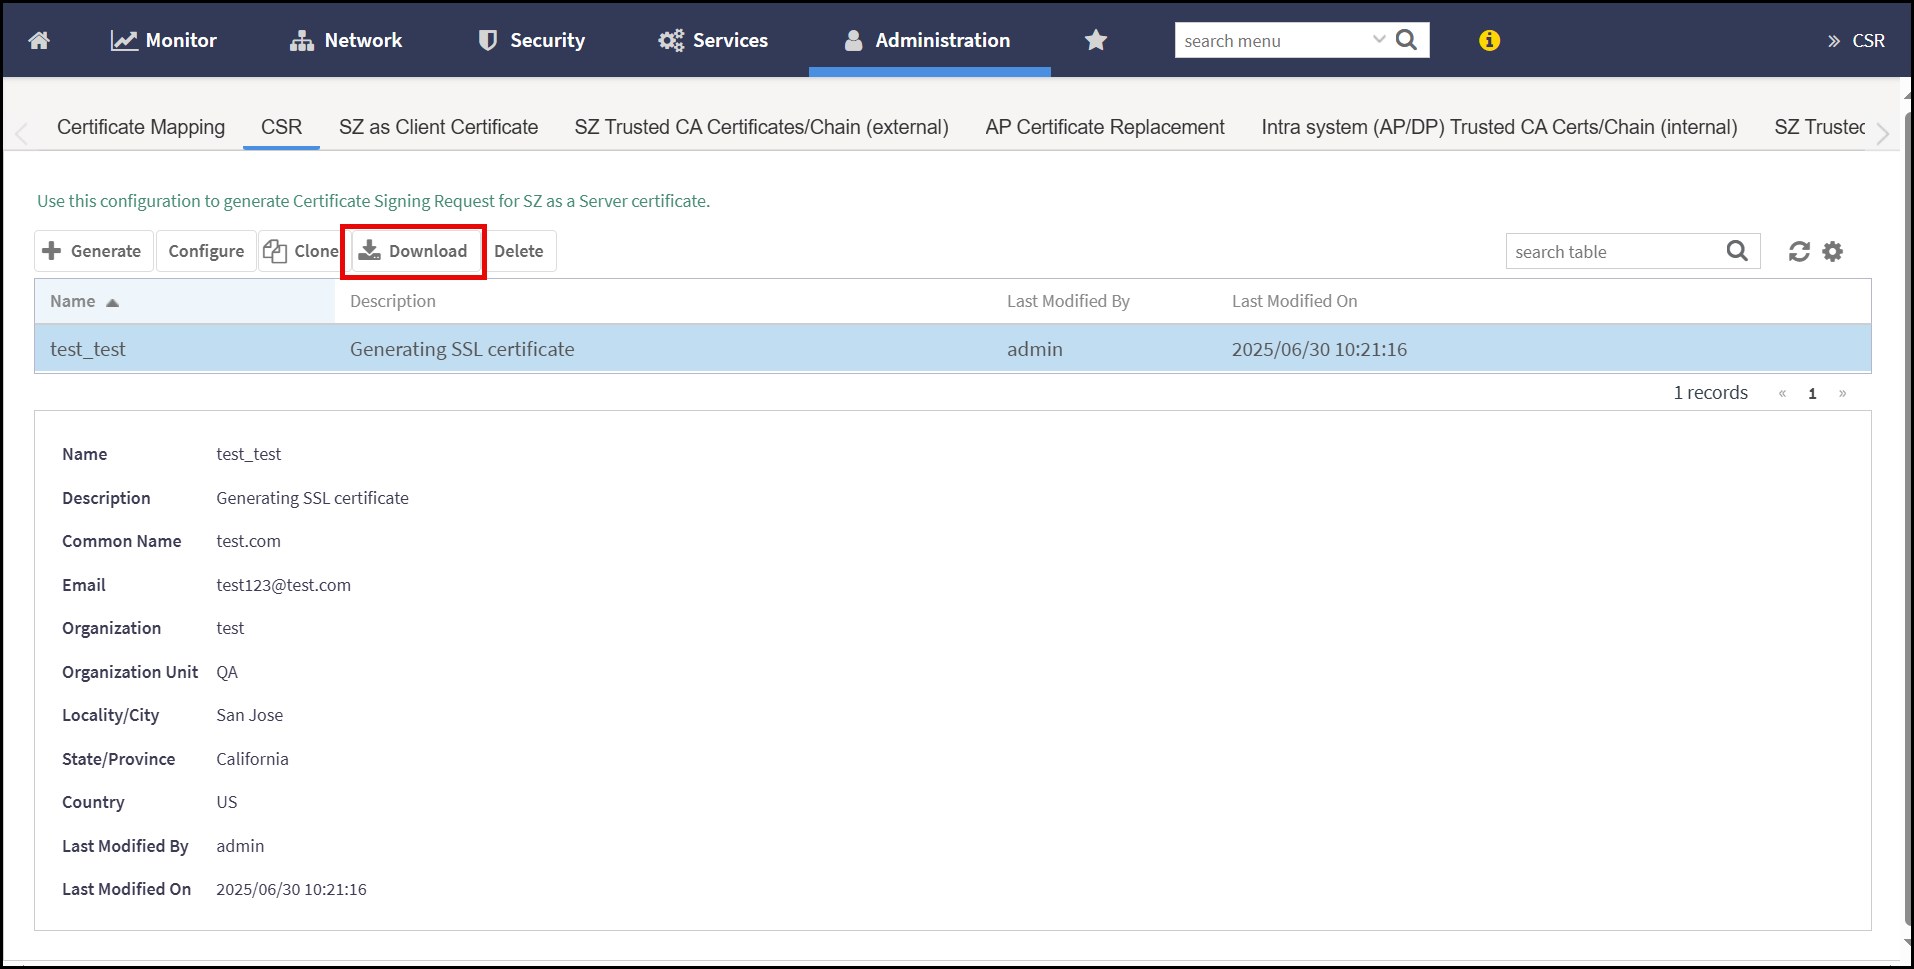
After entering all the details in the Generate CSR window, click OK. The controller generates the certificate request and the request is displayed in the CSR screen.
Note: The system authenticates itself using X.509 certificates with RSA (3072, or 4096-bit keys) or ECDSA over NIST curves (secp256r1, secp384r1, and secp521r1). Certificates using other key sizes or elliptic curves are not supported.
- Select the CSR certificate and click Download.
- Use a text editor, such as Notepad, to open the certificate request
(
.csr) file. - Go to the website of the preferred SSL certificate provider and follow the
instructions for purchasing an SSL certificate. At the prompt for the
Certificate Signing Request (CSR), copy and paste the entire content of the
.csrfile, including the-----BEGIN CERTIFICATE REQUEST----------END CERTIFICATE REQUEST-----lines.-----BEGIN CERTIFICATE REQUEST----- MIICvTCCAaUCAQAweDELMAkGA1UEBhMCVVMxEzARBgNVBAgMCkNhbGlmb3JuaWEx ETAPBgNVBAcMCFNhbiBKb3NlMQ0wCwYDVQQKDAR0ZXN0MREwDwYDVQQDDAh0ZXN0 LmNvbTEfMB0GCSqGSIb3DQEJARYQdGVzdDEyM0B0ZXN0LmNvbTCCASIwDQYJKoZI hvcNAQEBBQADggEPADCCAQoCggEBALlWtwaToYnm4VAs1wvRDGaaMFPLbmEFMzMX kuC3xP2YEMvzgesAs7CSWkKRLy2MHckOx4n8qGLhYktpIKjB+Ne3zgCPjhL+G18n Lr+IP3JUQs196FTdoNUvPuPFosUceutvmBJE5qg/2/mCLnwKY/erQ4NaRLkVq0OO otK+XyqmXkzg8nfiMzDOPEjbNIZ+AqUyAJavgApq1kSQs/JvJftkeEtD94keGwNJ CDdwr/q6E7mZpdpMKL6zX/ZgqkZxsdFEggYfSA5lmLgtHQX/8D59upSyLliu2SwC gf0m33uhHTuOE/CvSDU90TZRROmZQOJ8w5DAM65FydmiHLJdqCcCAwEAAaAAMA0G CSqGSIb3DQEBCwUAA4IBAQAMlHopYZnraSciRonZfuxeIsvPdhfnLlbCDfkhAvGs 1b+Md2sBcCeLsYbJVNmXPBy6hBjc08hNCAL8mFQhLSiIy/k/dNRasaCTup6pN6aB Kcp5jmicZoOwHnPv0CfjPTXiUhEKPLrw4sY+bYZwxeZ5sEwQrfmWPc2qAbplo4VU 6W9O4eDN2N9YWTC7AnHgwcDOViXn7/vfoh9FvUZwa9YPc623/mr6G72bx5woT6DS DYF/0Nnfd9Iyu6y+2C+ZMTt7b7GC242wjuXKhYQXRd3AMFOfqrcjAAiMNHbCm+bd uhJGWl+xDZaE13lKBtBNw04iXBBooE9YphDQzUikhXxq -----END CERTIFICATE REQUEST-----
- After the SSL certificate provider approves the CSR, the signed certificate is sent via email. Download the certificate and extract the contents for installation on the SmartZone controller.