Creating a RUCKUS GRE Profile

Creates a RUCKUS GRE (RGRE) tunnel profile to define tunneling parameters for AP-to-controller traffic in centralized deployments.
To create a RUCKUS GRE tunnel profile, perform the following -
  1. From the main menu, navigate to Services > Tunnels & Ports > Ruckus GRE.
    This displays the Ruckus GRE screen.
    Note: The add mode is not user-configurable. The system operates in Transport mode by default for communication with the vDP.
  2. In the Ruckus GRE screen, click Create.
    This displays the Create Ruckus GRE Profile window.
  3. In the Create Ruckus GRE Profile window, enter the following details -
    • Name - Enter a unique name to identify the RGRE tunnel profile.
      Note: Peer reference identifiers are not configurable. The controller auto generates the reference identifiers to AP and DP.
    • Description - Enter a brief description to provide additional context about the RGRE tunnel profile.
    • Ruckus Tunnel Mode - Select the tunnel mode from the drop-down list for encapsulating AP traffic. Supported modes include GRE, GRE+UDP, and GRE over IPSec, depending on deployment and security requirements.
    • Tunnel Encryption - Select the encryption level for the RGRE tunnel.
      • Disable - No encryption; standard GRE tunnel.
      • AES 128 - Encrypts tunnel traffic using 128-bit AES encryption.
      • AES 256 - Encrypts tunnel traffic using 256-bit AES encryption for enhanced security.
    • Tunnel MTU - Select the Maximum Transmission Unit (MTU) size for the RGRE tunnel.
      • Auto - Automatically sets the optimal MTU based on network conditions.
      • Manual - Allows manual entry of MTU value in bytes: 850-1500 bytes for IPv4, and 1384-1500 bytes for IPv6.
    • Tunnel Failover - By default, this option is disabled. When enabled, it allows automatic failover to a backup tunnel if the primary RGRE tunnel becomes unavailable.
      Note: This option is not available when using RGRE over IPSec.
    • Keep Alive Interval - Specifies the time interval (in seconds) at which keepalive messages are sent to monitor the health of the RGRE tunnel.
    • Keep Alive Retry - Specifies the number of consecutive missed keepalive responses allowed before the RGRE tunnel is considered down.
  4. After entering all the fields, click OK to create a new RUCKUS GRE profile.
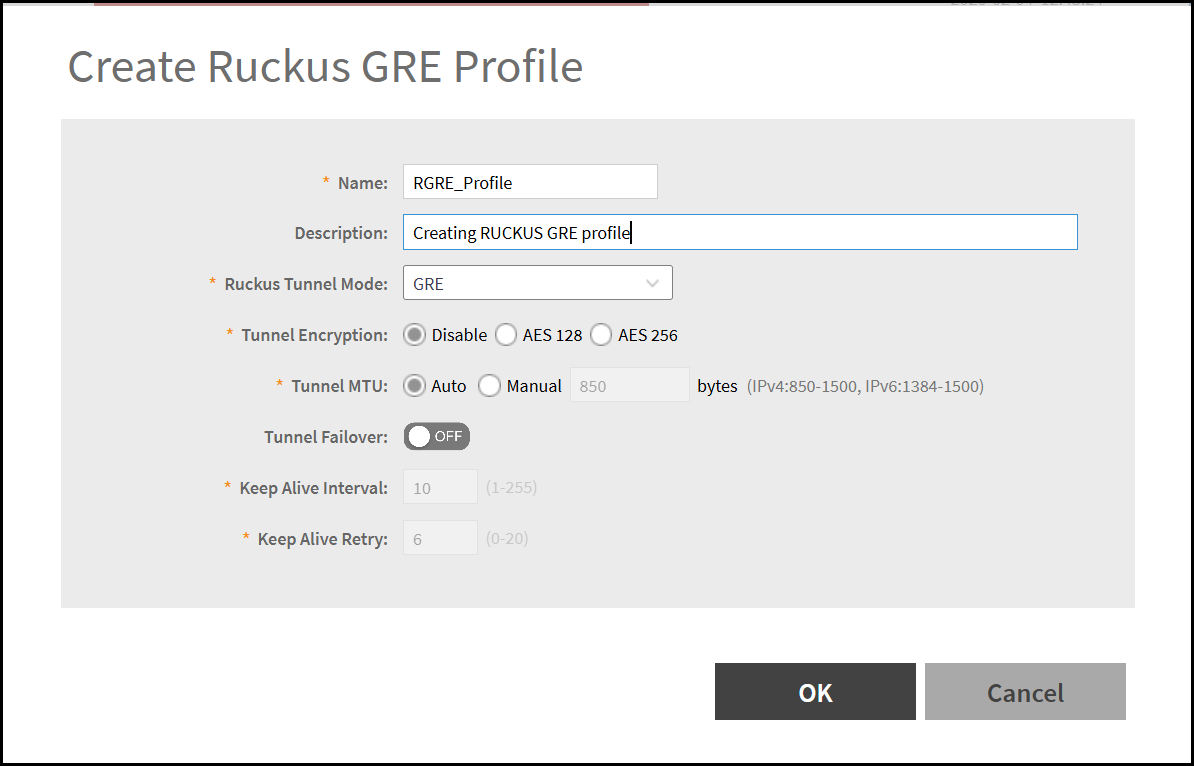
    Create Ruckus GRE Profile

Creating IPSec Profile for RUCKUS GRE

An IPSec profile for RGRE defines the security parameters used to protect GRE-encapsulated traffic between peers.
The profile specifies the authentication method, encryption and integrity algorithms, key management settings, and security association lifetimes required to establish and maintain a secure tunnel. The RGRE tunnel uses certificate authentication. The certificates are verified when they are presented as part of authentication.

By applying an IPSec profile to an RGRE tunnel, data transmitted between remote endpoints is protected against eavesdropping, tampering, and unauthorized access, ensuring confidentiality, integrity, and authenticity of routed traffic.

Note: Internet Key Exchange version 2 (IKEv2) is the only supported key management protocol for establishing IPSec tunnels.

To create IPSec profile for RUCKUS GRE, perform the following -

  1. From the main menu, navigate to Services > Tunnels & Ports > IPSec.
    This displays the IPSec screen.
  2. In the IPSec screen, click Create.
    This displays the Create IPSec Profile window.
  3. Enter all the fields to create a new IPSec Profile.
    In the Security Association section, selec the following:
    • IKE Proposal Type - Selected by default.
      • Algorithm Combination - Select AES256-SHA384-ECP384 or AES256GCM-PRFSHA512-ECP384 from the drop-down list.
    • ESP Proposal Type - Selected by default.
      • Algorithm Combination - Select AES256-SHA384-ECP384 or AES256GCM-ECP384 from the drop-down list.
    Note: The WLAN controller does not allow the ESP proposal to use a lower security level than the IKE proposal; that is, the ESP proposal cannot be stronger than the IKE proposal.
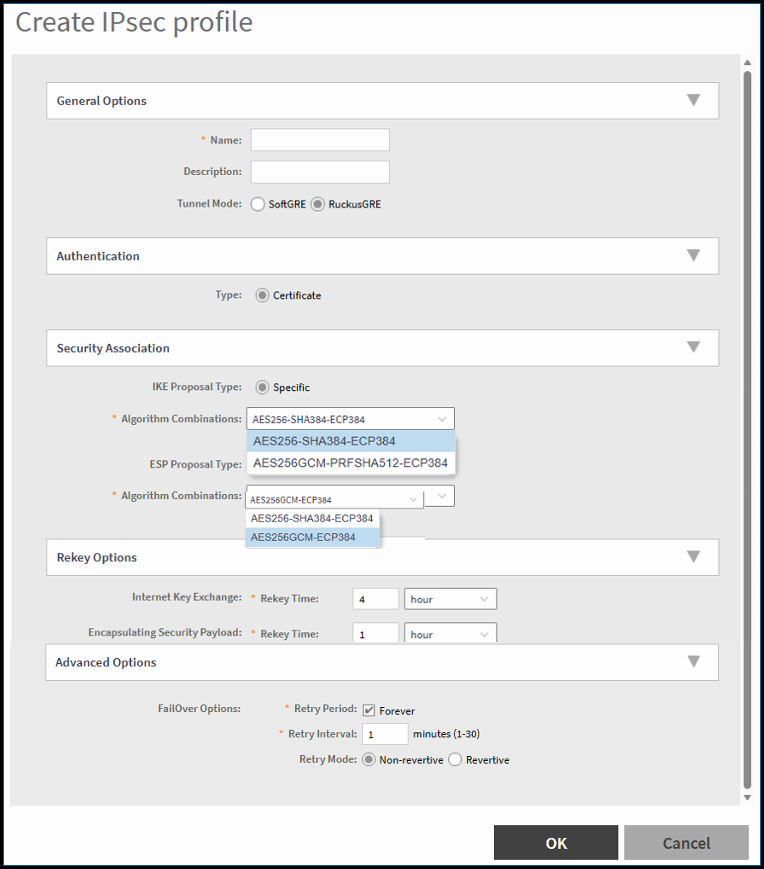
    Note: For instructions on entering all the fields to create a new IPSec profile, refer to the Creating an IPSec Profile section in the RUCKUS SmartZone Tunnel and Data Plane Guide.

    Create IPsec Profile

Connection Recovery for Ruckus GRE over IPsec

Provides details on restoring connectivity for Ruckus GRE over IPsec tunnels after disruptions, including reconnection behavior, retry mechanisms, and factors affecting recovery time.
Connection recovery for Ruckus GRE over IPsec ensures that tunnel connectivity is automatically restored after temporary disruptions such as network instability, peer unreachability, or key renegotiation events. When a disruption occurs, the system initiates recovery mechanisms that include tunnel re-establishment, security association renegotiation, and periodic retry attempts based on configured timers.

The recovery process is influenced by factors such as keepalive intervals, Dead Peer Detection (DPD), and underlying network conditions. Proper configuration of these parameters helps minimize downtime and ensures stable and reliable tunnel operation.

The connection recovery happens through the following procedure:

  1. Trigger recovery through automatic re-negotiation.
    • Re-initiate IKE Phase 1
    • Create new IPsec Security Associations (SAs)
  2. Re-establish the GRE tunnel.
    • Recreate the RGRE interface
    • Resume client traffic forwarding
  3. Restore client traffic
    • Preserve existing client sessions where possible.
    Note: The IPSec connection between AP and vSZ-D is recovered automatically and manual intervention is not required.

Mapping Ruckus GRE Tunnel Options

Mapping an AP to a GRE tunnel ensures that data traffic from the AP is forwarded through the defined tunnel, enabling secure and controlled transport between the AP and the controller or remote endpoint.
Mapping an AP to a GRE tunnel associates AP traffic with a specific tunnel configuration and ensures that the traffic is forwarded according to the defined tunnel settings.

To map an IPSec profile to AP GRE tunnel, perform the following -

  1. In the main menu, click Network > Wireless > Access Points.
    This displays the Access Points screen.
  2. Select a zone from the system hierrachy and click the Edit icon on the configuration page.
    This displays the Edit Zone window.
  3. In the Edit Zone window, navigate to AP GRE Tunnel Options section.
    • Ruckus GRE Profile - Click the drop-down arrow and select Ruckus GRE profile from the list.
    • Ruckus GRE Forwarding Broadcast - Broadcast traffic is forwarded over the Ruckus GRE tunnel. By default, this option is disabled. To maintain basic network connectivity, ARP and DHCP traffic is always permitted even when broadcast forwarding is disabled.
    • Soft GRE Profiles - SoftGRE tunnels operating in IPSec mode supports single SoftGRE profile configuration.
    • IPSec Tunnel Mode - By default, Ruckus GRE is selected as the broadcast traffic is forwarded over the Ruckus GRE tunnel.
    • IPSec Tunnel Profile - Click the drop-down arrow and select IPSec Tunnel profile from the list.
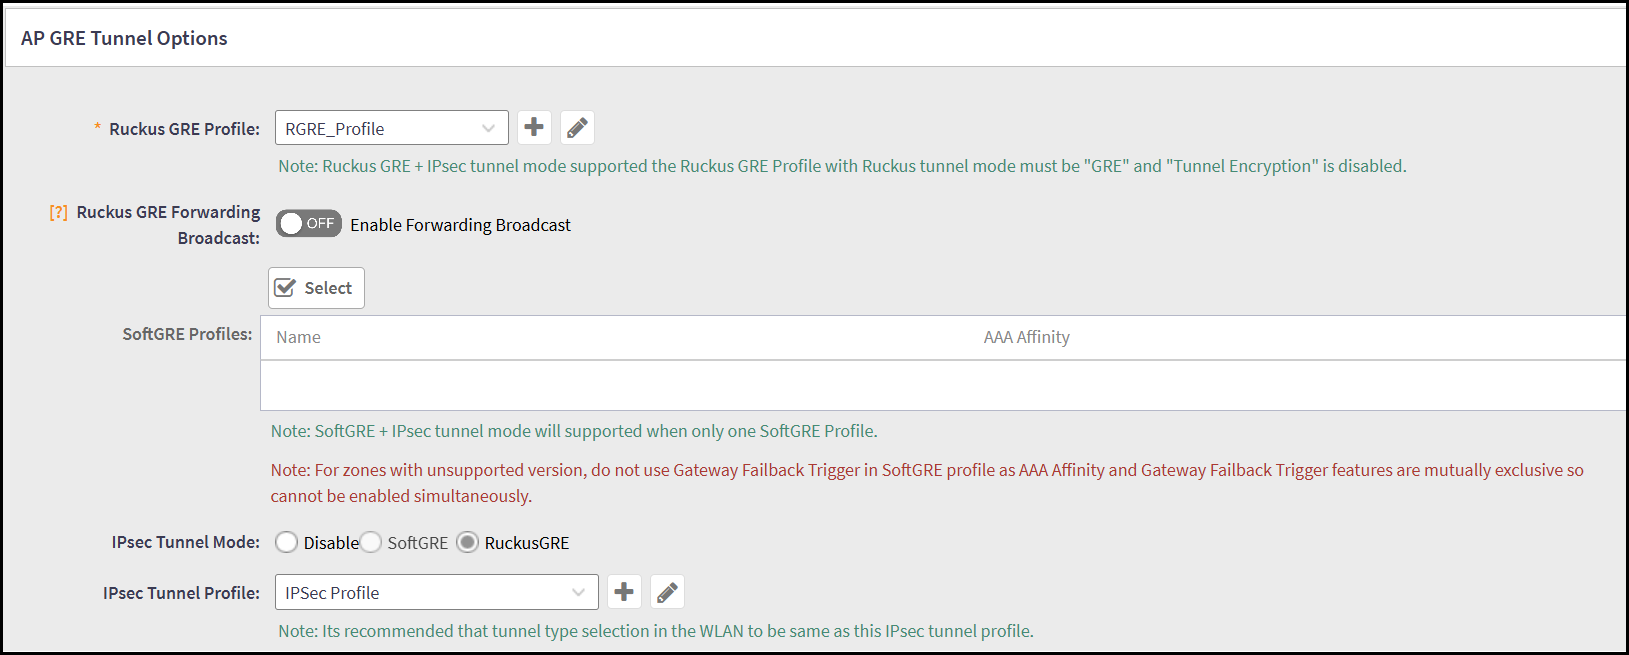
      AP GRE Tunnel Options

Mapping Data Plane Options

Mapping data plane options allows administrators to control traffic behavior, forwarding methods, and processing rules applied to tunneled data traffic.
Mapping data plane options defines the forwarding and handling of AP traffic within a tunnel.

To map an IPSec profile to AP GRE tunnel, perform the following -

  1. In the main menu, click Network > Wireless > Wireless LANs.
    This displays the Wireless LANs screen.
  2. Select a zone from the system hierrachy and click the Create icon on the configuration page.
    This displays the Create WLAN Configuration window.
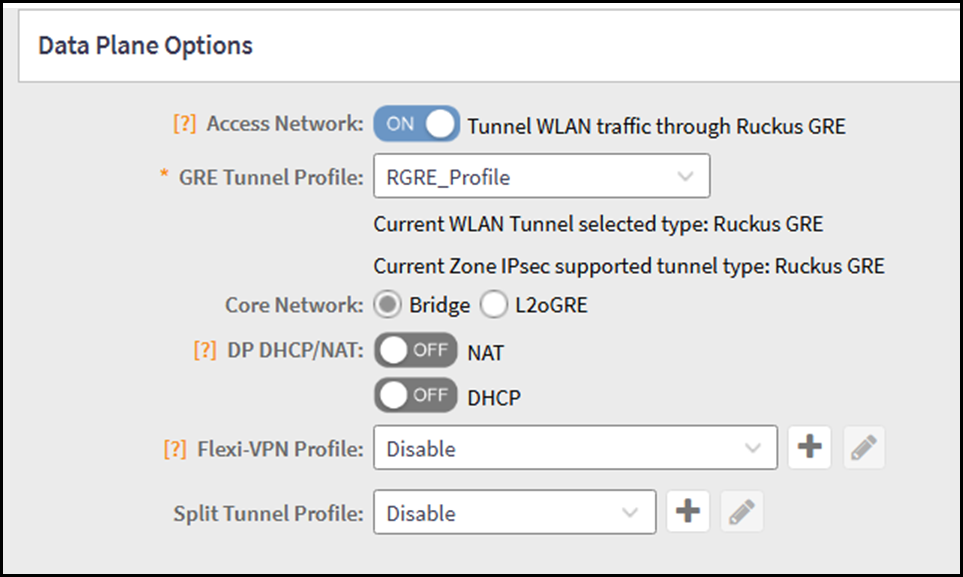
  3. In the Create WLAN Configuration window, navigate to Data Plane Options section.
  4. Enable the Access Networks by clicking on the toggle button. By default, this option is disable.
    After enabling the Access Networks option, the fields are populated automatically.

    Data Plane Options