Prepare the Administrative Computer
Prepare the admin computer for pre-configuring the AP.
Note: The following procedure uses Windows as an example. The steps required for modifying
your computer's IP address settings may be different if using another operating system.
- On your Windows computer, open the Network Connections control panel:
- When the
Network Connections window appears, right-click the icon for
Local Area Connection, and then click
Properties.
Note: Make sure that you configure the Local Area Connection Properties, not the Wireless Network Connection Properties.
- When the Local Area Connection Properties dialog box appears, select Internet Protocol Version 4 (TCP/IPv4) from the scrolling list, and then click Properties. The Internet Protocol (TCP/IP) Properties dialog box appears.
- Write down all of the currently active network settings. You will need this information later when you restore your computer to its current network configuration.
- Click
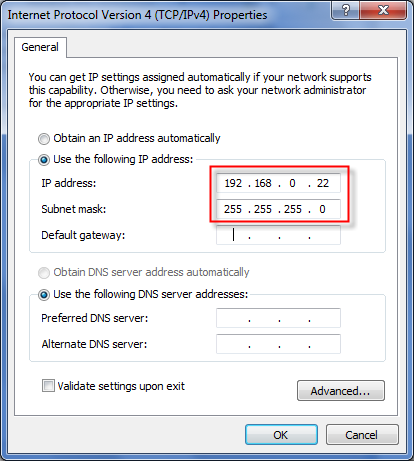
Use the following IP address, and then configure the IP address settings with the values listed in the following
table. For a sample configuration, refer to the figure below.
Configure your computer's IP address settings
Setting Value IP address 192.168.0.22 (or any address in the 192.168.0.x network—with the exception of 192.168.0.1, which is the default IP address assigned to the AP) Subnet mask 255.255.255.0 Note: You can leave the Default Gateway and DNS server fields blank. - Click OK to save your changes and close the TCP/IP Properties dialog box.
- Click OK again to close the Local Area Connection Properties dialog box.