Enabling Cluster Redundancy
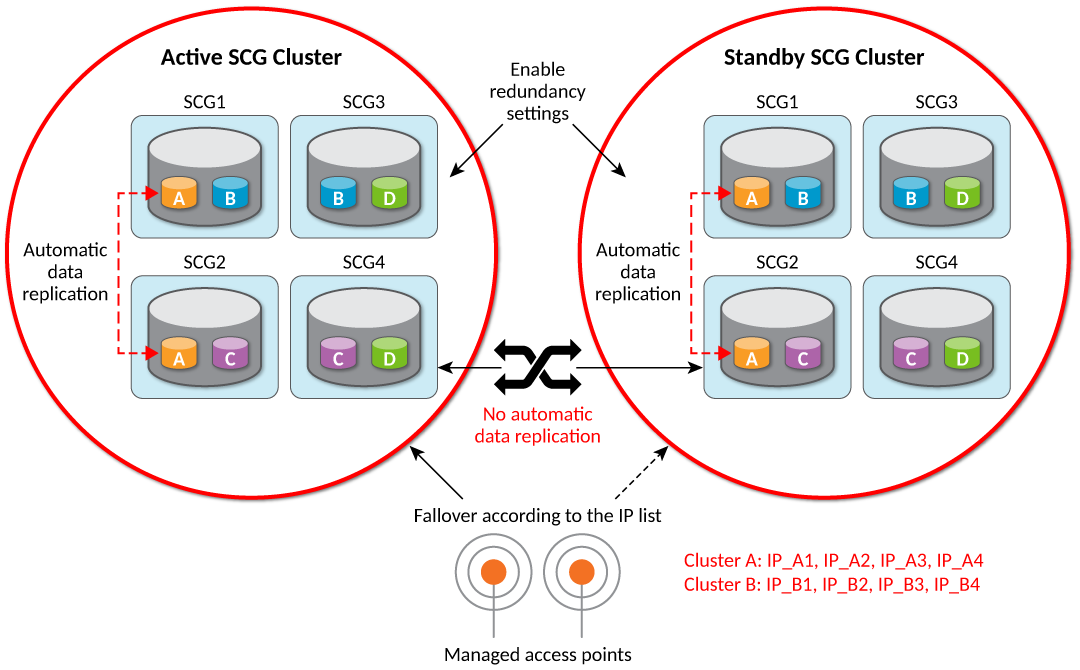
Cluster redundancy enables APs to fail
over automatically to another cluster if their parent cluster goes out-of-service
or becomes
unavailable.
Before you configure cluster redundancy for Active-Standby mode, consider the following items:
- Cluster redundancy is disabled by default.
- Super administrators and system administrators have the capability to configure the cluster redundancy settings.
- The super administrator and system administrator usernames and passwords can be different in the active and standby clusters.
- Up to three active clusters are supported beginning with SmartZone 5.0.
- The standby cluster can serve AP failover from one active cluster at a time.
- Some AAA configurations have a secondary server which acts as the backup for AAA. Therefore, AAA configuration for the standby cluster in geo-redundancy provides only the primary AAA configuration used on the standby cluster.
- A secondary server for non-proxy RADIUS and proxy RADIUS does not support High Availability standby in SmartZone 5.1.
- A "SUPPORT-HA-EU" license is required for upgrading a standby cluster.
- A SmartZone support license cannot be used to upgrade the standby cluster.
- It is highly recommended to enable cluster redundancy only in multi-node clusters. For single-node clusters, the external devices (AP, DP, and switch) may failover between clusters with a latency.
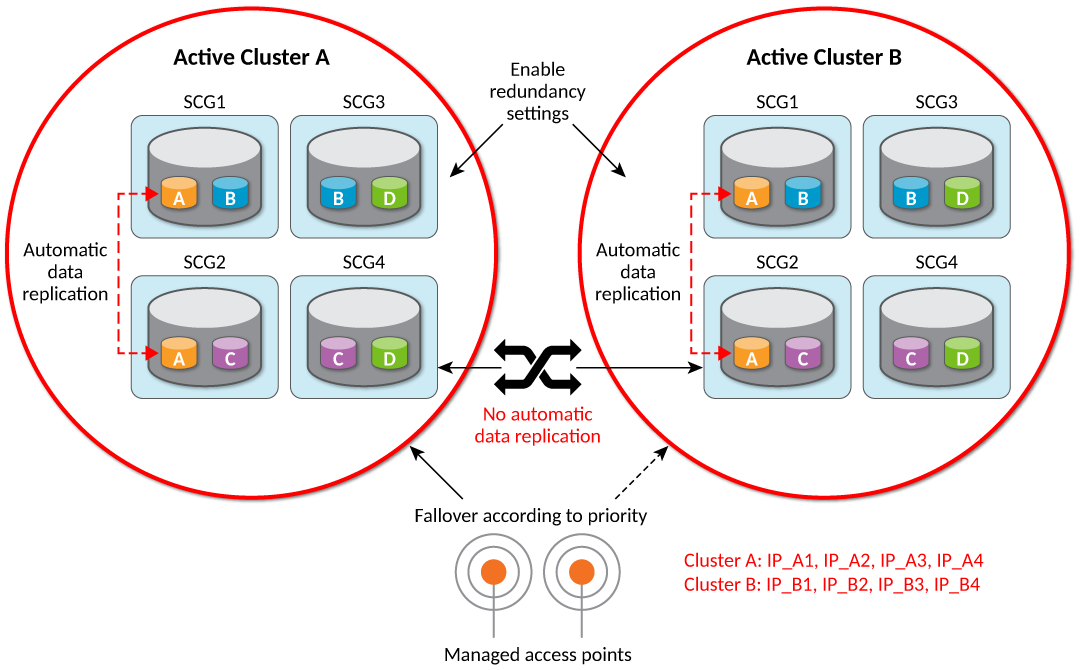
Before you configure cluster redundancy for Active-Active mode, consider the following items:
- Switch firmware 10.0.20a supports cluster redundancy for Active-Active mode.
- Cluster redundancy is disabled by default.
- Super administrators and system administrators have the capability to configure the cluster redundancy settings.
- The super administrator and system administrator usernames and passwords can be different in all active clusters.
- Each cluster in Active-Active redundancy can configure up to three target clusters.
- Allow only one cluster enable configuration scheduler sync.
- Licenses in the source active cluster and the target active cluster are independent.
- The following features are disabled in the target active cluster after the configuration is restored from the source active cluster:
- For adding external devices (APs and external DPs), the devices must be registered to the source active cluster (for which the Schedule option must be enabled in Configuration Sync) before dispatching these devices to the desired target active cluster.
- Target active clusters receive a configuration backup file from the source active cluster and restore it periodically. It is highly recommended to update the configuration from the source active cluster.
Note: It is highly recommended to enable cluster
redundancy only in a multi-node cluster. If cluster redundancy is enabled in a
single-node cluster, external devices (APs, DPs, and ICX switches) may fail over
between
clusters with a perceivable latency.
Complete the following steps to enable cluster redundancy.
- Select . The Cluster page is displayed.
- Select the cluster, scroll down, and click the Configuration tab.
- On the right side of the Configuration area, click Configure. The Edit Cluster page is displayed.
- In the Cluster Redundancy area, enable the Enable Cluster Redundancy option.
- Choose one of the following types to
enable cluster redundancy:
Active-Standby: You can configure up to three active clusters and one standby cluster to support APs, vSZ-Ds, and ICX switches failover to the standby cluster.
6.0 updateNote: Only switches running FastIron 08.0.95b and later fail over to the standby cluster. Failover switches must be approved or rejected according to the switch High Availability license on the standby cluster.For more information, refer to RUCKUS SmartZone Software Licensing Guide.-
6.1 updateTiming to serve Active cluster: Determines when the standard cluster turns to backup mode and manages external devices (APs, DPs, and ICX switches).
- Active out-of-service: Only when active cluster is out-of-service (default setting).
- Always: Always on service.
- Enter the admin Password of the standby cluster.
- For Management IP and Port, enter at least one IP address and port number of the standby cluster.
- For Time, select the duration in HH:MM format from the list to periodically sync the configurations.
- Click OK. A confirmation dialog box is displayed.
-
- Active-Active: To support AP and vSZ-D failover from
one active cluster to another active cluster, you can configure up to
three target clusters to an active cluster.
6.0 update
- For Password, enter the admin password of the active cluster.
- For Management IP and Port, enter at least one IP address and port number of the active cluster, and click Add.
- For Interval, select the interval to sync and restore the configuration to the target active clusters. If you select Monthly or Weekly, select the respective day.
- For Hour and Minutes, select the hour and minutes to periodically sync the configurations.
- Click OK. A confirmation dialog box is displayed.
- Click OK.
Note: Once the standby cluster IP address and port
has been configured, the active cluster begins to sync configuration to the standby
cluster.