Deployment Scenario 6: Changing PE IDs Using SPX Interactive-Setup
Use the SPX interactive-setup utility to make changing PE IDs simpler.
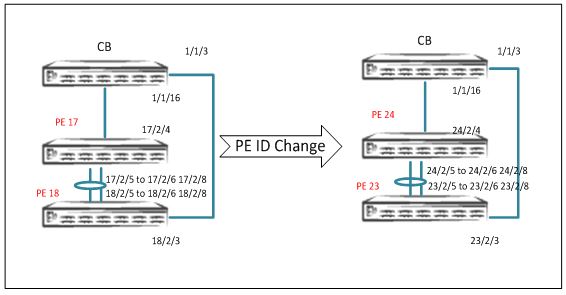
-
The new PE ID can be assigned only if the ID is not taken and if no reserve configuration is associated with the ID.
-
The PE IDs cannot be changed or swapped on PE units that are physically present in the Campus Fabric domain.
-
Ruckus recommends that you change PE IDs, if desired, when the Campus Fabric is initialized and before connecting hosts or configuring protocols.
Attention: Proceed with caution when changing PE IDs. Only the SPX LAG and SPX port configuration is dynamically changed after a PE ID change. Once PE IDs are changed, the user is responsible for reconfiguring all the configurations applicable to the old PE ID ports.
In the following example, PE 17 becomes PE 24, and PE 18 becomes PE 23.
- Use the
show running-configcommand to verify the domain and the PE ID configuration.ICX7750-48F Router(config)# show running-config Current configuration: ! ver 08.0.50b1T203 ! stack unit 1 module 1 icx7750-48-xgf-port-management-module module 2 icx7750-qsfp-6port-qsfp-240g-module module 3 icx7750-6q-6port-qsfp-240g-module spx unit 17 module 1 icx7250-24-port-management-module module 2 icx7250-sfp-plus-8port-80g-module spx-port 17/2/4 spx-lag 17/2/5 to 17/2/6 17/2/8 spx unit 18 module 1 icx7250-24-port-management-module module 2 icx7250-sfp-plus-8port-80g-module spx-port 18/2/3 spx-lag 18/2/5 to 18/2/6 18/2/8 ! ! spx cb-enable spx cb-configure zero-touch-enable spx-port 1/1/3 spx-port 1/1/16 zero-touch-ports 1/1/3 to 1/1/16 pe-id 1/1/3 18 17 1/1/16 ! ! no inline power non-pd-detection enable ip ssl min-version tls_1_1 ! ! interface management 1 ! ! End
- Run the SPX interactive-setup utility, and choose option 1 to change PE IDs. When
prompted, enter the desired PE IDs and confirm your changes.
ICX7750-48F Router# spx interactive-setup
You can abort spx interactive-setup at any stage by <ctrl-c>
0: quit
1: change PE IDs
2: discover and convert new units (no startup-config flash) to PEs
3: discover and convert existing/new standalone units to PEs
The example shows the options available when you start the interactive-setup utility.
4. When prompted, type "1" to change PE IDs.
Please type your selection: 1
           +----+ 	      +----+
 1/1/3--2/3| 18 |2/5==2/5| 17 |2/4--1/1/16
 	    +----+         +----+
You can type n to cancel. If you need to cancel later, type Cntrl-C at any time.
Type "done" to finish, or a new ID for PE 18 (default 18): 23
Type "done" to finish, or a new ID for PE 17 (default 17): 24
Change IDs: 18->23, 17->24,
Do you want to proceed? (enter 'y' or 'n'): y
Note: Be sure that the zero-touch utility is disabled before running the SPX interactive-setup utility.
ICX7750-48F Router(config-spx-cb)# no zero-touch-enable
ICX7750-48F Router(config-spx-cb)# end
In the example, the zero-touch utility is disabled as a precursor to enabling interactive-setup.
- The affected PEs are assigned new PE IDs and rejoin the network with the new IDs.
T=14m43.4: Sending new IDs to PE(s) 17-18...
power down ports to detach PEs: 1/1/3 1/1/16
power up ports: 1/1/3 1/1/16.
Affected PEs will join with new IDs.
Exit spx interactive-setup, reason: done ID changes
Sica Unit id:24, PoD License Capacity:8
Stack unit 24 Power supply 1 is up
Stack unit 24 Power supply 2 is down
Sica Unit id:23, PoD License Capacity:8
Stack unit 23 Power supply 1 is up
Stack unit 23 Power supply 2 is down
- Use the
show spxcommand to verify the topology and the operational state of the PEs. Then enter thewrite memorycommand to save the configuration.SPX# show spx T=17m13.2: alone: standalone, D: dynamic cfg, S: static ID Type Role Mac Address Pri State Comment 1 S ICX7750-48XGF alone cc4e.24d2.2c00 0 local Ready 23 D ICX7250-24 spx-pe cc4e.24dc.e9ce N/A remote Ready 24 D ICX7250-24 spx-pe cc4e.24dc.f166 N/A remote Ready +---+ 2/1| 1 |2/4 +---+ +----+ +----+ 1/1/3--2/3| 23 |2/5==2/5| 24 |2/4--1/1/16 +----+ +----+ The example changes the ID for PE 18 to 23 and the ID for PE 17 to 24 ICX7750-48F Router# write memory - Use the
show spx csp allorshow debug allcommand to verify the CSP operational status and any other items as needed. If the topology includes a PE ring, use theshow spx ring allcommand to verify that the ring is in the active state.Note: There are no specific
showcommands for ZTP. All commands that apply to SPX also apply to ZTP. Refer to Debugging and Verification Commands.