Modifying the System Default AP Group
You can create AP Groups to apply custom
settings that differ from the System Default AP Group settings.
- Select .
- Click the System
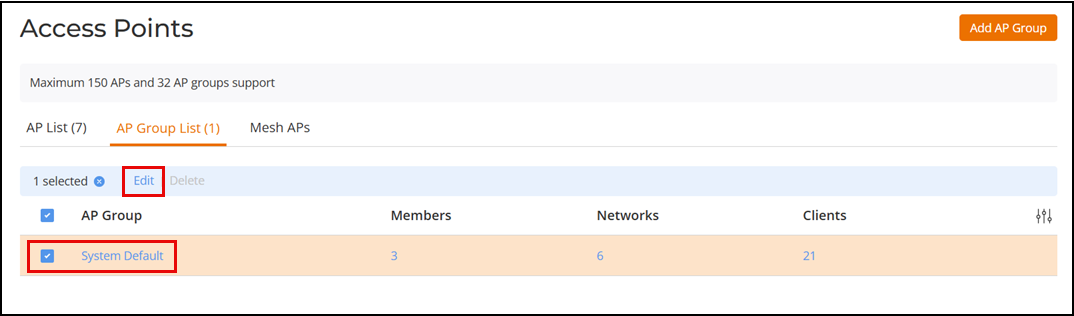
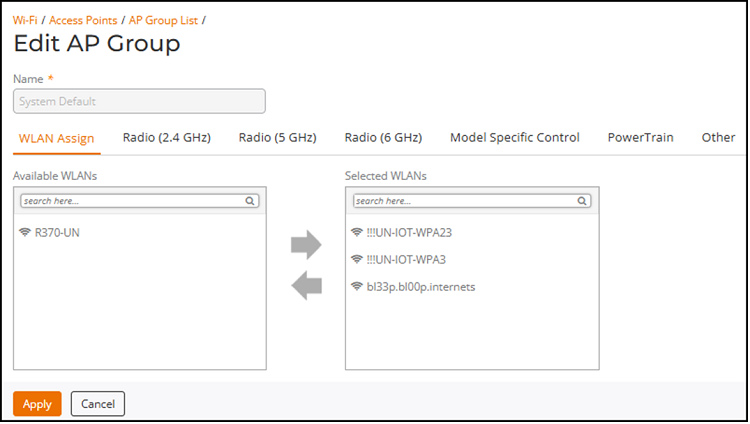
Default AP Group checkbox, then click the Edit button. The Edit AP Group page is displayed.
- Assign or unassign WLANs for this AP Group using the left and right arrows on the WLAN Assign tab.
- On the Radio (2.4 GHz),
Radio (5
GHz), and Radio (6 GHz)
tabs, respectively, select Enable or Disable from the Enable 2.4 GHz
band, Enable 5 GHz band, and Enable 6 GHz band
drop-down lists as required, and modify any of the following settings that you
want to apply to the System Default AP Group.
- Channel
Range: To limit the available channels for 2.4 GHz, 5 GHz indoor
(lower and upper) and 5 GHz outdoor (lower and upper), and 6 GHz (indoor and
outdoor) channel selection, clear the channel selection by clicking any
channels that you do not want the APs to use.
Note: For country codes "US", "UK", and "JP", channel 144 is supported if DFS channels are enabled.
- Channelization: Select Auto, 20, or 40 MHz channel width
for the 2.4 GHz radio. Select Auto, 20, 40, 80, or 160 MHz channel width for
the 5 GHz radio. Select Auto, 20, 40, 80, 160, or 320 MHz channel width for
the 6 GHz radio.
Note: For the 5 GHz radio, if 160 MHz is selected and the access point does not support 160 MHz or no 160 MHz channels are available, the system automatically selects Auto mode.UN-15227
- Channel: Select Auto or manually assign a channel for the 2.4 GHz radio.
- Indoor Channel: Select Auto or manually assign a channel (applies only to the 5 GHz and 6 GHz radios).
- Outdoor Channel: Select Auto or manually assign a channel (applies only to the 5 GHz and 6 GHz radios).
- TX Power: Set
the transmit power on all 2.4 GHz, 5 GHz, or 6 GHz radios (default is
Auto, numerical values are in dB).
Full is the maximum allowable transmit power according to country regulations.
- Call Admission Control: (Disabled by default). Enable Wi-Fi Multimedia Admission Control (WMM-AC) to support Polycom/Spectralink VIEW certification.
- Protection
Mode: If you activate Protection Mode, you control how Wi-Fi
devices know when they should communicate with another device. The use of
RTS/CTS (Request to Send/Clear to Send) reduces collisions and increases
network performance if hidden stations are present. However, RTS/CTS (and
CTS Only) introduce overhead and may reduce overall performance in some
situations. Through the proper use of RTS/CTS and CTS Only, you can
fine-tune the operation of your wireless LAN depending on the physical
operating environment.
- CTS Only: Select this option to force all destination devices to acknowledge their ability to receive data when a transmission is initiated. Use this option for compliance with the Wi-Fi Alliance certification.
- RTS/CTS: Select this option to force both sending and receiving devices to confirm a data exchange on both ends before proceeding.
- None: Select this option to disable both RTS and CTS acknowledgment.
- BSS Minimum Rate: Select the minimum data rate that client devices must support to connect to the basic service set (BSS). Available options include HE‑MCS0 - 7 Mbps, HE‑MCS1 - 14 Mbps, HE‑MCS2 - 21 Mbps, and HE‑MCS3 - 29 Mbps (applies only to the 6 GHz radios).
- Management TX Rate: Select the data rate used to transmit management frames such as beacons and probe responses. Available options include 6 Mbps, 9 Mbps, 12 Mbps, 18 Mbps, 24 Mbps, 36 Mbps, 48 Mbps, and 54 Mbps (applies only to the 6 GHz radios).
- Enable Indoor AFC: Select whether to enable or disable AFC for indoor access points. AFC is enabled automatically for outdoor access points (applies only to the 6 GHz radios).
- Channel
Range: To limit the available channels for 2.4 GHz, 5 GHz indoor
(lower and upper) and 5 GHz outdoor (lower and upper), and 6 GHz (indoor and
outdoor) channel selection, clear the channel selection by clicking any
channels that you do not want the APs to use.
- On the Model Specific Control tab, modify settings for all APs of a specific model in the System Default AP Group. Settings vary depending on the selected AP model; for descriptions of the available settings, refer to Modifying Model-Specific Controls.
- On the PowerTrain tab, configure the available power settings for the selected AP model. Refer to PowerTrain for more information.
- On the Other tab, select
a Bonjour Fencing policy from the drop-down list or click the
 icon to create a new Bonjour Fencing policy. Refer to Creating Bonjour Fencing Policies for more
information.
icon to create a new Bonjour Fencing policy. Refer to Creating Bonjour Fencing Policies for more
information. - Click Apply to save your changes.