Creating a Guest Pass Profile
- Enter the URL of the Guest Pass
request page in your web browser:
https://[host_ip_address]/guestpass. - Enter your username and
password, and click Login. The Generate Guest Pass page is displayed.
- Complete the following steps:
- For Number of Guest
Passes, select By Profile
and upload Guest Pass profile (in CSV format).
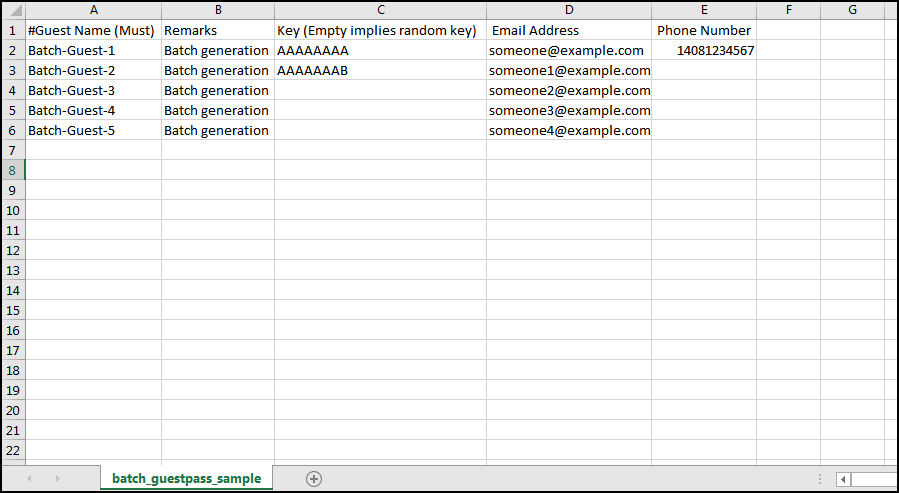
- You can download a sample profile using the click
here link. Using a spreadsheet application, open the
CSV file and edit the Guest Pass profile by filling out the
following columns:
- #Guest Name: Enter the name of the guest user (one name per row).
- #Remarks: (Optional) Enter any note or remarks about the Guest Pass.
- #Guest Key: Enter a Guest Pass key consisting from 1 through 16 alphanumeric characters. If you want RUCKUS Unleashed to generate the Guest Pass key automatically, leave this column blank.
- You can download a sample profile using the click
here link. Using a spreadsheet application, open the
CSV file and edit the Guest Pass profile by filling out the
following columns:
- Guest WLAN: Select one of the existing WLANs with which the guest users will be allowed to associate.
- Valid for: Enter a number in the Valid for field and select a time unit (Hours, Days, or Weeks) to specify the time period when the Guest Pass will be valid.
- Enable Session Timeout: Select the checkbox and select a time interval (Minutes, Hours, or Days) after which guests are required to log in again. If the Session Timeout is disabled, the connected users are not required to log in again until the Guest Pass expires.
- Enable Shared Pass: Use this option to allow multiple users to share a single Guest Pass.
- For Number of Guest
Passes, select By Profile
and upload Guest Pass profile (in CSV format).
- Click Generate to create the Guest Pass and the page displays the generated guest passes and allows you to select the delivery method for sharing the passes with guests.
- On the Generate Guest
Pass page, the following options are available:
- Print passes using template: Allows you to select the template used when printing guest passes.
- Print All: Prints all generated guest passes using the selected template. A new browser page displays the Guest Pass instructions and the Print dialog box is displayed.
- Email All: Sends all generated guest passes to the guests’ email addresses specified during pass creation.
- SMS All: Sends all generated guest passes to the guests’ phone numbers via SMS.
- Download All: Downloads all generated guest passes as files for offline sharing or printing.
You can also select individual guest passes and choose to print, email, or send via SMS only the selected passes.
- Click Create More to generate additional guest passes or click Done to complete the guest pass generation process.