Workflow Basics
The Workflow page has 5 tabs across the top.
- Use the Properties tab to update the workflow properties and the Enrollment Portal URL Options.
- Use the Enrollment Process tab to configure the steps presented to a user to create the workflow.
- Use the Look & Feel tab to configure the Cloudpath skin, and to customize the logos, colors, buttons, and images for the Cloudpath server, the Cloudpath Wizard, and the Download page.
- Use the Snapshot(s) tab to view the latest snapshot, the version, timestamp and the notes added to a particular workflow.
- Use the Advanced tab to view the Enrollment Portal URL, Passpoint OSU URL, and the QR code. You can also use it to Manage Chromebook Setup and for Cleanup.
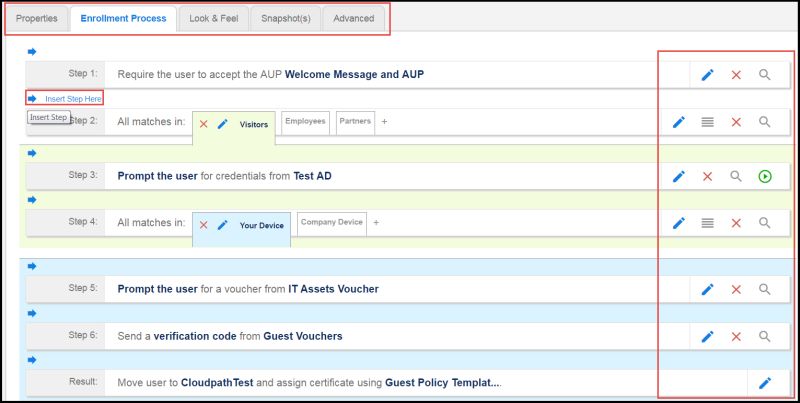
Use the icons along the side to make changes to the enrollment workflow:
- Use the icons on the right side of each step to edit, modify, delete, view the enrollment steps.
- Use the
Test Server icon
 to verify interaction with an authentication server.
- Use the
Edit List icon
 to label options, to change the order of the selection options in a split, add more
options, or add filters and restrictions.
Note: There are additional options available by entering Edit mode for the workflow plugin that are not available during the creation of the plugin to add to a workflow. It is recommended to go into Edit mode to at least view all the options.
to label options, to change the order of the selection options in a split, add more
options, or add filters and restrictions.
Note: There are additional options available by entering Edit mode for the workflow plugin that are not available during the creation of the plugin to add to a workflow. It is recommended to go into Edit mode to at least view all the options. - Use the icons on the split tabs to modify or delete a specific option.
When you create a new workflow, you will choose one of three options from a drop-down list called Workflow Template Type. These options are described in detail in the following sections:
- Modifying a Workflow Template
- Creating a Workflow From a Blank Slate
- Using the Timed Access Workflow Template
New for 5.5