Using Auto VLAN
The range of VLANs that you configure creates a VLAN pool in the database. Each customer account can have one VLAN pool. Once the pool has been created, you can increase its size by expanding its range. However, if you shrink the size of the pool, existing users who have a VLAN that is outside the new range will maintain that VLAN until the next time they enroll, at which time they are assigned a new VLAN.
There are three main steps to setting up the Auto VLAN feature:
- Assign the ${VLAN_POOL_ASSIGNMENT} variable: Using
this variable allows the RADIUS server to select the VLAN port assigned to an
authenticated user.
- Assign the variable for a RADIUS attribute group.
- Add the RADIUS attribute to a policy.
- Assign the policy to the desired area of Cloudpath. For example,
policies can be assigned to DPSK pools, PEAP that uses onboard RADIUS,
and certificate templates.
Note: For detailed information about configuring RADIUS attribute groups and using policies, refer to the manuals for each of these categories.
Note: To use this feature with MAC Registrations, refer to Using Auto VLAN With MAC Registration. - Enable the feature for your authentication server in the Configuration > Authentication Servers portion of the UI
- Define the VLAN Range and the default VLAN in the Administration > System Services portion of the UI.
Configuration Steps for Adding the ${VLAN_POOL_ASSIGNMENT} Variable
- Go to Configuration > Policies.
- Click the RADIUS Attribute Groups tab.
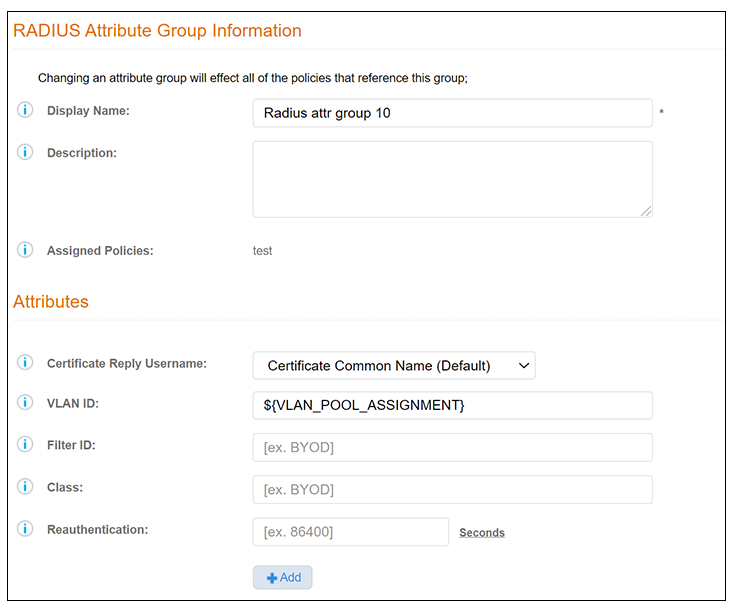
- Either click Add RADIUS Attribute Group or click the pencil icon to edit an existing RADIUS attribute group.
- In the VLAN ID field, enter the variable: ${VLAN_POOL_ASSIGNMENT} thereby allowing the RADIUS server to select the VLAN port that gets assigned to an authenticated user.
- Click Save.
- In the Policies tab, either click Add Policy or click the pencil icon to edit an existing policy.
- In the "RADIUS Attribute Dropdown" list of the Policy configuration screen, select the attribute group that you have configured with the ${VLAN_POOL_ASSIGNMENT} Variable.
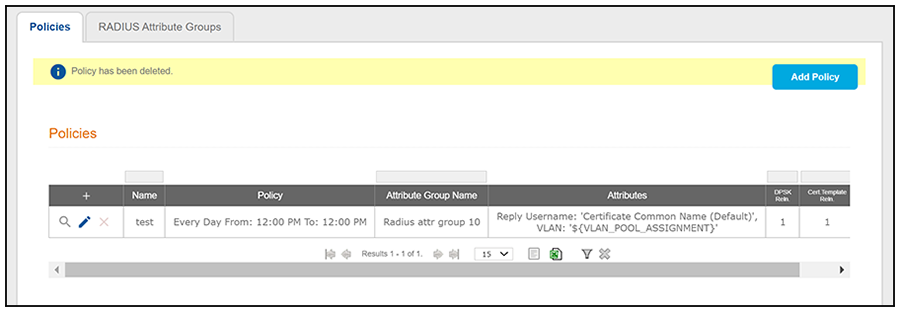
- Click Save. The "Attributes" column in the ensuing screen should now indicate that the variable is being used.
- Assign the policy to the desired usage; for example:
- For each traditional authentication server that you want to support this feature,
you must enable the "Use VLAN Range" check box:
- Go to Configuration > Authentication Servers.
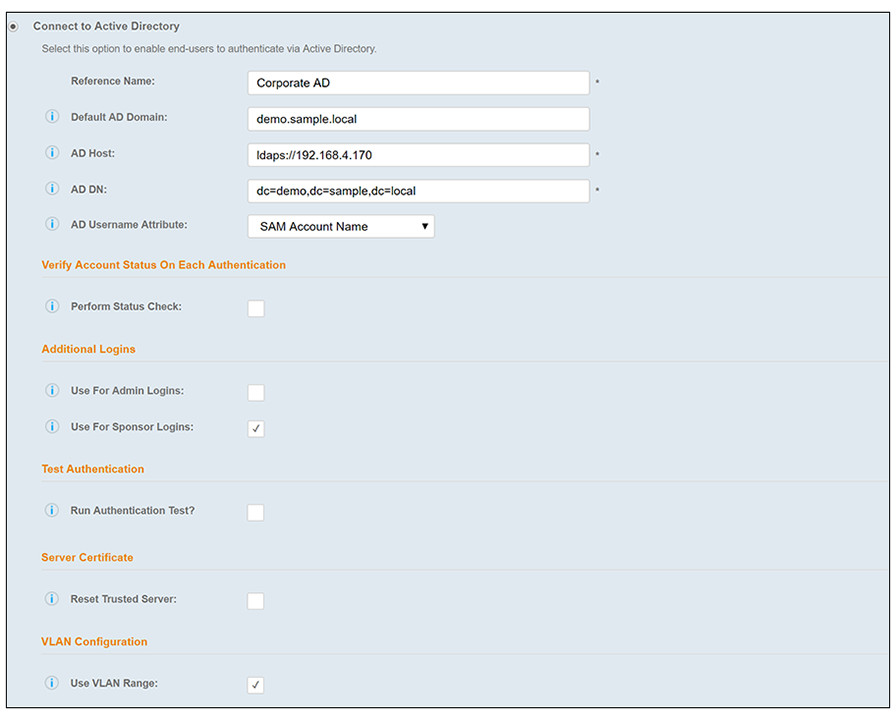
- Whether you are adding a new authentication server or need to edit the configuration of an existing authentication server, go to its configuration, as shown in the example figure below for an Active Directory authentication server.
- Enable the "Use VLAN Range" checkbox, as shown in the figure below. (Note that it
is not enabled by default.)
Note: Without this check box enabled, a VLAN will not be assigned to a user, and any currently assigned VLANs will be removed from users if they re-enroll by means of an authentication server where this box is not checked.
- Click Save.
- Go to
Administration > System Services:
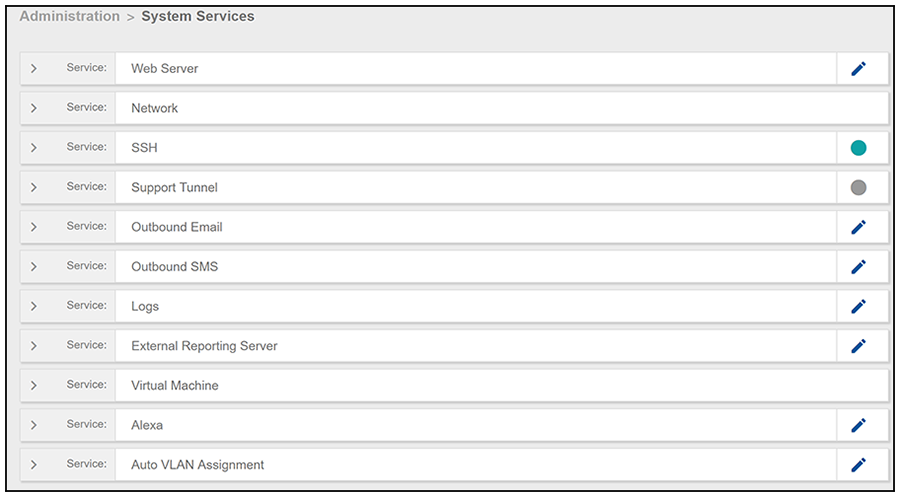
- Scroll down and click the pencil icon to the right of the "Auto VLAN Assignment" service.
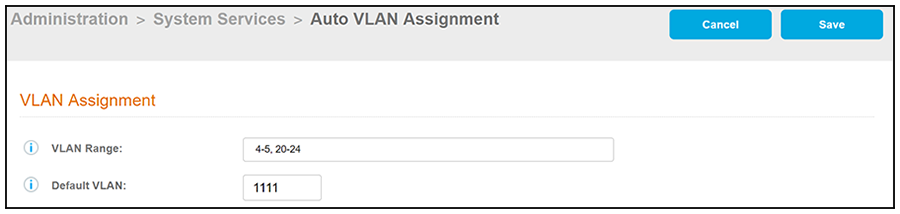
- Set the values as desired in the VLAN Assignment window; an example is shown below:
- VLAN Range: Range to use for automatic VLAN assignment. A single user is assigned
the same VLAN for all devices. Any changes to the range will affect future enrollments
only.
Example of how to specify a range in a valid format: 1-142, 532, 1000-1235
- Default VLAN: The VLAN to use once all other VLANs defined in the pool have been assigned to other users.
- VLAN Range: Range to use for automatic VLAN assignment. A single user is assigned
the same VLAN for all devices. Any changes to the range will affect future enrollments
only.
- Click
Save.
The following figure shows the Auto VLAN Assignment service expanded after the VLAN assignments have been saved:

How the VLAN ID Gets Assigned During Enrollment
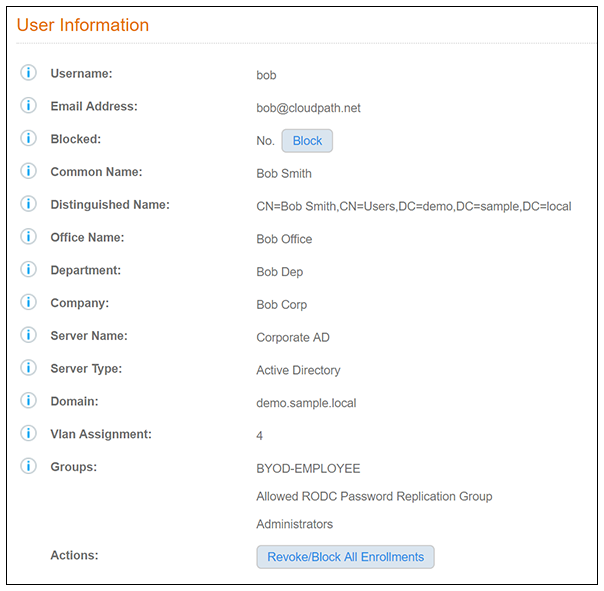
As an enrollment is made that uses a traditional authentication server (as specified when you create your workflow), an identity is either created or retrieved from the database. If the identity is on an authentication server with the "Use VLAN Range" checkbox enabled, a VLAN is selected (lowest available number), and the identity is assigned to this VLAN. This VLAN is shown in the User Information section of the Dashboard > Users & Devices page. For example, if the configured the VLAN ranges are 4-5 and 20-24, as shown in the figure above, the first user who enrolls would be assigned a VLAN ID of 4 because 4 would be the lowest available number (see the "VLan Assignment" field in the figure below):
If an authentication server has not been enabled to support the VLAN behavior, then any existing VLAN assignments are removed from the user during enrollment, and that VLAN ID then is released back into the VLAN pool for use by an authentication server that does support the VLAN behavior.
Viewing All VLAN Assignment Information
In the UI, navigate to Dashboards > VLAN Assignments for complete information about VLANs available, assigned, users for each VLAN, and so on.
Using Auto VLAN With MAC Registration
In addition to using Auto VLAN with RADIUS attribute groups (and therefore within policies), you can also use this feature with MAC registrations. From the UI, go to: Configuration > MAC Registrations > Add MAC Registration, "Authentication Attributes" section; add the following three Success Reply Attributes: