Using Variables in a Workflow Split
The following steps show an example of how to use variables within a branch of a workflow.
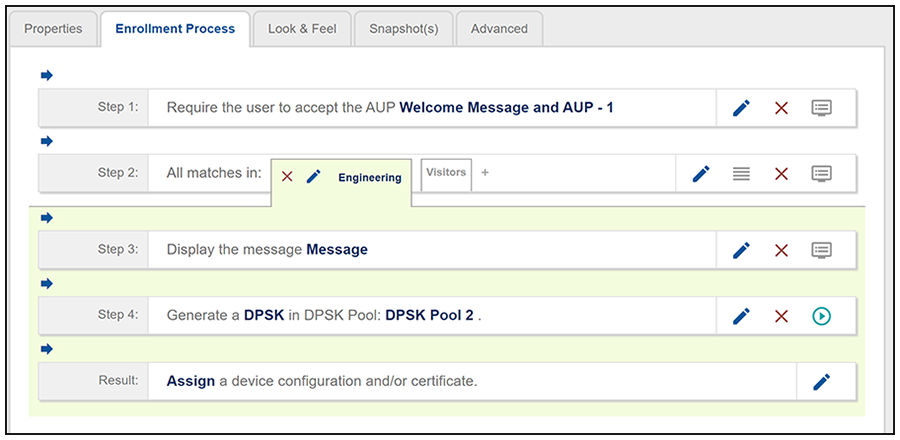
- Create a workflow that includes a branch split, such as the one shown below, where the split is for "Engineering/Visitors":
- Click the pencil icon within the "Engineering" split label to invoke the "Modify Step" screen.
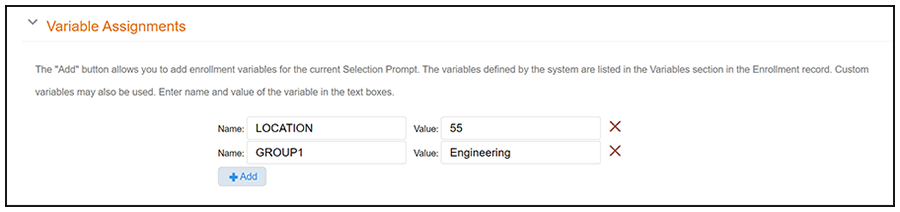
- Scroll down to the "Variable
Assignments" section, and click the arrow to view instructions for adding
system-defined variables and/or any custom variables, then add as many variables
(and assign corresponding values) as you wish, as demonstrated in the screen below.
Note: A custom variable can be any name you wish.Note: Custom enrollment variables do not work with certificate templates.Is this note correct?
- When you are done adding variables, click Save.
- You can now use those variables elsewhere in your workflow. For example, you can use
a "Display a Message" plug-in next to show the enrolling user what the values are
for the variables you set in the previous step. (You might use the LOCATION variable
as a VLAN ID, described later in this procedure.) To add a "Display a Message"
plug-in below the "Engineering" split (as shown in Workflow Split Example), do the following:
- With the "Engineering" tab highlighted (in the example workflow), click the arrow under Step 2 to insert a step.
- Scroll down the list of steps and click "Display a message."
- On the ensuing screen, with the selection "A new message created from a standard template" selected, click Next.
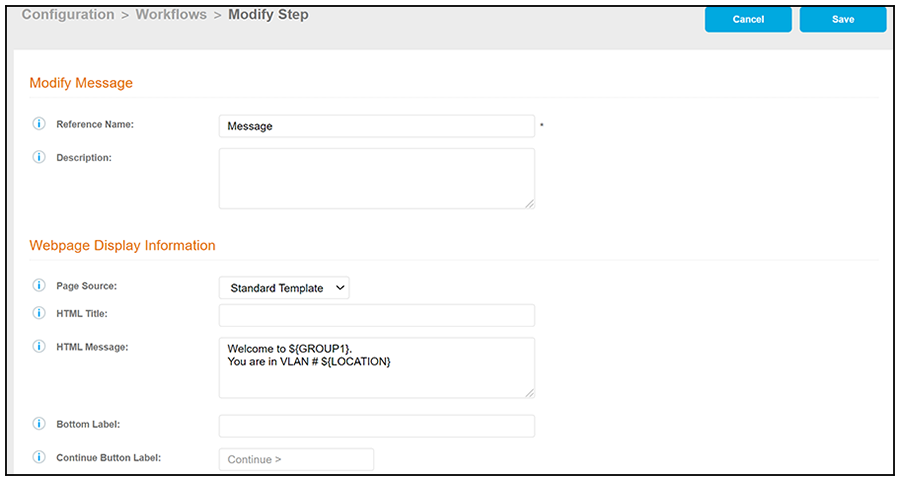
- You can use the fields in the
next screen as desired. The example below shows how you can use the "Webpage
Display Information" area to include some text around the variables.
Note: The variables themselves, when referenced, must be enclosed in curly brackets that are preceded by a $.
- Click Save.
Possible Usage of LOCATION Variable
One way you could use the LOCATION variable is as the VLAN ID in a RADIUS attribute group (Go to Configuration > Policies > RADIUS Attribute Groups). You could enter $(LOCATION} in the VLAN ID field of a RADIUS attribute group, and the value of LOCATION becomes the VLAN ID of that attribute group. A RADIUS attribute group belongs to a policy that is in turned assigned to different entities, such as an eDPSK pool, which is a step shown in the example workflow in Workflow Split Example.
How the Variables Are Presented to an Enrolling User
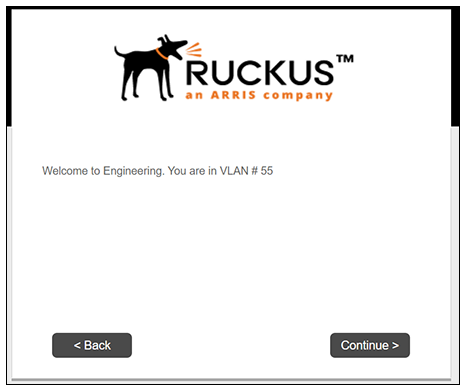
Once you publish the workflow, the "Display a message" configuration that is shown in Using Variables in Display-A-Message Step would be presented to an an enrolling user as follows:
Checking Variable Assignments in the Dashboard
After a user enrollment completes, you can go to Dashboard > Enrollments, then click the magnifying glass icon next to the enrollment you wish to view, and then scroll down to the "Enrollment Variables" section. The variables you assigned and their corresponding values should be in the list.