Configuring a Local User Account
Complete the following steps to configure the user account in a local database.
- From the main menu, select .
- Click the Local
Users tab. All the configured user accounts are listed in the main pane. You can perform the following actions:
- Add a user account: Continue to step 3 to add a new user account.
- Edit a user account:
Click the
 icon to display the Edit Local User
dialog box. Make the necessary changes and click
Apply, then click Ok in
the confirmation window, to apply the changes.
icon to display the Edit Local User
dialog box. Make the necessary changes and click
Apply, then click Ok in
the confirmation window, to apply the changes. - Delete a user account:
Click the
 icon to display the Delete Local User
dialog box. Click Apply to
delete the user account.
icon to display the Delete Local User
dialog box. Click Apply to
delete the user account.
- In the Local
Users tab, click the
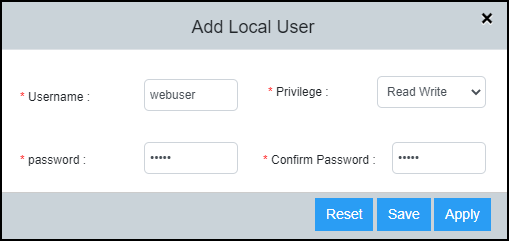
 icon to display the Add Local User dialog box.
- Complete the following fields:
- Username: Enter a username for the user.
- Privilege: Select the
desired privilege level for the user from the list.
- Read Write: Specifies to provide complete read-and-write access to the system.
- Read Only: Specifies to provide limited read-only access.
- Port Config: Specifies to provide read-and-write access at the port configuration level (but not for global parameters).
- Cloud User: Specifies to provide access to cloud users.
- Password: Enter the password for the user.
- Confirm Password: Re-enter the password for confirmation.
- Click Apply, then click Ok in the confirmation window, to add the local user account.