Configuring a VE Port
Complete the following steps to configure
a Virtual Ethernet (VE) interface, add an IP address and network mask for the interface,
and
associate a helper IP address with the interface.
- From the main menu, select .
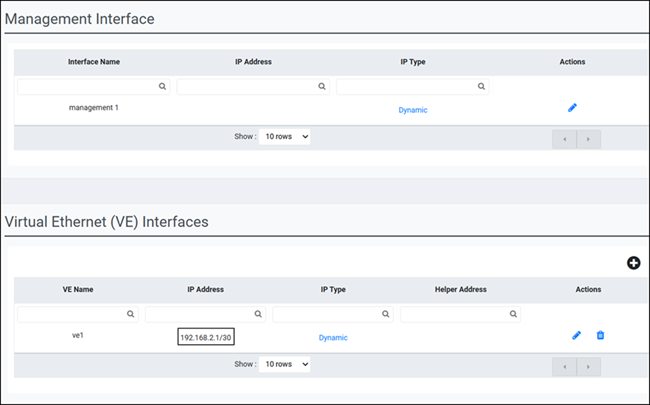
- Under the Management Interface section, the following
details are displayed:
- Interface Name: Displays the default name of all the configured interfaces.
- IP Address: Displays all saved management IP addresses.
- IP Type: Indicates whether each entry is configured as a static IP address or assigned dynamically via DHCP.
- Actions: The
Actions column displays icons allowing you quick access to the available
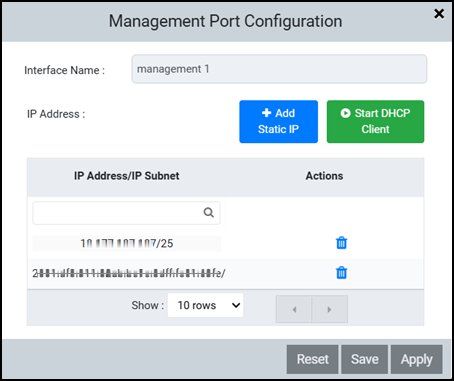
actions for the interface. The Management Port Configuration page is
displayed when you click the
 icon, enabling configuration of a static IP
address or initiation of the DHCP client on the management port as
follows:
icon, enabling configuration of a static IP
address or initiation of the DHCP client on the management port as
follows:- The Interface Name field displays the default name assigned to the management port.
- Click Add Static
IP to create a new static IP address. The
following fields are available:
- In the IP address/IP Subnet field, type the desired static IP address and the subnet mask.
- Click the
 icon to delete any already
configured IP address.
icon to delete any already
configured IP address. - Click Start DHCP Client to start the DHCP client on the management port.
- (Optional) In the Actions field,
click the
 icon to add and save the
new IP address or you can delete it using the delete
icon.
icon to add and save the
new IP address or you can delete it using the delete
icon.
- (Optional) Click Save to save the new IP address.
- (Optional) Click Apply to apply the newly added static address.
- (Optional) Click Reset to discard all the entries.
Note: Selecting a static IP disables DHCP, and enabling DHCP removes the static IP configuration. - Under the Virtual Ethernet (VE) Interfaces section, the
following details are displayed:
- VE Name: Displays the default name of the VE interface.
- IP Address: Shows the configured IP address for the VE interface.
- IP Type: Indicates whether the IP address is static or assigned dynamically via DHCP.
- Helper Address: Displays the helper address associated with the VE interface (if configured).
- Actions: Provides options to edit or delete VE ports and their associated configurations.
- Click the
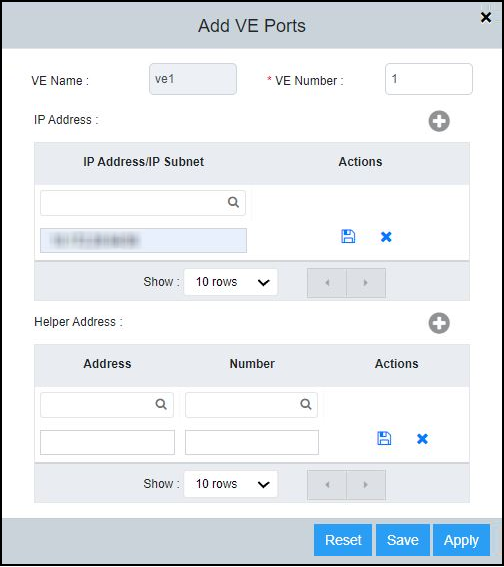
 icon to add a VE port. The Add VE Ports window is
displayed.
icon to add a VE port. The Add VE Ports window is
displayed.
- Complete the following
fields:
- VE Name: Displays the default VE name after you enter the VLAN ID in the VE Number field.
- VE Number: Enter the
VLAN ID. The VE number must be valid and match an existing VLAN.
Note: A VE port is created only if the corresponding VLAN is present in the device.
- IP Address: Click
Add Static
IP to enter the static IP address and network mask.
Click the icon to add the entry. Continue to click
Add Static
IP and save to add additional IP addresses.
- When Start DHCP Client
is clicked, the system displays the message: "Dynamic IP - Press
Apply to start DHCP Client on this interface." The Save option is
disabled, and only the Reset and Apply options remain available.
Note: Selecting a static IP disables DHCP, and enabling DHCP removes the static IP configuration.
- Helper Address: Enter
the helper address. Click the icon to add the helper address and the
number. Click the iocn to add the entry.
- (Optional) Click Save to save the new IP address.
- (Optional) Click Apply to apply the newly added static address.
- (Optional) Click Reset to discard all the entries.