Applying a Configuration Template Bundle
- From the navigation bar, select
.The Configuration Templates page is displayed.
- Select the Bundles tab to view all configuration bundles.
- Choose a view mode from the
View
by drop-down list:
- View by Venue Type: Displays bundles organized by venue templates.
- View by Network
Type: Displays bundles organized by network templates.
You can use the Search option to display only the table entries matching the specified template Name for the specified type; enter a minimum of two characters. You can sort the list by clicking the associated column header.
Note: Search and sort apply only to top-level templates.
- Expand the bundle by clicking
the
 icon next to the template name to view the
downstream templates.
icon next to the template name to view the
downstream templates. - Select the radio button next to
the Name column.Note: Only the top-level template can be selected to apply the configuration bundle.
- Click Apply
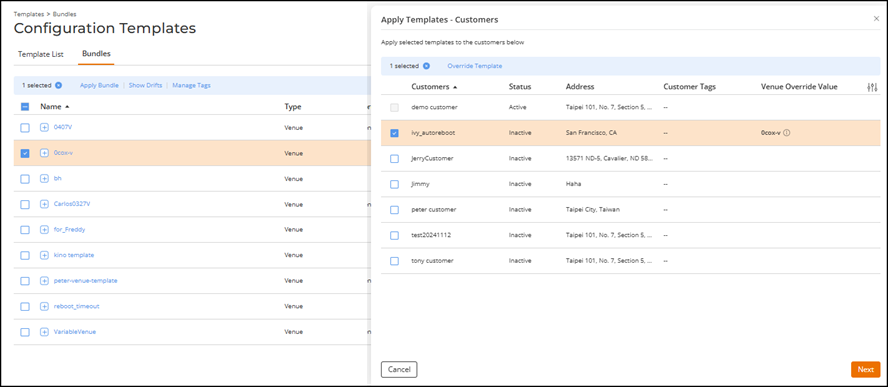
Bundle.The Apply Templates - Customers sidebar appears, displaying the following details:
- Customers: Displays the customer names.
- Status: Displays the status of the customer account (Active, Inactive, or Trial).
- Address: Displays the customer’s registered address.
- Customer Tags: Displays the tags associated with the customer.
- Venue Override
Value: Displays the configured venue override name with
an
 icon. If no value is configured, the field
is displayed as empty. This table column appears only for Venue
type bundles, not for Network
type bundles.
icon. If no value is configured, the field
is displayed as empty. This table column appears only for Venue
type bundles, not for Network
type bundles.
You can use the Search option to display only the table entries matching the specified Customers or Customer Tags; enter a minimum of two characters. You can customize which fields appear in the table by clicking the
 icon and selecting or deselecting the desired column names. Optionally,
you can click Reset to default to restore the default
subset of columns.
icon and selecting or deselecting the desired column names. Optionally,
you can click Reset to default to restore the default
subset of columns.Click Clear Filters to reset the filters. You can sort the list by clicking the associated column header.
- Select one or more customers to
apply the selected bundle by selecting the checkboxes.
- (Optional) Click Override Template to create a
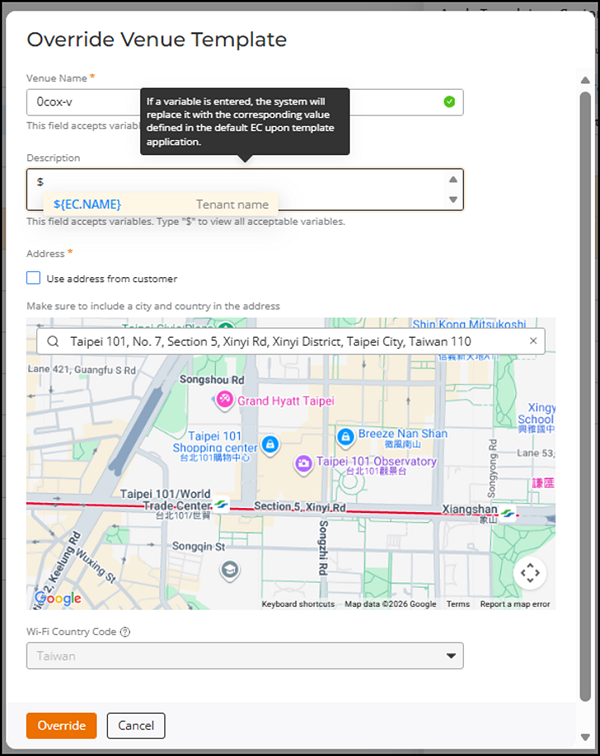
customer-specific version of the selected venue template.Enter or update the required details in the Override Venue Template dialog box:
- Venue
Name: Displays the current venue name. Enter or
update the venue name as needed. Type the $
character to view available variables, such as
${EC.NAME}.When the template is applied, any variable entered is replaced with the customer account name. If no customer has been selected yet, the variable remains visible as typed until the confirmation stage.
- (Optional)
Description: Displays an empty or existing
description. Enter or update the description. Type the $
character to view and insert available variables, such as
${EC.NAME}.When the template is applied, any variable entered is replaced with the customer account name. If no customer has been selected yet, the variable remains visible as typed until the confirmation stage.
- (Optional) Tags: Enter identifiers for easy searching or grouping.
- Address: Displays the existing address for the venue. Enter a new address or update the current address, including street, city, and country details.
- Wi-Fi Country Code: This field is
read-only. The country code can be added only when creating a
Venue Template. Refer to the RUCKUS One User Guide for configuration
details related to adding a venue.
The Wi-Fi country code defines the Wi-Fi channels and power levels available for access points at the venue. In most cases, it matches the venue’s location and does not need to be changed.
- Click Override to save the override configuration for
the selected customer(s).
The Venue Override Value column displays the venue name.
Hover over the
icon to view the final values
that will be applied for each customer.
- Venue
Name: Displays the current venue name. Enter or
update the venue name as needed. Type the $
character to view available variables, such as
- Click Next to
proceed to the confirmation screen of the Apply Templates -
Customers sidebar.The confirmation view displays the Selected customers along with the Venue Override Value for each customer and the Selected Templates. Venue Override Value is displayed only when the template Type is set to Venue and the value is configured; for Network templates, Venue Override Value is not displayed.
Hovering over the
shows the final values that will be
applied after variable substitution. If variables were entered in
fields such as Venue
Name, Description, or Address, these fields appear with the
customer‑specific values in the confirmation preview.Note: When applying configuration templates, all configurations in the selected templates are applied to the selected customers. During this process, the template settings replace the existing settings in each customer’s venue. Ensure that the customer access points are running a firmware version that is compatible with the template, and update the firmware if necessary. - Click Apply Template to confirm and deploy the
configuration bundle to the selected customers.The dialog box disappears, and the Bundles tab refreshes.
- (Optional) Click Override Template to create a
customer-specific version of the selected venue template.
- (Optional) Click Show Drifts to
open the Customer Drifts Report sidebar. Alternatively,
click the Drift
Detected status in the table to view drift details.The sidebar displays customers for which configuration drifts are detected and allows you to reapply templates for correction. Refer to Viewing and Syncing Config Template Drifts for more information.
- (Optional) Click the number in
the Applied
To column to open the Applied to EC Tenants
sidebar.The sidebar displays the customers (tenants) and their associated addresses where the bundle is currently applied.
- (Optional) Click Add Template to create a new configuration template. Refer to Adding and Managing Configuration Templates for more information.
- (Optional) Click the template
Name to view the Template Details. The Template Details sidebar is displayed with the following information: Template Name, Type, Drift Status, Enforcement, Created By, Created On, Last Modified, Last Applied, Configuration Details, Active on Networks (if template category is Venues), Active on Venues (if template category is Wi-Fi Network), and Applied To.
- Drift Status: Displays the current drift status. If a drift is detected, a Drift Detected hyperlink appears. Clicking the hyperlink opens the Drifts Report sidebar. Refer to Viewing and Syncing Config Template Drifts for more information.
- Configuration Details: The View Configuration hyperlink opens the configuration details page for the selected template and displays all defined parameters and values. When a template is enforced, all fields appear in read-only mode. For non-enforced templates, click Configure to modify editable fields. The View Configuration hyperlink appears only for templates that contain saved configuration data; the hyperlink is inactive when no configuration is available.