Adding and Managing a Custom Privilege Group
- Click Manage My Account to go to the tenant portal for your own account.
- On the navigation bar, select
.The Account Management page is displayed.
- Click the Privilege Groups
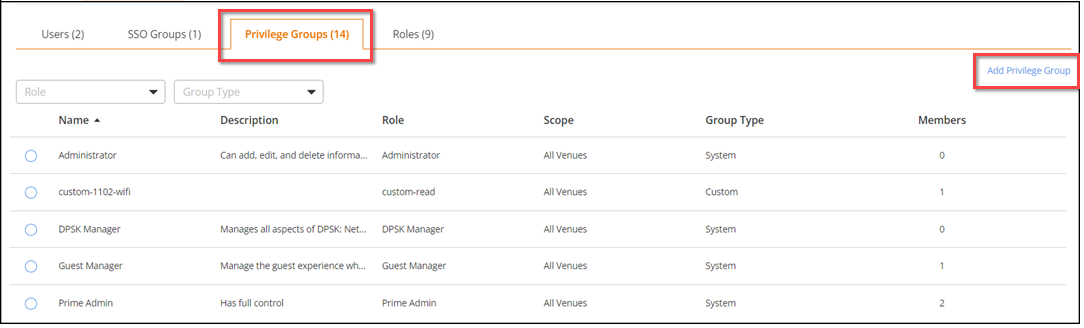
sub-tab.The following information is displayed:
- Name: Displays
the name of the privilege group.
Note: Once a privilege group is created and a member is assigned, the Name cannot be modified; however, other parameters can be edited.
- Description: Displays a description of the privilege group.
- Role: Displays
the system-defined roles and custom roles associated with the privilege
group.
ACX-67279
- Scope: Displays the venues that can be accessed by the members of the group.
- Group Type: Displays whether the group is system-defined or custom.
- Members: Displays the number of administrators or users associated with the group.
You can filter the list of privilege group roles by selecting one of the options from the drop-down menu of the Role and Group Type fields. The role options include Administrator, DPSK Manager, Guest Manager, Prime Admin, Read Only, and all custom roles. The group type options are System and Custom. - Name: Displays
the name of the privilege group.
- Click Add Privilege
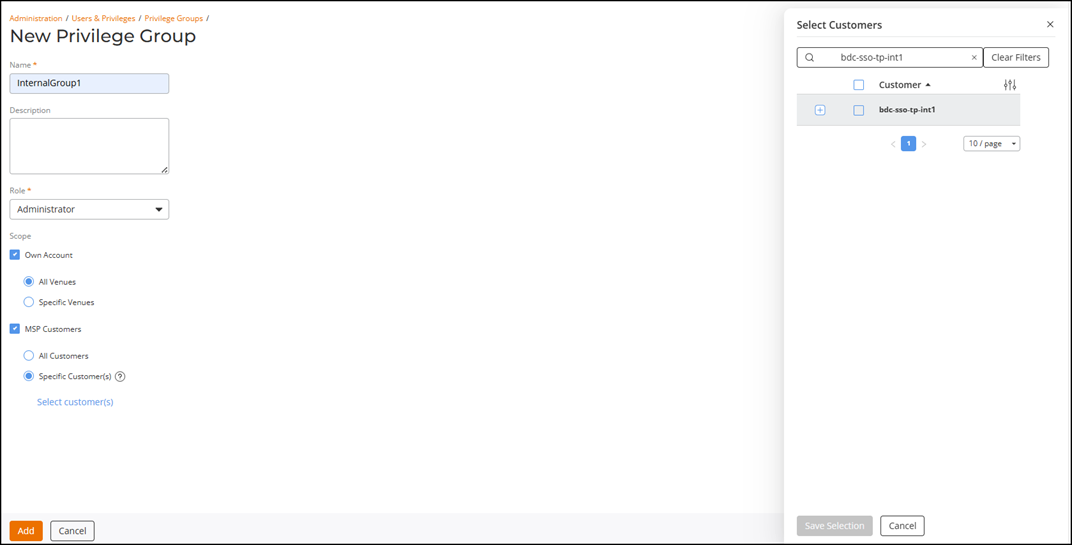
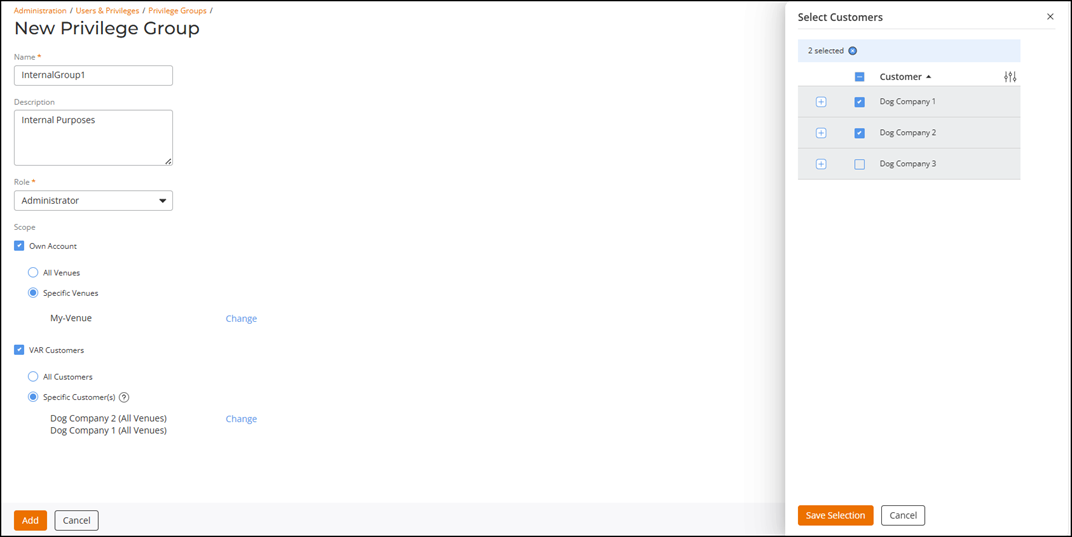
Group.The New Privilege Group page is displayed. Complete the following steps before proceeding to the Scope section:
- In the Name
field, enter the name of the group.
Note: You cannot create a custom privilege group with the same name as a system-defined privilege group. The name must be unique and cannot contain spaces; you can use underscores (_).As per Sanjay Shrivastava
- In the Description field, type a short description for the group.
- From Role, select the system-defined roles or custom roles from the drop-down list.
- In the Name
field, enter the name of the group.
- Scope: Define the venues and customers that this role or
privilege group can access.The Scope section controls what venues or customers a member can see or manage. The assigned scope directly impacts permissions, visibility, and control levels.
Own Account:
The Own Account check box is selected by default. Choose either All Venues or Specific Venues to select one or more venues to manage.
- All Venues: This is the default option. Members of the Privilege Group with this scope can access all venues.
- Specific Venues: Selecting Specific Venues enables the Select venues hyperlink. Click the hyperlink to open the Select Venue sidebar, then select one or more venues using the checkboxes. You can use the Search option to display only the table entries matching the specified venue; enter a minimum of two characters. Click Save Selection to confirm, after which members with this scope can access only the selected venues. Use Change to modify the scope later if needed.
The second check box appears for MSP, Tech Partner, and VAR tenants.
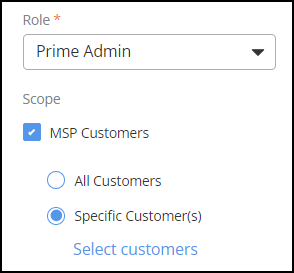
MSP Customers:
When you access the Privilege Groups tab via the MSP Customers page (through Manage Portal or a specific MSP Customer), the MSP Customers check box appears. This allows you to assign the Privilege Group to either all MSP customers or specific customer(s).
- All Customers: This is the default option. Members of the Privilege Group with this scope can access all customers.
- Specific
Customer(s): Selecting Specific
Customer(s) enables the Select
customer(s) hyperlink. Click the hyperlink to open the
Select
Customers sidebar. Select one or more customers using the
checkbox(es). You can click the
 icon to view the sub-options under specific customers.
You can use the Search option to display only the table entries matching the specified customer; enter a minimum of two characters. You can customize which fields appear in the Customers table by clicking the
Click Save Selection. The selected customer(s) are listed below the Specific Customer(s). Members with this scope can access only the selected customer(s). Click Change to modify the scope of customers managed by the member. icon and selecting or deselecting the
desired column names. Optionally, you can click Reset to
default to have the default subset of columns appear in
the Customers table.
icon and selecting or deselecting the
desired column names. Optionally, you can click Reset to
default to have the default subset of columns appear in
the Customers table.
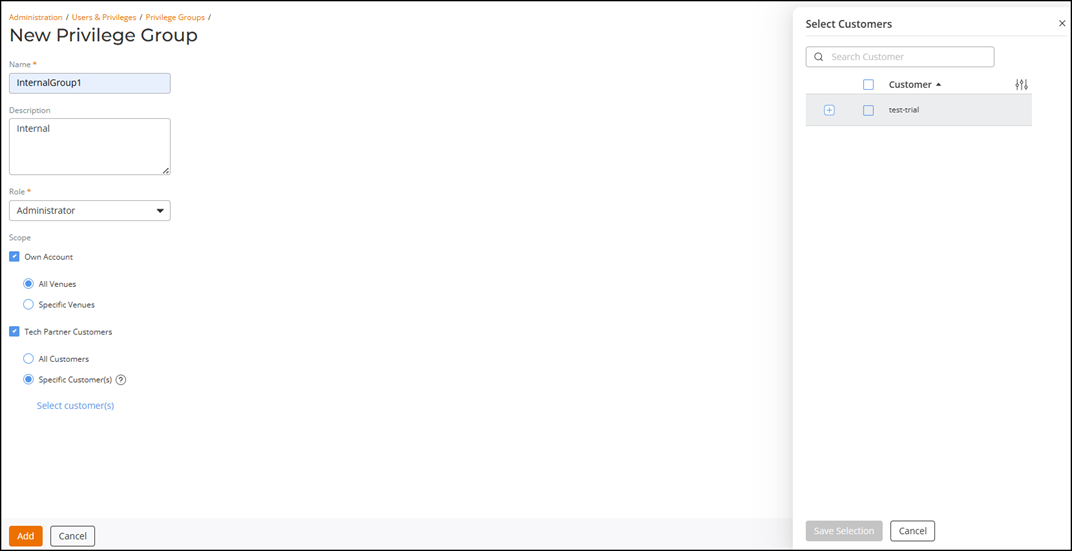
Tech Partner Customers:
When you access the Privilege Groups tab via the Tech Partner page (through Manage Portal or a specific tech partner customer), the Tech Partner Customers check box appears. You can assign the group to all customers or select specific MSP-EC customers under the Tech Partner account. Only customers assigned to the Tech Partner account are available for selection. This ensures the group manages only relevant MSP-EC customers.
- All Customers: This is the default option. Members of the Privilege Group with this scope can access all customers.
- Specific
Customer(s): Selecting Specific
Customer(s) enables the Select
customer(s) hyperlink. Click the hyperlink to open the
Select
Customers sidebar. Select one or more customers using the
checkboxes. You can click the icon to view the sub-options under specific customers.
You can use the Search option to display only the table entries matching the specified customer; enter a minimum of two characters. You can customize which fields appear in the Customers table by clicking the
Click Save Selection. The selected customer(s) are listed below the Specific Customer(s). Members with this scope can access only the selected customer(s). Click Change to modify the scope of customers managed by the member. icon and selecting or deselecting the
desired column names. Optionally, you can click Reset to
default to have the default subset of columns appear in
the Customers table.
VAR Customer:
When you access the Privilege Groups tab via the VAR Customer page (through Manage Portal), the VAR Customers checkbox appears. You can assign the group to all customers or select specific REC customers under the VAR account. Only customers assigned to the VAR account can be selected. This access path ensures the Privilege Group is scoped correctly for VAR-managed customers.
- All Customers: This is the default option. Members of the Privilege Group with this scope can access all customers.
- Specific
Customer(s): Selecting Specific
Customer(s) enables the Select
customer(s) hyperlink. Click the hyperlink to open the
Select
Customers sidebar. Select one or more customers using the
checkboxes. You can click the icon to view the sub-options under specific customers.
You can use the Search option to display only the table entries matching the specified customer; enter a minimum of two characters. You can customize which fields appear in the Customers table by clicking the
Click Save Selection. The selected customer(s) are listed below the Specific Customer(s). Members with this scope can access only the selected customer(s). Click Change to modify the scope of customers managed by the member. icon and selecting or deselecting the
desired column names. Optionally, you can click Reset to
default to have the default subset of columns appear in
the Customers table.
- Click Add.