Configuring a Link Aggregation Group
Complete the following steps to configure a Link Aggregation Group (LAG).
- select Layer 2 >
LAG. You can perform the following actions:
- Add a LAG: Continue to step 2 to configure a new LAG.
- Search and view existing LAGs: To view existing LAGs, follow one of the following methods:
- Edit a LAG: Select an
existing LAG from the list. Select the required ports to add or remove the
ports from the LAG.
Note: You cannot edit the LAG type or the LAG ID from the Web Management Interface.
- Delete a LAG: Select a
configured LAG from the list and select
 . The Delete LAG confirmation dialog box displays.
Select Apply to delete the selected LAG.
. The Delete LAG confirmation dialog box displays.
Select Apply to delete the selected LAG.
- Select
 to
create a new LAG.
to
create a new LAG. - Complete the following fields:
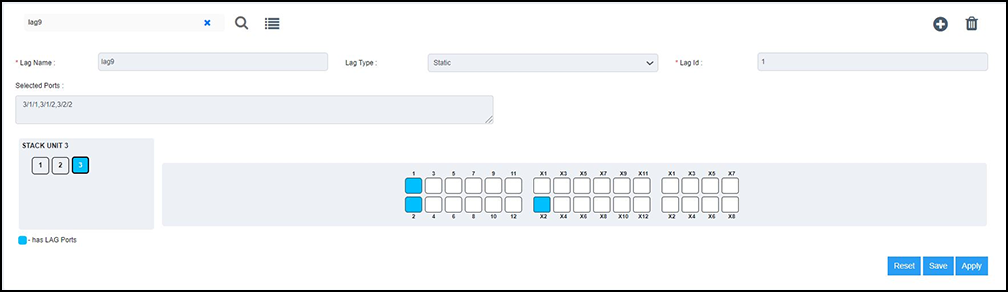
- Lag Name: Enter a name for the LAG. The LAG name can be up to 64 characters in length.
- Lag Type: From the list, select the type of LAG that you want to create:
- Lag Id: Enter an ID for the LAG. The LAG ID parameter is applicable for static and dynamic LAGs only. No explicit configuration of a LAG ID is allowed for keep-alive LAGs.
- Add ports to the LAG by
performing the following actions:
- Select a unit ID box in the STACK UNIT panel to view the corresponding port panel of the stack unit.
- Select the ports that
you want to add to the LAG from the ports panel.The ports that are added to the LAG display in the Selected Ports panel. To remove a port, select the port again on the ports panel.The color code of the stack unit indicates that the ports of that unit are associated with the LAG. The color of the ports in the ports panel indicates that the ports are part of the LAG.
- Select to apply the LAG configuration to the device.
 to the configured LAGs are displayed
in a list. Select a LAG to view the configuration details.
to the configured LAGs are displayed
in a list. Select a LAG to view the configuration details.