Adding and Managing a SAML Identity Provider Profile
You can associate a SAML Identity Provider
(IdP) with Captive Portal settings, providing secure authentication for Wi-Fi users
and
administrators and ensuring seamless user access.
- From the navigation bar, select .
- In the My
Services page, click the Identity Provider
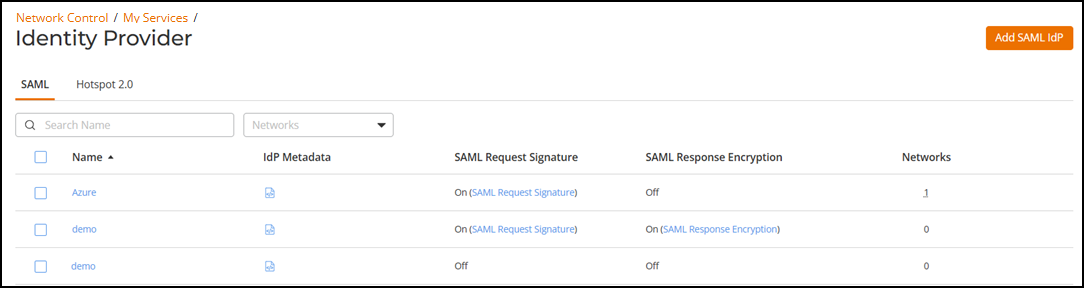
tile. By default, the SAML tab is displayed with the
following information:
- Name: Displays the name of the SAML Identity Provider profile.
- IdP
Metadata: Displays the IdP metadata that is provided by
the identity provider. Click on the
 icon to view the IdP metadata.
 - SAML Request Signature: Displays whether the SAML request signature option is on or off. If it is on, then you may click the blue SAML Request Signature link to view more details.
- SAML Response Encryption: Displays whether the SAML response encryption is on or off. If it is on, then you may click the blue SAML Response Encryption link to view more details.
- Networks: Displays the number of networks associated with a SAML IdP profile. Pause your cursor over the network number to view more details.
You can filter the list of profiles by network name and sort the SAML table by clicking on the column headers. By default, the table is sorted alphabetically by IdP profile name.
- To add a new identity provider,
select . Alternatively, You can click on . The Service Catalog page is displayed.
- Select Identity Provider and click Add.
- Click Next.
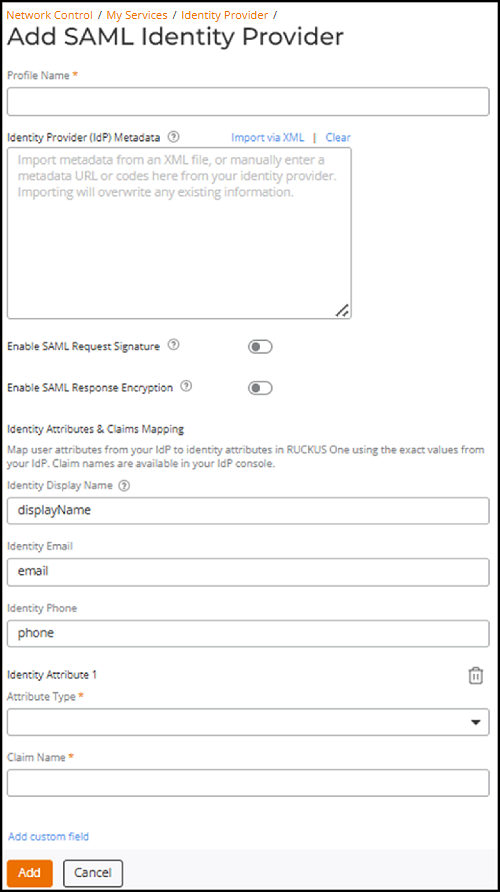
- Enter a profile name.
- In the Identity Provider (IdP)
Metadata field, enter the IdP metadata URL provided by your
identity provider, or paste the XML codes from your identity provider, or click
Import via
XML to import metadata from an XML file. Importing will
overwrite any existing information. Click Clear to enter
the metadata again.
For more information on how to get the IdP metadata, refer to Configuring SAML SSO with Azure AD.
- (Optional) Toggle Enable SAML Request Signature to enable RUCKUS One to digitally sign and validate SAML authentication requests to an external IdP, ensuring data integrity and protection against unauthorized access. Select a signing certificate from the drop-down list or click Generate a signing certificate to generate a new signing certificate (refer to Adding a Certificate Authority and Generating Server and Client Certificates).
- (Optional) Toggle Enable SAML Response Encryption to enable SAML response encryption in your IdP setup for additional security. Select a server encryption certificate from the drop-down list or click Generate an encryption certificate to generate a new encryption certificate (refer to Generating Server and Client Certificates)).
- (Optional) In the Identity Attributes & Claims Mapping section, enter the identity display name, identity email, and identity phone number to map user attributes in RUCKUS One using the exact values from your IdP. The claim names are available on your IdP console.
- (Optional) Click Add custom field, select an attribute type from the drop-down list and enter a claim name. If you want to enter another attribute name and claim name, click Add custom field again.
- Click Add.
- (Optional) Manage existing SAML
IdP profiles as necessary. On the SAML tab, click the
checkbox for a specific profile and perform any of the following actions:
- Click Edit to edit the SAML IdP profile. Alternatively, you can click on the SAML IdP profile, then on the Details page, click Configure.
- Click Download SAML Metadata to download the SAML metadata file and provide it to your identity provider. Alternatively, you can click on the SAML IdP profile, then in the Details page, click Download SAML Metadata.
- Click Delete to delete the SAML IdP profile. Note that you cannot delete a profile that is associated with a network.