Adding and Managing a RADIUS Server
Before you begin this procedure, ensure that you have the IP address, port number, and shared secret of the primary and secondary (if any) RADIUS server that you want to use to authenticate network users.
Complete the following steps to create a RADIUS Server profile:
- Add the RADIUS Server service to your tenant account. From the navigation bar, select . Alternatively, you can select , then click Add Service.
- Find the RADIUS Server tile and click Add.
- Enter a Profile Name for the RADIUS server.
- Select the Type of RADIUS
server to configure. The options are:
- Authentication RADIUS Server: Selecting this option enables the wireless device to send authentication requests to the RADIUS server to verify user credentials and allow or deny network access.
- Accounting RADIUS Server: Selecting this option enables the wireless device to send accounting information to the RADIUS server to record user login, logout, and usage details of the authenticated user.
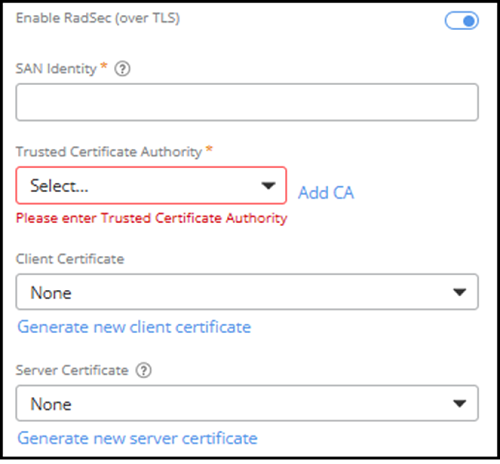
- Toggle the Enable RadSec (over
TLS) switch on to enable this feature. Enabling RadSec ensures
secure and reliable transport and encryption of RADIUS protocol traffic over
TLS. When enabled, the RADIUS Server communicates over port 2083 by default. This
option is disabled by default. Complete the following configuration to finish
the setup.RadSec (ACX-71997)
- CN/SAN
Identity: Common Name (CN) or Subject Alternative Name
(SAN) is used to verify the identity of the RADIUS server. Enter the CN
or SAN value that matches the server certificate to ensure the
connection is established with the intended server.
ACX-71997- Shared by Cecil
- Trusted Certificate Authority: Issues and verifies the server certificates. Select a Certificate Authority from the drop-down list or click Add CA to add a new Certificate Authority. Refer to Adding a Certificate Authority for more information.
- Client
Certificate: Authenticates this RADIUS proxy to the
remote AAA server when establishing outbound RadSec connections for
authentication and accounting requests. Select a client certificate from
the drop-down list or click Generate new client
certificate to add a new client certificate. Refer to
Generating Server and Client
Certificates.
ACX-71997- Shared by Cecil. deleted OCSP Validation: Enabling OCSP Validation ensures that the certificate is still valid and has not been revoked. By default, OCSP Validation is disabled. Toggle the switch on and in the OCSP URL field, enter an Online Certificate Status Protocol (OCSP) URL to check the revocation status of the server certificate.
- Server
Certificate: Authenticates this RADIUS proxy to external
AAA servers when accepting inbound CoA (Change of Authorization)
requests over RadSec. Select a server certificate from the drop-down
list or click Generate new server certificate to add a new server
certificate. Refer to Generating Server and Client
CertificatesNote: When establishing a RadSec connection for sending Change of Authorization (CoA) requests, the client must include the Server Name Indication (SNI) extension in the TLS
ClientHello.The SNI value must match the hostname specified in the server certificate (CN or SAN). This is required to ensure successful TLS certificate validation and proper server certificate selection during the TLS handshake. Failure to provide a matching SNI may result in TLS handshake failures or certificate validation errors.
ACX-71997- Shared by Cecil; ACX-120170- Note on CoA
- CN/SAN
Identity: Common Name (CN) or Subject Alternative Name
(SAN) is used to verify the identity of the RADIUS server. Enter the CN
or SAN value that matches the server certificate to ensure the
connection is established with the intended server.
- Select the Server Address
Type. Options include IP address and
FDQN.ACX-100471Note: FQDN is only supported when Proxy Service is enabled on the WLAN.Note: If FDQN is selected, both the primary and secondary FQDNs must resolve to valid IP addresses. If either FQDN fails to resolve, the configuration will be rejected, even if the other server is valid.
- Select IP Address.Configure the following RADIUS Server settings:
- Select FQDN.Configure the following RADIUS server settings:
- FQDN:
Enter the FQDN of the primary RADIUS server.Note: When the network selects a RADIUS Server for authentication or accounting, specifying an FQDN in the primary address field automatically enforces proxy mode. FQDN is supported only when Proxy Service is enabled on the WLAN.
- Port:
Enter the listening port number for the primary RADIUS server.Note: The default port for the Authentication RADIUS Server is 1812, and for the Accounting RADIUS Server is 1813.
- Shared Secret: Enter the shared secret configured on the RADIUS Server.
- (Optional) Secondary
Server: Click Add Secondary
Server to display the secondary server settings.
- FQDN: Enter the Fully Qualified Domain Name
(FQDN) of the secondary RADIUS Server.
Note: When the network selects a RADIUS Server for authentication or accounting, specifying an FQDN in the secondary address field automatically enforces proxy mode.
- Port: Enter the listening port number.
Note: The default port for the Authentication RADIUS Server is 1812, and for the Accounting RADIUS Server is 1813.
- Shared Secret: Enter the shared secret configured on the RADIUS Server.
- FQDN: Enter the Fully Qualified Domain Name
(FQDN) of the secondary RADIUS Server.
- FQDN:
Enter the FQDN of the primary RADIUS server.
- Add user roles. In the
User Role
Mapping section, click Add Role
Mapping.The Create User Role Mapping sidebar is displayed.
- Enter a value in the
Group
Attribute Value field.
This value may comprise any string of characters, but it must match the Filter-ID attribute value defined in the RADIUS authentication server. When a client is authenticated to access the network, your RADIUS Server sends the Filter-ID attribute in its reply to the AP, indicating what type of user is attempting to access the network.
For example, if your RADIUS Server is configured to mark students with the Filter-ID of 10, enter 10 in the Group Attribute Value field and select Student as the User Role. When a student accesses the network, the system receives Filter-ID: 10 in the Access-Accept message and automatically applies the Student user role.
If you are unsure of the Filter-ID values defined in your RADIUS Server, the look at the configuration on your AAA RADIUS Server.
- Select a User Role
from the drop-down list.
If a user role is not yet defined, you can create a new one; click Add, complete the fields in the Add User Role sidebar, and click Add. You can then select the newly created user role from the User Role drop-down. Refer to Adding User Roles for more information.
- Click Create to save the user role mapping.
- To manage role mappings, select a role mapping configuration, and click Edit or Delete.
- To reorder the priority
of user roles, drag and drop the specific user role up or down using the
 icon in the far right side of the
table.
ACX-97403 - RBAC Dot1x Group Attribute Mapping
icon in the far right side of the
table.
ACX-97403 - RBAC Dot1x Group Attribute Mapping
- Enter a value in the
Group
Attribute Value field.
- Click Add.The new RADIUS Server is created and displayed in the RADIUS Server page.