Adding and Managing a Switch Access Control Policy
- From the navigation bar, select
.The My Services page is displayed.
- In the My Services page, click the Access Control tile. By default, the Wi-Fi tab and Access Control Set sub-tab are displayed. Alternatively, in the My Services page, click Add Service, select Access Control, and click Add.
- Select the
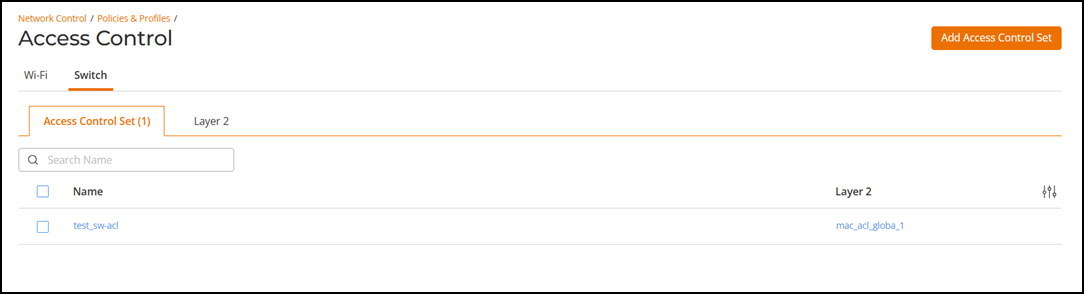
Switch tab.By default, the Access Control Set sub-tab is displayed with the following information:
- Name: Displays the Access Control Set name. Click on the policy name to view more details.
- Layer 2: Displays the Layer 2 policy. Click on the policy name to view more details.
You can either create a switch Access Control Set first, then apply a Layer 2 policy, or create a Layer 2 policy first, then associate a switch Access Control Set.
- Select the Layer 2 sub-tab.The following information is displayed:
- ACL Name: Displays the name of the Layer 2 policy.
- Rules: Displays the number of rules configured for the Layer 2 policy. Pause your cursor over the number to view more details.
- Switches: Displays the number of switches associated with the Layer 2 policy. Pause your cursor over the number to view more details.
- Venues: Displays the number of venues associated with the Layer 2 policy. Pause your cursor over the number to view more details.
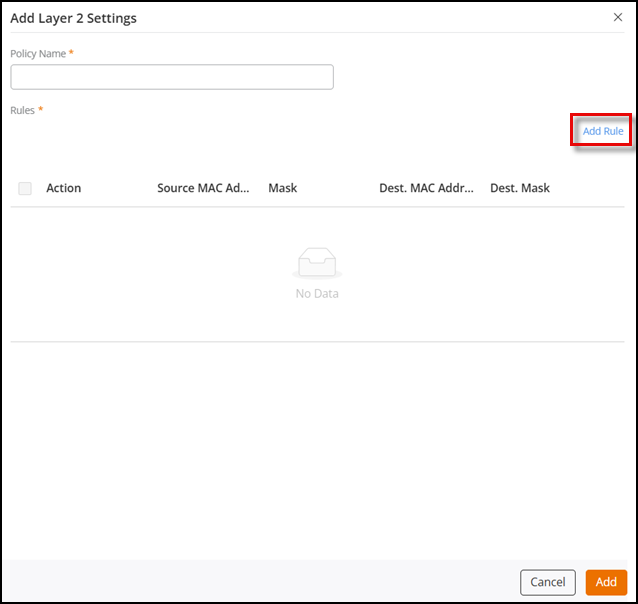
- Click Add Layer 2 Policy and configure the following
settings:
- Enter a Layer 2 policy name.
- Under Rules, click Add
Rule. The Add Rule sidebar is displayed.
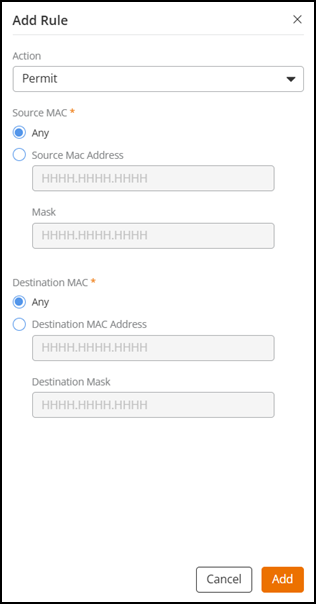
Configure the following settings:
- For Action, select a Layer 2 policy rule (Permit or Deny).
- For Source MAC, select Any or Source MAC Address to enter a source MAC address and mask. The mask is used to define a range of MAC addresses. The mask comprises 0 and f characters. In each bit position, an f means that the bit is not checked, and a 0 means that the bit must equal the value in the defined MAC address. For example, mask 0000.0000.0000 matches only the defined MAC address, whereas mask ffff.ffff.ffff matches all MAC addresses.
- For Destination MAC, select Any or Destination MAC Address to enter a destination MAC address and destination mask.
- Click Add. You can see the new Layer 2 policy rule
added in the Rules table.
Optionally, you may select a specific Layer 2 policy rule and click Edit or Delete to perform the edit or delete operations, respectively.
- Click Add to save the new Layer 2 MAC ACL policy.
- (Optional) Click the
Access Control Set sub-tab, then clickAdd Access Control
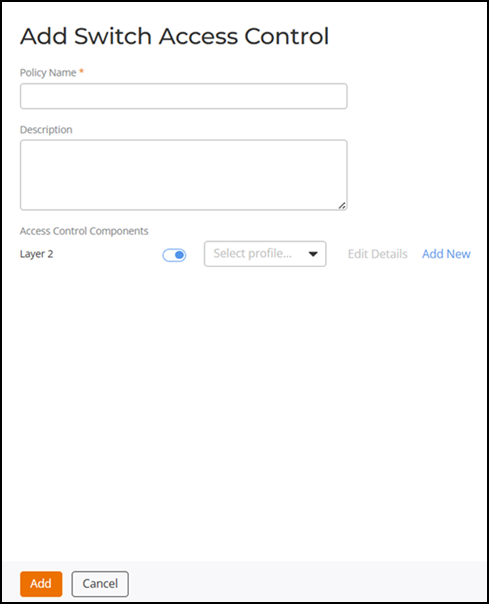
Set. The Add Switch Access Control page is
displayed.
- Enter a policy name and optionally enter a description.
- Under Access Control Components, toggle the Layer 2 option and select an existing Layer 2 policy from the drop-down list or click Add New to create a new Layer 2 policy. Click Edit Details to edit the Layer 2 policy details. Alternatively, select the Layer 2 sub-tab, then click Add Layer 2 Policy to create a new Layer 2 policy.
- Click Add to add the Access Control Set.
You can see the ACL set added to the Access Control Set table.
You can search for an ACL set using its name. Enter the full or partial policy name; all matching entries are displayed.
You can see the Layer 2 policy added to the Layer 2 table. Pause the cursor over the row entries in the Rules, Switches, and Venues columns to view more details.
You can search for a Layer 2 policy using its name. Enter the full or partial policy name; all matching entries are displayed.
- (Optional) From the list of existing Access Control Sets or Layer 2 policies in the Access Control Set or Layer 2 tables, click the checkbox for a specific policy and perform the following actions:
- (Optional) Click on a specific Layer 2 policy to view the Layer 2 configuration details page. The Overview tab displays the MAC ACL applied to the switch except the customized MAC ACLs. The Rules tab displays the rules of the MAC ACL.