Managing a Switch LAG
You can manage a Link Aggregation Group
(LAG) for a specific RUCKUS ICX switch, including adding, editing, and deleting
a
LAG.
- On the navigation bar, click .The Switches page is displayed.
- Click the name of a specific
switch.The Overview page is displayed.
- Select the Ports sub-tab.
- Click Manage LAG.The Manage LAG sidebar is displayed.
- Click Add LAG to add a
new LAG.The Add LAG dialog box is displayed.Note: After a LAG is created, its member ports are grayed out and cannot be edited or configured individually. Any configuration must be performed through the LAG interface.
- Enter the name of the LAG in the LAG Name field.
- Select the Type as either Static or Dynamic.
- From the Ports Type drop-down list, select one of the following:
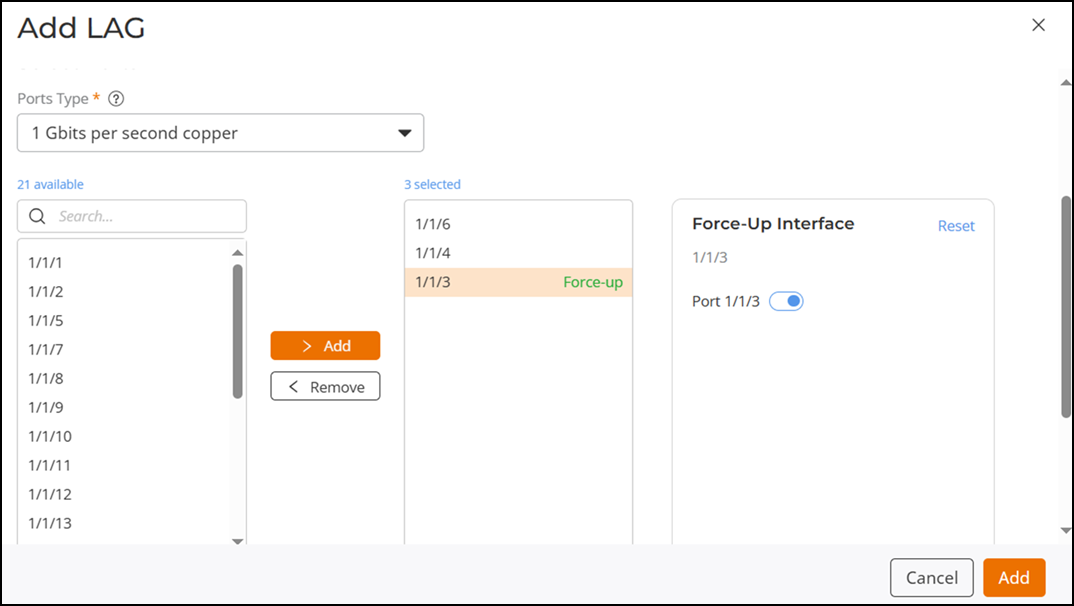
- Select the ports to include in the LAG from the available list, and click > Add.
- (Optional) Select a port within
the selected list and the Force-Up Interface
setting becomes available. Toggle the Force-Up Interface
switch on to enable the feature; Force-Up
Interface is disabled by default.
The label Force-up appears next to the selected port in the list after the toggle switch is enabled. This indicates that the port is configured to stay active even if no physical link is detected or before LACP negotiation, and it will serve as the Force-Up Interface for the dynamic LAG.
Note: The Force-Up Interface feature is available only for Dynamic LAGs and only one port can be designated as the Force-Up interface.Note: If you add a Ports Type interface to LAG members and enable the Force-Up setting without applying the changes, modifying the Ports Type clears the current LAG member configuration, including the Force-Up setting.Optionally, click Reset to clear the current selection and assign the Force-Up Interface to another port.
- Click Add to save and exit the Add LAG dialog box.
- (Optional) Perform the edit and delete actions from the Manage LAG sidebar:
- Click OK to exit the Manage LAG sidebar.
 icon. In the
  icon. A confirmation message is displayed.
Click
icon. A confirmation message is displayed.
Click