Adding APs in Bulk
RUCKUS One
provides a bulk import function, allowing you to add multiple access points (APs)
to RUCKUS One using a single, downloadable CSV template file.
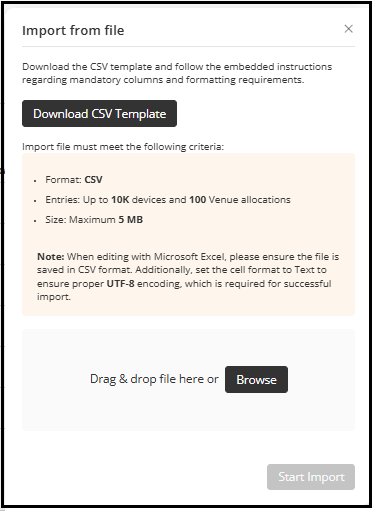
Note: The import file must be in CSV format,
contain no more than 10,000 APs, include a maximum of 100 venue allocations (the
venues must already exist in the system), and be no larger than 5 MB.
Refer to for information about CSV
formatting, validation rules, and import requirements.ACX‑98088 – AP Device Import Enhancements. The Target Venue step
has been removed, and the workflow has been fully updated starting from step
3 –
Download CSV Template.
- On the navigation bar, select
.The Access Points page is displayed.
- In the upper-right corner, click
Add
and then click Import
APs. The Import from file sidebar is displayed.ACX-96138 - Bulk import flow has been fully updated to support cross venues import. (Chen, Sharon)
- (Recommended) Click Download CSV Template to download the CSV template to your local machine.
- Open the downloaded template
file on your local device, enter the following details and save the file. Note: You can edit the CSV file using Google Sheets, Microsoft Excel, or Apple Numbers.
- AP Name: Enter the name to be assigned to the AP.
- (Optional) Description: Enter a short description to be assigned to the AP.
- Serial Number: Enter the serial number of the AP.
- Venue: Enter the venue name.
- (Optional) AP
Group: Enter the AP group name.
Replaced "If the AP is part of an AP group, enter the AP group name. "with "Enter the AP group name." ACX-97844
- (Optional) Tags: Enter one or more AP tags.
- (Optional) Latitude: Enter the latitude coordinate ranging between -90 to 90 degrees.
- (Optional) Longitude: Enter the longitude coordinate ranging between -180 to 180 degrees.
- (Optional) Global Untagged VLAN ID: Allows you to define a VLAN ID that is automatically applied to all downstream access ports when an access point connects to the cloud. This ensures consistent VLAN tagging across the network without requiring manual configuration for each port.
- In the Import from file sidebar, drag-and-drop the CSV file into the upload area, or click Browse to select the file.
- Click Start Import.
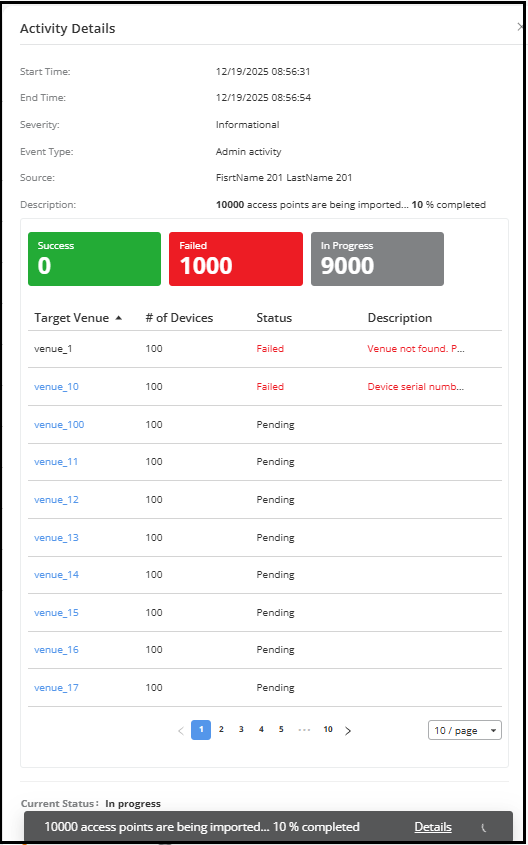
- Click the Details link to
view the Activity Details
sidebar.Note: The toast notification remains on the screen until all import activities are complete.
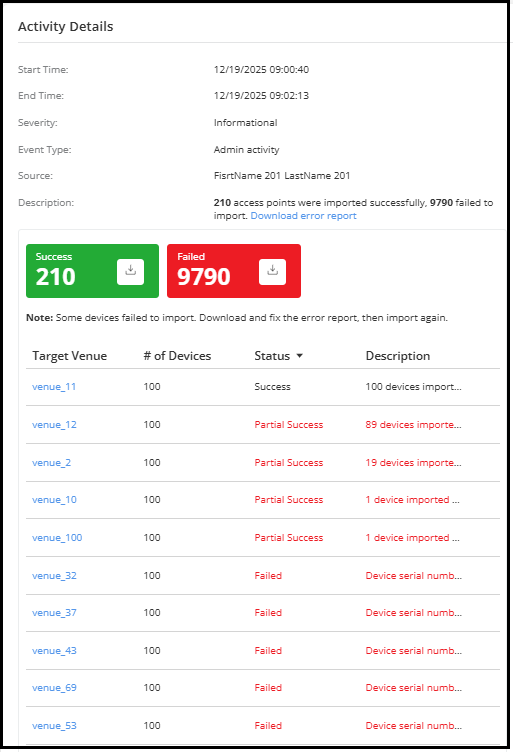
The Activity Details sidebar continuously refreshes, displaying the following information:
- The sidebar displays the Start Time, End Time, Severity, Event Type, Source (the user who performed the import), and Description. While in-progress, the description shows the number of APs being imported and the overall completion percentage. After all import activities are completed, the description displays the final numbers of successful and failed AP imports, and includes the Download Error Report link if failures occurred.
- Success: Displays a green panel showing how many APs were imported successfully.
- Failed: Displays a red panel showing how many APs were not imported.
- In Progress: Displays a gray panel showing how many APs are still processing.
- Target Venue: Displays import results for each venue included in the CSV file. Venue names appear as clickable links if they are accessible to you.
- # of Devices: Displays the number of APs associated with the venue.
- Status: Indicates the outcome or progress of AP import tasks for each venue. Status includes Success, Failed, Partial Success, In Progress, and Pending.
- Description: Displays a brief explanation when the target venue has a single error. When multiple records have validation errors, it summarizes the number of successful and failed imports instead of listing individual error messages.
- Current Status: Indicates the system-level status of the bulk AP import operation.
- Processing Timeline: Displays the sequence and status of system operations involved in completing the bulk AP import. It includes timestamps for each step, indicates statuses like In Progress, Success, Partial Success, or Failed.
- (Optional) You can download the
success report by clicking the
 icon on the Success panel. Similarly, you can download the error report by
clicking the Download
Error Report link in the Description field
or the icon on the Failed panel.
icon on the Success panel. Similarly, you can download the error report by
clicking the Download
Error Report link in the Description field
or the icon on the Failed panel.