Working with Data Plane Groups
Creating a Data Plane Group
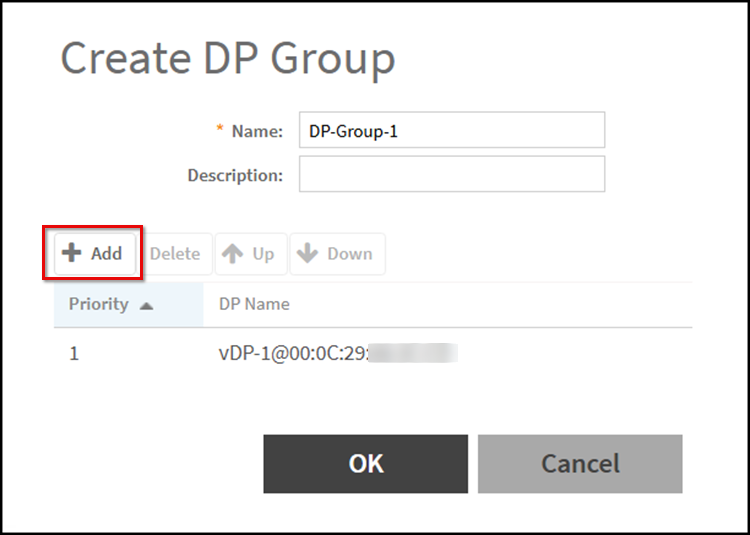
Complete the following steps to create a DP group.
Editing or Deleting DP Groups
You can edit or delete a DP group. Complete the following steps to edit or delete a DP group.
- From the controller web GUI, select .
- Select the DP Group from the list and click Configure or Delete, respectively.
Removing a Data Plane from a DP Group
To remove a Data Plane from a DP Group, ensure you clear DHCP or NAT license assignments. The AP tunnels failover to the remaining DPs in the DP Group.
- Remove the DP from any DHCP or NAT license assignments:
- Delete the DP from the DP Group.
Note: At least one DP must remain in each DP Group; you cannot remove all DPs from a group.
Verifying DP Version Match
Verify version alignment to ensure all Data Planes in a DP Group run the same software release; SmartZone requires the same vSZ‑D version within a group for consistent AP/DP operation.
Complete the following steps to verify the DP Group version match:
- From the controller web GUI, select .
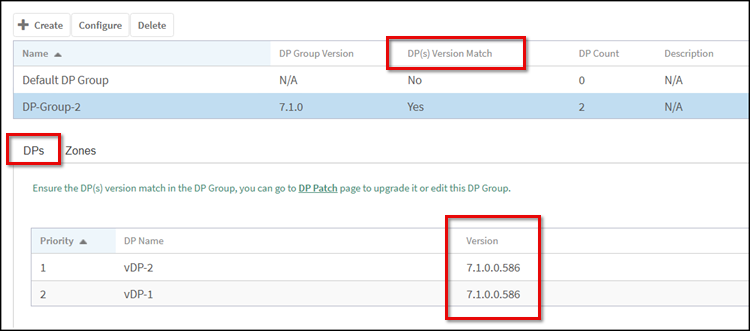
- In the DP Group list, check the DP(s) Version Match column—Yes indicates all DPs share the same version, No indicates a mismatch.
- Select a DP Group and scroll to the DPs tab to verify the version of the DP.
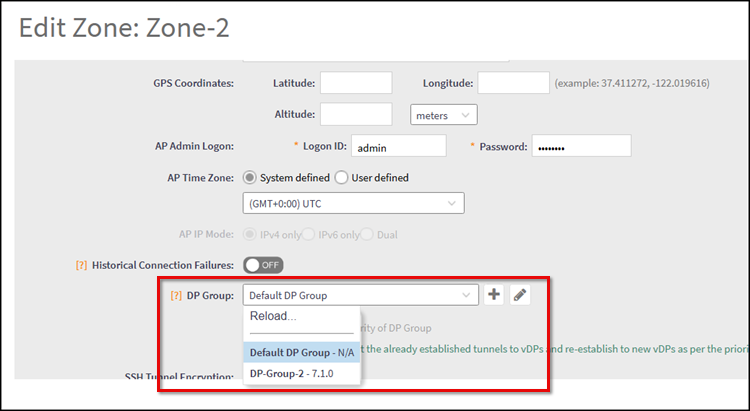
Associating a Data Plane Group with a Zone
Associating a Data Plane Group with a Zone defines which Data Planes handle traffic for the APs in the zone. APs in that zone establish tunnels to group members by priority and health, enabling tunneled WLANs when configured.
Complete the following steps to associate a Data Plane Group with a Zone.
- In the controller web UI, select to open the Access Points page.
- Do one of the following:
- In the Zone General
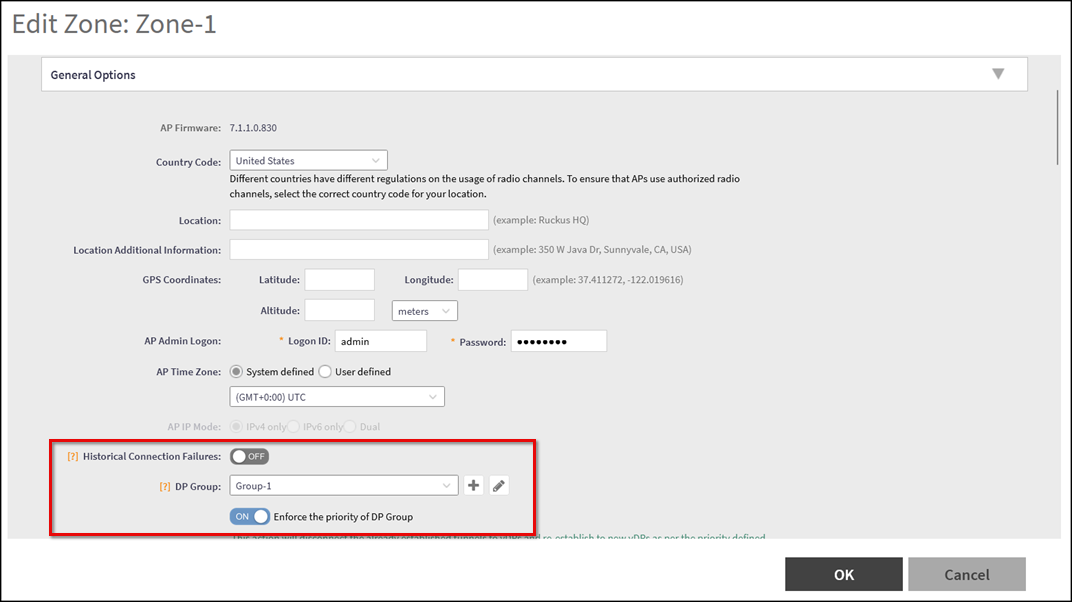
Options section, for DP Group, select the
desired Data Plane Group from the drop-down list.
- To create a new group, click
 .
- To edit the selected group, click
 . For configuration details, refer to
Working with Data Plane Groups.
- To create a new group, click
- (Optional) Toggle on the Enforce the priority of
DP Group option if you want to enforce priority order for
tunnel establishment. When Enforce the Priority of DP Group is enabled, APs
always attempt the first DP in the list. If it is unavailable, they failover
to the next DP in order.
Attention: Enabling this option disconnects any already established tunnels to virtual Data Planes (vDPs) and re-establishes tunnels according to the priority defined in the selected Data Plane Group. For more information related to DP priority enforcement, refer to DP Node Affinity and Failover in DP Groups.
- Click OK to save the changes.
The Data Plane Group is now associated with the Zone, and APs begin forming tunnels with the Data Planes in the group.
Verifying the Zones Assigned to the DP Group
Verify which Zones are associated with a DP Group to ensure APs connect as intended and to maintain proper traffic distribution.
Complete the following steps to verify the Zones for a DP Group:
- From the controller web GUI, select .
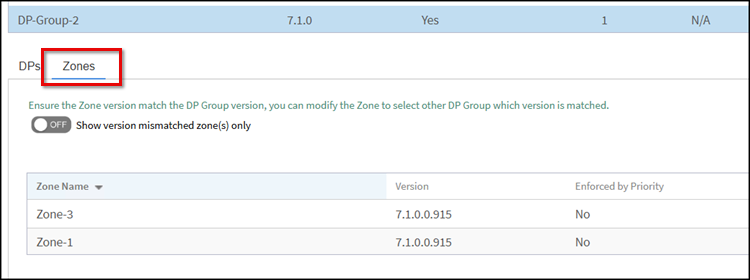
- Select a DP Group and scroll
to the Zones tab to
confirm the Zone assignments.
APs belonging to the Zones in the list will form RUCKUS GRE tunnels with the DPs in the selected DP Group.
Modifying the DP Group Associated with a Zone
All the APs in a Zone form RUCKUS GRE tunnels with the DPs in the selected DP Group for the Zone.
Complete the following steps to modify the DP Group associated with a Zone:
- From the controller web GUI, select or .
- Select the Zone you want to
edit and click .
The Edit Zone: window opens.
- In the General
Options section, select the DP Group from the DP Group
drop-down menu.
Alternatively, click
to edit the DP Group or to create a new DP Group without leaving
the Edit Zone:
window. - Optionally, enable the toggle
Enforce the
priority of DP Group to force the APs to connect to the
first DP listed in the DP Group and failover to the next DP in the list in
case the first DP becomes unreachable.
Note: For more details regarding Priority Enforcement, refer to DP Node Affinity and Failover in DP Groups.
- Click OK.
DP Node Affinity and Failover in DP Groups
DP Node Affinity defines how APs prefer a specific Data Plane within a DP Group and how the controller redistributes tunnels during failures. Consider the DP Group as an ordered list from which APs choose a DP to which they connect. You can order DPs and, if needed, enforce that order so APs always try preferred DPs first, resulting in two different modes of operation:
- Load-Balanced Mode (Default): The controller distributes AP tunnels across all available DPs in the group. If a DP fails, APs automatically reconnect to another DP without preference.
- Priority-Enforced Mode: When Enforce the Priority of DP Group is enabled, APs always attempt the first DP in the list. If it is unavailable, they fail over to the next DP in order.