Creating an IPsec Profile
- In the controller web UI, select .
- Click Create. The Create IPsec Profile dialog box is displayed.
- Under General Options,
configure the following:
- Name: Enter a name for the profile.
- Description: Enter a description for the profile.
- Security Gateway: Enter the IP address or fully-qualified domain name (FQDN) of the IPsec server. If you use the IP address, the IP address format that you must enter will depend on the IP mode that is configured on the controller (IPv4 or IPv6).
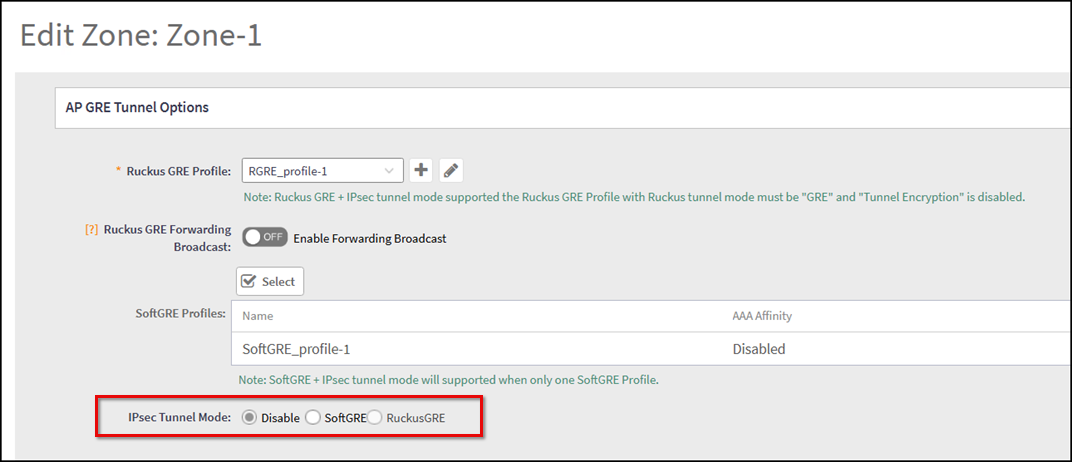
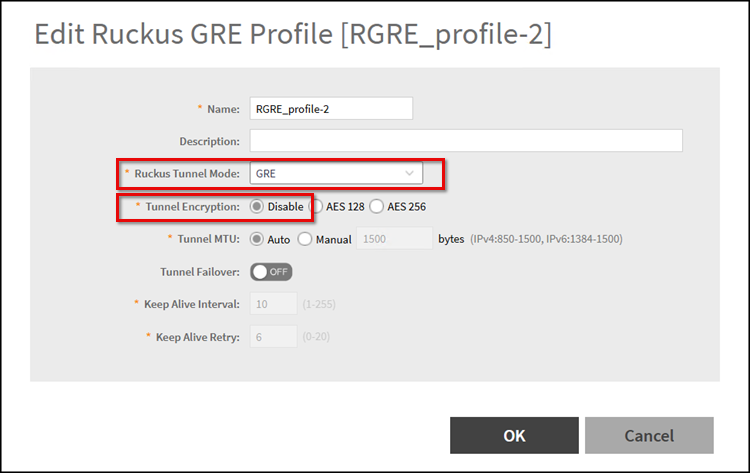
- Tunnel Mode: Select SoftGRE or RuckusGRE.
- IP Mode: Select IPv4 only or IPv6 only. This setting determines which IP protocol version the IPsec tunnel uses for communication. Choose IPv4 only for networks that use IPv4 addressing or IPv6 only for networks that use IPv6.
- The remaining configuration
options depend on whether you select SoftGRE or
RuckusGRE as the tunnel mode.To complete the configuration, refer to one of the following topics:
Configuring an IPsec Profile for SoftGRE Tunnels
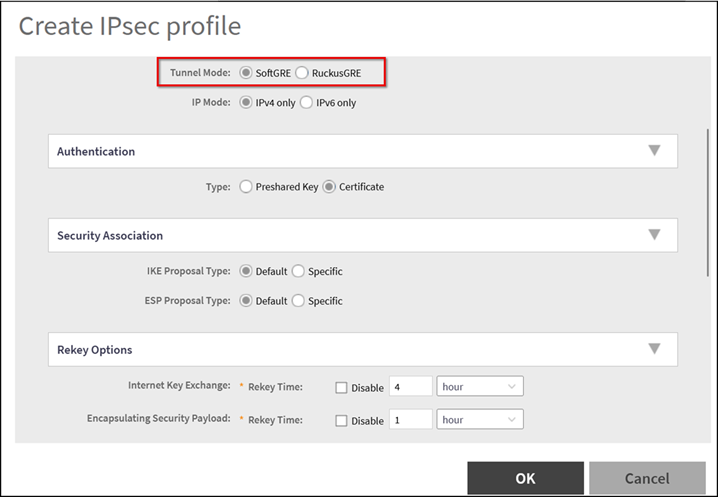
- In the Create IPsec Profile dialog box, select SoftGRE as the tunnel mode.
- For IP Mode, select IPv4 only or IPv6 only. This setting determines which IP protocol version the IPsec tunnel uses for communication.
- Under Authentication, choose one of the following types:
- Preshared Key. Use a preshared key (PSK) for authentication. The PSK you enter must be 8 to 128 ASCII characters.
- Certificate. Use an X.509 certificate from a certificate authority (CA) or registration authority (RA) server. The controller uses the CMPv2 protocol to obtain the signed certificate from the CA or RA server. For more information about certificate validation, refer to Data Plane Certificates.
- Under Security
Association, set the IKE Proposal
Type and ESP Proposal
Type fields to one of the following:
- Default: Uses system-defined proposals.
- Specific: Uses custom configuration. Refer to Configuring Specific IKE and ESP Proposals for SoftGRE Tunnels.
- Under Rekey
Options, configure the following options:
-
Internet Key Exchange. The Internet Key Exchange (IKE) Rekey Time setting controls how often the system renegotiates the keys used to secure the IKE phase of your VPN tunnel. Enter a value and select the unit (day, hour, or minute). To disable automatic rekeying, select the Disable checkbox.
- Encapsulating
Security Payload. The Encapsulating Security Payload (ESP)
Rekey Time setting controls how often the system
renegotiates the keys for encrypting and authenticating data packets
in the tunnel. Enter a value and select the unit (day, hour, or
minute). To disable automatic rekeying, select the Disable
checkbox.
Attention: Regular rekeying helps maintain security by replacing old keys with new ones at set intervals. If disabled, the system will not automatically renegotiate IKE or ESP keys, instead, it will use the same key until manually reset or the session ends, which may reduce security if the key is exposed.
-
- Under Advanced
Options, configure the following options:
- DHCP Option 43 Sub
Code for Security Gateway: Devices use the DHCP Option 43
subcode to discover the address of the security gateway. Keep the
default subcode (7) unless your network requires a different subcode for
gateway discovery.
Attention: Devices may fail to locate the gateway if the subcode does not match your network configuration.
- Retry Limit: Set the number of times that the controller will attempt to discover the address of the security gateway. The default retry count is 5. Accepted values are 1 through 16. Increase the limit to improve connection reliability; decrease to reduce network traffic. Disable the retry functionality by clicking the Disable checkbox. If disabled, the controller will not attempt to discover the address of the security gateway after the first failed attempt.
- Replay Window: This setting defines how many data packets the system tracks to protect against replay attacks. A replay attack occurs in the Encapsulating Security Payload (ESP) phase when an attacker intercepts and resends valid data packets to disrupt or compromise the connection. A larger replay window allows the system to accept packets that arrive out of order, which can happen in busy or unstable networks. This helps prevent legitimate packets from being rejected. A smaller window uses less memory but may drop valid packets if they arrive out of order. If disabled, the system will not check for duplicate or replayed packets, which can expose your tunnel to security risks.
- IP Compression:
Enables IP Payload Compression Protocol (IPComp) before encrypting
traffic in the VPN tunnel. Use this option to reduce the size of data
packets, which can improve bandwidth efficiency, especially on slow or
congested links.
Attention: Enable only if both ends of the tunnel support IPComp and your network benefits from reduced packet size.
- Force NAT-T: Network Address Translation Traversal (NAT-T) ensures that VPN traffic can pass through NAT devices without being blocked. When enabled, this option enforces UDP encapsulation for ESP packets, which is required for NAT-T. Enable this option if devices are behind a NAT device, such as a firewall or router.
- Dead Peer
Detection: Monitors the health of the remote VPN peer using
periodic checks. If the peer becomes unreachable, the system can quickly
terminate or renegotiate the connection. If disabled, the system does
not check peer status; failed connections may persist until manually
reset. As a best practice, enable this setting for reliable VPN
operation unless troubleshooting requires it to be off.
Note: When you clear the Disable checkbox for Dead Peer Detection, the Delay field becomes available. This field defines the interval in seconds between Dead Peer Detection probes that check if the peer is still active. The range is 1 to 65536 seconds. A shorter delay detects failures faster but increases probe traffic, while a longer delay reduces traffic but may take more time to identify a dead peer.
- NAT-T Keep Alive Interval: Sets how often the system sends keepalive messages to maintain NAT mappings. NAT devices may close idle connections. Sending regular keepalive messages prevents this, ensuring the VPN tunnel remains open. Enter a value (in seconds) to set the keepalive interval for NAT traversal. By default, this option is enabled and the interval set to 20 seconds. Accepted values are 1 to 65536. To disable the keep alive interval, click Disable.
- FailOver Options:
Control how APs respond when unable to connect to the security gateway
in the following way:
- Retry Period: Set the number of days during which APs will keep attempting to connect; accepted values are 3 through 65536. Select the Forever checkbox to keep trying indefinitely (this is the default setting).
- Retry Interval: Set the interval (in minutes) between each retry attempt. The default retry interval is 1 minute. Accepted values are from 1 through 30 minutes.
-
Retry Mode: Click Revertive if you want APs to fall back to the specified primary security gateway. Click Non-revertive (the default setting) if you want APs to maintain connectivity with the security gateway to which they are currently connected.
- DHCP Option 43 Sub
Code for Security Gateway: Devices use the DHCP Option 43
subcode to discover the address of the security gateway. Keep the
default subcode (7) unless your network requires a different subcode for
gateway discovery.
- Click OK.The dialog box is closed. The profile configuration is saved and listed on the IPsec page.
Configuring Specific IKE and ESP Proposals for SoftGRE Tunnels
- Internet Key Exchange (IKE): Negotiates Security Associations (SAs) and cryptographic keys between endpoints.
- Encapsulating Security Payload (ESP):
Encrypts and authenticates actual IP packets after IKE negotiation.
Note: IKE and ESP work together to provide confidentiality, integrity, and authentication for VPN tunnels.
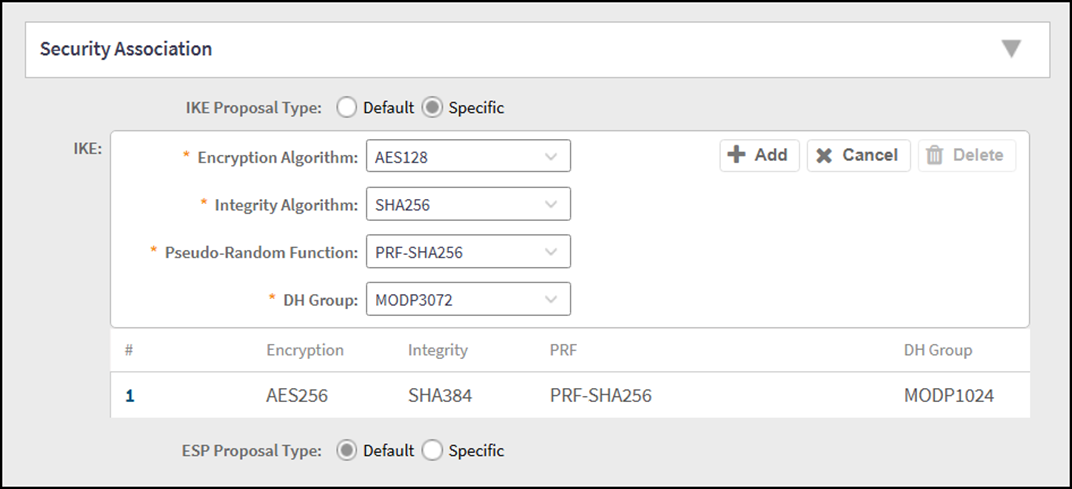
IKE proposals define how endpoints negotiate the secure channel. To create a custom IKE proposal, complete the following steps:
- Set the IKE Proposal
Type to Specific
and select the Encryption Algorithm, Integrity
Algorithm, Pseudo-Random Function, and DH Group
according to your needs as explained in Parameter
Selection Table for IPsec Proposals.Note: Match PRF strength to integrity algorithm for consistency
- Click Add to add the configured proposal.
- Set the ESP Proposal Type to Specific and fill the Encryption Algorithm, Integrity Algorithm, and DH Group according to your needs as explained in Parameter Selection Table for IPsec Proposals. The available options defined in Parameter Selection Table for IPsec Proposals are organized from most secure to least secure for each parameter.
- Click Add to add the configured proposal.
-
Parameter Selection Table for IPsec Proposals
- Continue to add additional proposals for more flexible negotiation capabilities.
- Use the Cancel
and Delete options to cancel an ongoing proposal
configuration or delete a proposal, respectively.Attention: List strongest proposals first. Add fallback proposals for compatibility with legacy systems.
- Continue to finish the profile configuration parameters as explained in Configuring an IPsec Profile for SoftGRE Tunnels.
Configuring an IPsec Profile for RuckusGRE Tunnels
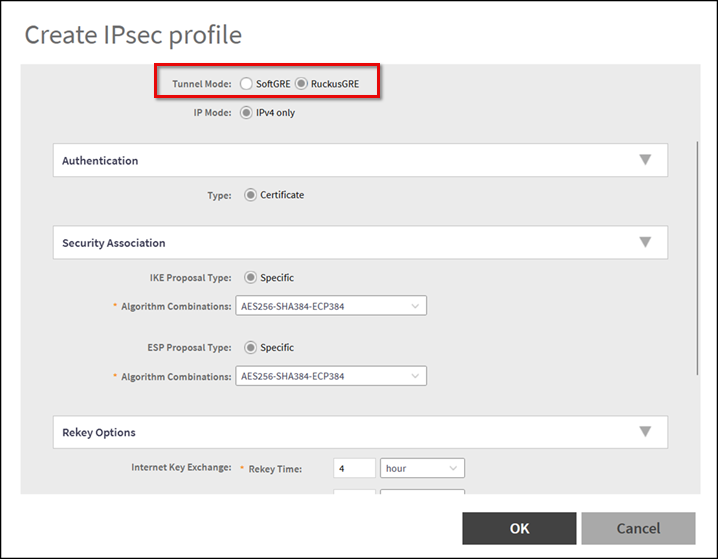
- In the Create IPsec Profile dialog box, select RuckusGRE as the tunnel mode.
- Under Authentication, the Certificate option is
preselected as the only available option for this tunnel type. This type
uses an X.509 certificate from a certificate authority (CA) or registration
authority (RA) server. The controller uses the CMPv2 protocol to obtain the
signed certificate from the CA or RA server.Note: For more information about certificate validation, refer to Data Plane Certificates.
- Under Security
Association, the Specific
option is preselected as the only available option for the proposal types
for this tunnel type. Select the algorithm combinations for IKE and ESP
proposal from the following options:
- AES128-SHA1-MODP2048: Provides AES-128 encryption for confidentiality and SHA-1 for integrity and authentication. Uses Diffie-Hellman Group 14 (MODP 2048) for secure key exchange. This combination offers moderate security and is suitable for environments where legacy compatibility is required.
- AES256-SHA384-ECP384: Provides AES-256 encryption for strong confidentiality and SHA-384 for enhanced integrity. Uses Elliptic Curve Group 19 (ECP 384) for efficient and secure key exchange. This combination offers high security and is recommended for modern deployments requiring robust encryption. This is the default setting.
- Under Rekey Options, configure the following
options:
-
Internet Key Exchange. The Internet Key Exchange (IKE) Rekey Time setting controls how often the system renegotiates the keys used to secure the IKE phase of your VPN tunnel. Enter a value and select the unit (day, hour, or minute). The default setting is 4 hours.
- Encapsulating Security Payload. The Encapsulating Security Payload (ESP) Rekey Time setting controls how often the system renegotiates the keys for encrypting and authenticating data packets in the tunnel. Enter a value and select the unit (day, hour, or minute). The default setting is 1 hour.
-
- Under Advanced Options, configure the following
options:
- FailOver Options: Control how APs respond when unable to
connect to the security gateway in the following way:
- Retry Period: Set the number of days during which APs will keep attempting to connect; accepted values are 3 through 65536. Select the Forever checkbox to keep trying indefinitely (the default setting).
- Retry Interval: Set the interval (in minutes) between each retry attempt. The default retry interval is 1 minute. Accepted values are from 1 through 30 minutes.
-
Retry Mode: Click Revertive if you want APs to fall back to the specified primary security gateway. Click Non-revertive (the default setting) if you want APs to maintain connectivity with the security gateway to which they are currently connected.
- FailOver Options: Control how APs respond when unable to
connect to the security gateway in the following way:
- Click OK.The dialog box is closed. The profile configuration is saved and listed on the IPsec page.