Adding a Data Plane to the Controller
Connect and associate the Data Plane (DP)
with the virtual SmartZone controller. After the DP is successfully added, the DP
establishes tunnels to the APs and securely forwards tunneled WLAN traffic for functions
such as guest isolation, POS security, and seamless roaming across Layer 2
boundaries.
Note: You require a license to onboard
the Data Plane to the controller and to enable licensed features. For detailed
definitions of the available licenses for DP deployments, refer to Tunnel and Data Plane Licenses.
- Deploy the vSZ-D or SZ144-D and connect it to the network.
- From the DP CLI, configure the
controller IP address:
- From the Privileged EXEC
mode, enter the
configcommand to access the Global configuration mode. - Enter the
controllercommand to access the controller configuration context. - Enter the ip controller_ip-address command with the IP address of the controller, or enter the ip FQDN command if a DNS entry has been configured.
- Type
endto exit the Global configuration mode and save the changes. - Enter the
rebootcommand followed byyto reboot the DP.
vDP-1> enable
Password:
vDP-1# config
vDP-1(config)# controller
vDP-1(config-controller)# ip 192.168.110.78
The command was executed successfully. To save the changes, type 'end'.
vDP-1(config-controller)# end
Changed vSZ address to 192.168.110.78!
Please reboot to take effect!
Save changes, and then exits the config context.
vDP-1# reboot
Are you sure you want to reboot vSZ-D[y/n]?
Note: Make sure the DP and the controller can reach each other through the network. - From the Privileged EXEC
mode, enter the
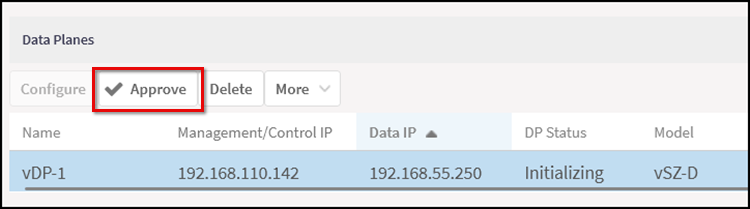
- Approve the DP in the controller. After completing step 2, the DP contacts the
controller and enters the Initializing status until you
manually approve it. To approve the DP:
- In the controller web GUI, select .
- In the Cluster page, scroll to the Data Planes section.
- Select from the list the DP to approve and click Approve.
- A confirmation message pops-up: Are you sure you want to approve the data plane [vDP-1]?. Click Yes.
- The DP is onboarded and a confirmation message appears: 1 DP(s) had been approved.
- Verify the DP status has changed
from Initializing to Managed. In this status, the DP is ready to form tunnels towards the APs configured with tunneled WLANs. The following are two methods to verify the AP-to-DP tunnel formation is successful:
- Check the WLANs the AP is broadcasting. From the controller web GUI, select . Select the AP you want to check, scroll to the Details section, and click the General tab. Scroll to the WLANs tile and check the listed WLANs. If the AP-to-DP tunnel is formed, the tunneled WLANs will be listed.
- Check the AP-to-DP tunnel
status:
- From the controller web GUI, select . Select the AP you want to check, scroll to the Details section, and click the General tab. Scroll to the AP Data Tunnel tile and check the listed data tunnels. The listed tunnel will display the DP to which it is connecting.
- From the AP CLI,
execute the command
get
                                 tunnelmgr
and scroll to find the Current connected SCG-D: line of output. If a DP is listed in this line, the tunnel is formed correctly.rkscli: get tunnelmgr ------ TUNNELMGR Information ------ <truncated output> ------- Run Time Status (Debug) ------- Current tunnel ID: 138 Current failover mode: 0 Current connected SCG-D: [192.168.55.250]:23233 ------------> shows the connected DP, the tunnel is up <truncated output> OK
Note: For instructions to create a tunneled WLAN, refer to Working with Tunneled WLANs. - (Optional) Move the DP to a different DP Group. By default, the newly onboarded DPs are placed in the default group. Move the DP to the appropriate DP Group as required. For more information regarding the DP Groups, refer to Working with Data Plane Groups.