Method 4: Configure DHCP Option 43 on the DHCP Server
Another method for the AP to discover the controller on the network automatically is to configure the DHCP server on the network. To do this, you will need to configure DHCP Option 43 (043 Vendor Specific Info) with the IP address of the controller on the network. When an AP requests an IP address from the DHCP server, the DHCP server will send a list of controller IP addresses to the AP. If there are multiple controller devices on the network, the AP will automatically select a controller to register with from this list of IP addresses.
DHCP Option 43 enables the DHCP server on your network to provide the controller’s server address – either IP address or FQDN– (specifically, the IP address assigned to the controller’s control plane or cluster plane interface) to DHCP clients, including APs that are connected to the network.
The procedure for configuring DHCP option 43 varies, depending on the DHCP server that you are using. Refer to the documentation provided with your DHCP server software for information on how to configure DHCP option 43.
Note: The following procedure describes how to configure DHCP option 43 on a Linux server (Fedora). If your DHCP server is running on a different platform, refer to the DHCP server documentation for the relevant instructions.
Caution: If you have a ZoneDirector controller on the network and you do not want APs to be managed by this ZoneDirector controller, you must disable auto approval on the ZoneDirector web interface. Log on to the ZoneDirector web interface, and then go to Configure > Access Points > Access Points Policies page, and then clear the Approval check box.
Follow these steps to configure DHCP option 43 on a Linux server.
- Log on to your DHCP server via a console terminal (for example, PuTTY).
- Go to
/etcdirectory. - Run
vi dhcpd.conf. This command opens the DHCP configuration file for editing. - At the beginning of the DHCP configuration file, insert the following lines:
option VendorInfo.WSG_sub6 code 6=text;
option VendorInfo.WSG_sub3 code 3=text;

option VendorInfo.WSG_sub6 "<Controller IP>";
option VendorInfo.WSG_sub3 "<Controller IP>";
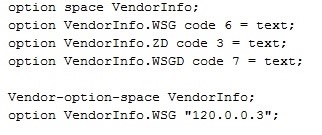
For example, if you only have one controller on the network and its IP address is 120.0.0.3, then these lines in the DHCP configuration file should look like in the following figure.
Sample DHCP Option 43 configuration
If you have a two-node controller cluster on the network, use a comma to separate the control interface IP addresses in option VendorInfo.WSG, for example:
option VendorInfo.WSG “120.0.0.3,120.0.0.4”
where 120.0.0.3 is the control interface IP address of the first controller and 120.0.0.4 is the control interface IP address of the second controller.
- Save the DHCP configuration file.
- Restart the DHCP server to apply the new settings.
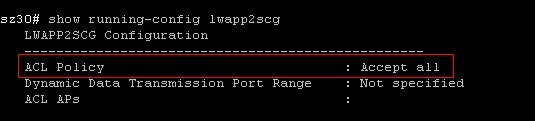
- Verify that the LWAPP2SCG application is enabled on the controller. To verify, log
on to the controller’s CLI, and then enter the following command:
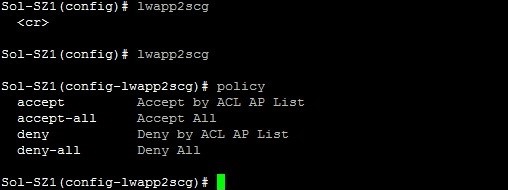
- Enter
config. - Enter
lwapp2scg. - Enter
policy. - Enter one of the following commands:
-
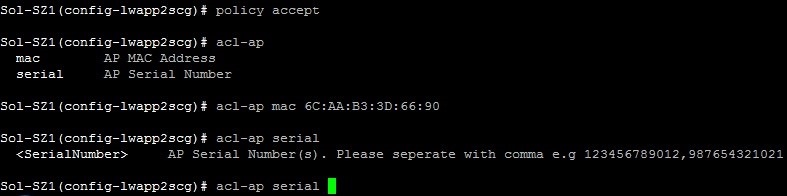
accept {MAC address}: Enter this command if you only want specific APs to be managed by the controller. See Enter accept {MAC address} if you only want specific APs to be managed by the controller. -
accept-all: Enter this command if you want all APs that discover the controller to be managed by it.
-
- Enter
- Reset the AP to factory default settings, and then connect it to a network subnet where it can communicate with the controller.
- Reboot the AP.