Creating and Managing the Domain Admin
The Domains page
provides an overview of your Domains (including status, location, phone, networks,
and
license utilization) and the associated Domain Administrators for each, as well as
management options such as create, edit, and delete.
Brand Administrators have the option to use either RMS, which is for local users, or RADIUS, which is for users from a RADIUS server. If a Brand Administrator chooses the RADIUS option to create Domain Admins or Group Admins, you must manage all Domain or Group Admin users within your RADIUS server. Refer Single Sign-On (SSO) Settings for more information.
- After you log in to the Remote Management Services Brand Admin web interface, click the Domains page.
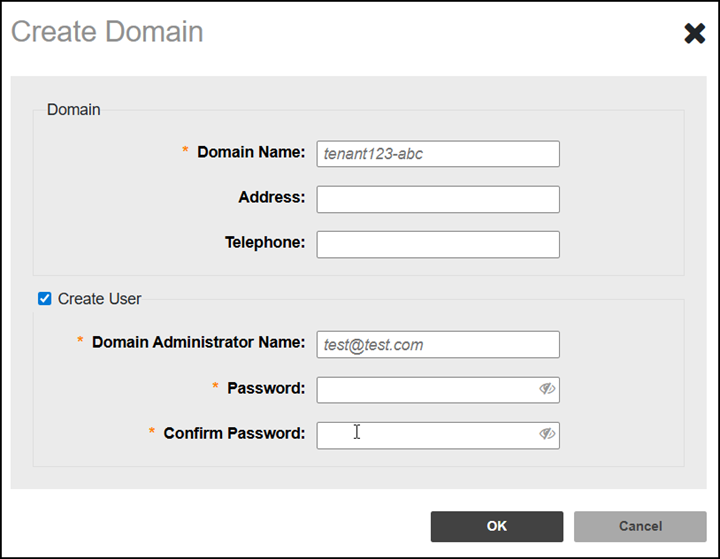
- To create a new Domain and define the associated Domain Admin credentials, click Create (above the list of Domains).
- In Domain Name, type the name of the Domain you want to create.
- In Address and Telephone, type the address and the telephone for the Domain name.
- In Telephone, type the telephone number of the Domain Administrator.
- Click OK.
- (Optional) If you enable Create User, in the Domain Administrator Name type the email address of the Domain Administrator. A validation message will be sent to that email address, and once validated, the status of the Domain will change to Active. The Domain Administrator Name (email address) must not already exist in your system.
- In the Password fields, type a password for the account and confirm the password again. The password is case-sensitive and must contain 8 to 18 characters (including at least one uppercase letter, one lowercase letter, one number, and one special character). Spaces are not allowed.
- Click OK. The newly created Domain name is added to the list of Domains.
A user can log in to the Domain Admin portal using this email and password. Refer to Logging In to the Domain Administration Portal.
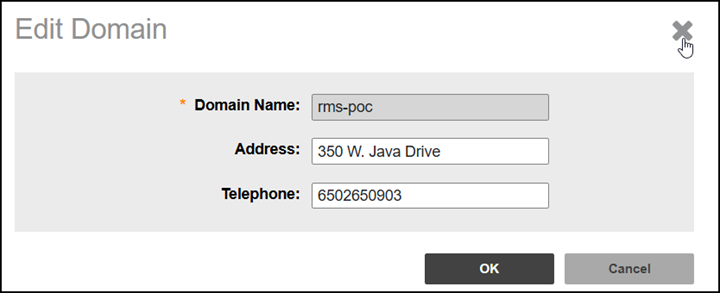
- (Optional) To edit a Domain, click on the Domain Name in the list, then click Edit. The Edit Domain page appears. Make the necessary changes and click OK.
- (Optional) To delete a Domain, click on the Domain Name in the list, then click Delete. Click Yes, delete it! in the pop-up confirmation box.
- (Optional) To approve a Domain
with a pending status in the list, click Approve.
The following table lists some of the fields and table columns that appear by default.
Managed Networks
Field/Column Description Domain Name Displays the name of the Domain. Status Displays the status of the Domain (active or approve pending). Address Displays the physical address of the Domain (if defined). Telephone Displays the phone number for the Domain (if defined). Connected Networks Displays the total number of defined, connected, or online networks for the Domain. Disconnected Networks Displays the total number of defined, but disconnected or offline networks for the Domain. Licenses Displays license utilization for the Domain. Metrics are displayed as a percentage of licenses that are utilized, as well as a bar graph reflecting the total number of available licenses, the number of licenses used and the number of licenses available. Unactivated Licenses Displays the number of unactivated licenses for any Domain that has at least one Connected Network. For Domains that have zero Connected Networks, this column reflects zero unactivated licenses. Insufficient Licenses Displays the number of insufficient licenses for the Domain. Used Trial Licenses Displays the number of used trial licenses for the Domain.
 icon to select and deselect the
contents of the table, select the number of rows to show, and manage
the Search function criteria.
icon to select and deselect the
contents of the table, select the number of rows to show, and manage
the Search function criteria.  icon to refresh the contents of the
table.
icon to refresh the contents of the
table.