Gateway Onboarding
The IoT AP onboarding process establishes
secure communication between the RUCKUS IoT Controller and IoT-enabled access points
(gateways). When an AP connects, it appears as Unapproved until you authorizes it.
Once approved, the controller validates firmware compatibility, enables relevant IoT
plugins
(such as Zigbee or BLE), and transitions the AP to an Online state.
- Log into AP console and set IoT
Controller IP using the command
set iotg-mqtt-brokerip
                     <iot controller ip address>
. - Log in to controller UI. From
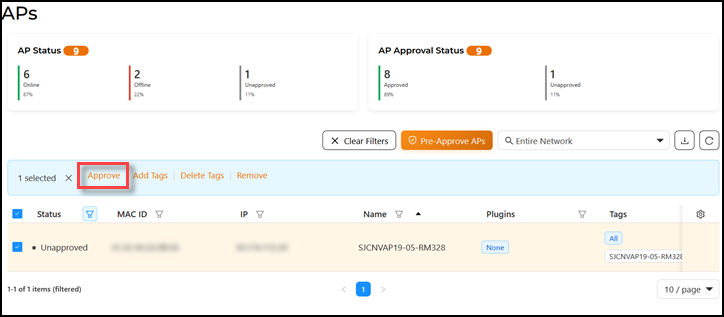
the main menu, Click APs.The APs page is displayed.
- Click the Approve button to approve an AP. Ensure the Plugins column displays None.
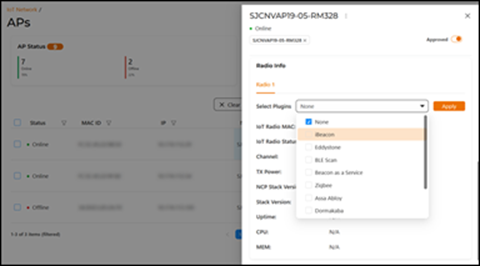
- Configure the plugin by
performing the following steps.
- In the APs page, click an IoT AP; a sidebar appears, displaying the Radio Info settings. Under the Radio Info tab, select the radio where the plugin needs to be enabled, click the Select Plugins drop-down list to choose the required plugins. Click Apply to apply the changes.
- (Optional) To configure a specific radio, from the main menu, select Radio. On the Radios page, click a radio; a sidebar appears, displaying the Radio Info settings. In the Radio Info section, click the Select Plugins drop-down list and choose the required plugins. Click Apply to apply the changes.
- (Optional) To configure plugins for multiple radios simultaneously, select Radios. On the Radios page, select multiple radios and click Set Plugin on the toolbar. A Set Plugin dialog box appears. From the Select Plugins drop-down list ,choose the required plugins for the selected radios and click Apply. The plugin changes are applied.