Modifying the System Default AP Group
If you want to configure global settings for default behavior for all access points,
modify the System Default AP group and apply settings to all APs at once.
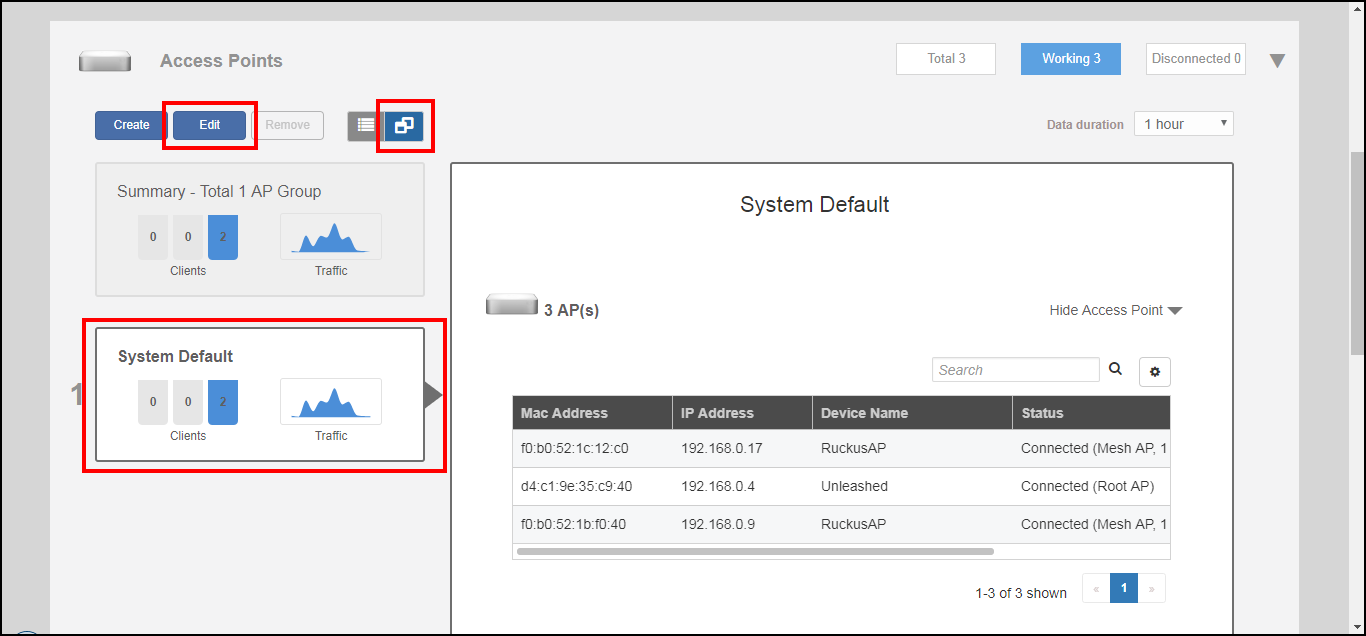
- Go to Access Points.
- Select the Access
Point Groups view, select the System
Default access point group, and click the
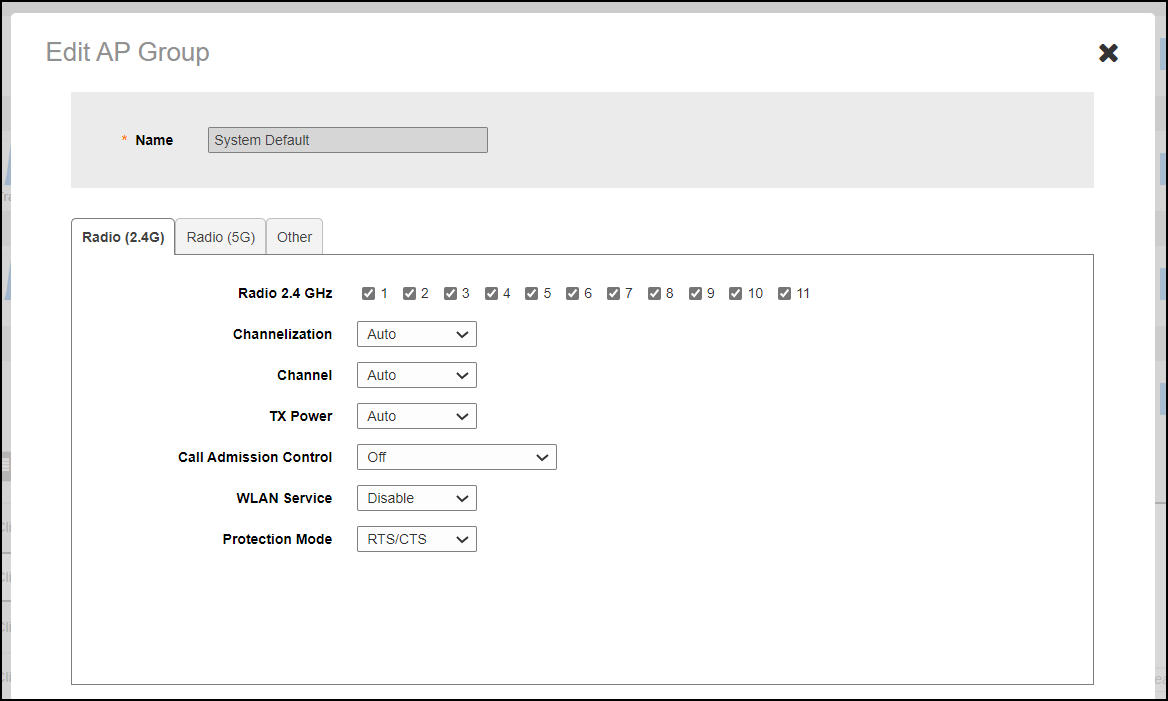
Edit button. The Edit AP Group page appears.
- Assign APs to or from this AP group using the left and right arrows on the AP Assign tab.
- Assign WLANs to or from this AP group using the left and right arrows on the WLAN Assign tab.
- On the Radio (2.4G),
Radio
(5G), and Radio (6G) tabs, modify any of
the following settings that you want to apply to the System Default AP group.
- Channel
Range: To limit the available channels for 2.4 GHz, 5 GHz indoor
(lower and upper) and 5 GHz outdoor (lower and upper), and 6 GHz channel
selection, cancel the channel selection by clicking on any channels that you
do not want the APs to use.
Note: For country codes "US", "UK", and "JP", channel 144 is supported if DFS channel is enabled.
- Channelization: Select Auto, 20MHz or 40MHz channel width for the 2.4 GHz radio. Select Auto, 20, 40, or 80 MHz channel width for the 5 GHz radio. Select Auto, 20, 40, 80, 160, or 320 MHz channel width for the 6 GHz radio.
- Channel: Select Auto or manually assign a channel for the 2.4 GHz, 5 GHz, or 6 GHz radio.
- TX Power:
Allows you to manually set the transmit power on all 2.4 GHz, 5 GHz, or 6
GHz radios (default is Auto), where
Full is the maximum allowable Tx power according to country regulations.
Min is the 0dBm per chain for 11n APs, 2dBm per chain for 11ac APs.
- Call Admission Control: (Disabled by default). Enable Wi-Fi Multimedia Admission Control (WMM-AC) to support Polycom/Spectralink VIEW certification.
- WLAN Service: This option allows users to disable WLAN service on the 2.4, 5, or 6 GHz radios on all APs in the AP group.
- Protection
Mode: If you activate Protection Mode, you control how
802.11 devices know when they should communicate with another device. The
use of RTS/CTS (Request to Send/Clear to Send) reduces collisions and
increases the performance of the network if hidden stations are present.
However, RTS/CTS (and CTS-only) introduce overhead and may in fact reduce
overall performance in some situations. Through the proper use of RTS/CTS
and CTS-only, you can fine-tune the operation of your wireless LAN depending
on the physical operating environment.
- CTS-only: Choose this option to force all destination devices to acknowledge their ability to receive data when a transmission is initiated. Use this option for compliance with the Wi-Fi Alliance certification.
- RTS/CTS: Choose this option to force both sending and receiving devices to confirm a data exchange on both ends before proceeding.
- None: Choose this option to disable both RTS and CTS acknowledgment.
- Channel
Range: To limit the available channels for 2.4 GHz, 5 GHz indoor
(lower and upper) and 5 GHz outdoor (lower and upper), and 6 GHz channel
selection, cancel the channel selection by clicking on any channels that you
do not want the APs to use.
- On the
Other tab, modify settings for all APs of a specific
model in the System Default AP group. For more information on model-specific
controls, see Modifying Model-Specific Controls.
- Model Specific
Control: Select the AP model to which the settings will
apply.
- Max Clients: Set the maximum number of clients that can associate per AP. Note that different AP models have different maximum client limitations.
- Status LEDs: When managed by ZoneDirector, you can disable the external LEDs on certain AP models. This can be useful if your APs are installed in a public location and you don't want to draw attention to them.
- PoE Operating Mode: Options vary depending on AP model selected from the Model Specific Control list. For a list of PoE operating modes by AP model, refer to Unleashed Access Point Power Supply Considerations.
- Port Setting: Refer to Configuring AP Ethernet Ports for more information on configuring AP-specific Ethernet port settings.
- Model Specific
Control: Select the AP model to which the settings will
apply.
- Click OK to save your changes.