Creating a RUCKUS GRE Profile
Generic Routing Encapsulation (GRE)
provides a way to encapsulate arbitrary packets (payload packet) inside of a transport
protocol, and transmit them from one tunnel endpoint to another. You can configure
the
RUCKUS GRE tunnel profile of the controller to manage AP traffic.
- From the main menu go to .
- Select the Ruckus GRE tab, and select the system to create the profile.
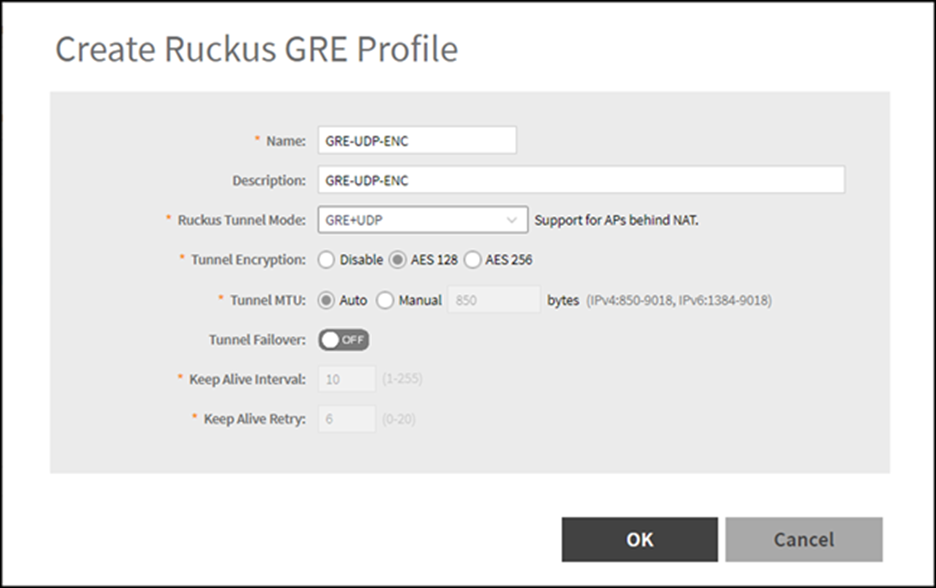
- Click Create.
- Type a name for the profile in the Name box.
- Type a description for the profile in the Description box.
- Select a protocol to use for tunneling WLAN traffic back to the data plane by choosing one of the following after clicking the drop-down arrow in the Ruckus Tunnel Mode box:
- To allow managed APs to decrypt
802.11 packets, and then use an AES encrypted tunnel to send them to the data
plane. Select one of the Tunnel Encryption
options:
- Click the Disable radio button to allow only the management traffic to be encrypted; data traffic is unencrypted. This is the default option.
- Click the AES 128 radio button to use an AES 128-byte encryption tunnel.
- Click the AES 256 radio button to use an AES 256-byte encryption tunnel.
MTU is the size of the largest protocol data unit that can be passed on the controller network. - Set the maximum transmission unit (MTU) for the tunnel using one of the Tunnel MTU options:
- Set the Tunnel failover option to either OFF or On. By default it is in OFF mode.
- Enter the Keep Alive Interval value. By default the interval value is 10 and the range is between 1-255.
- Enter the Keep Alive Retry value. By default the retry value is 06 and the range is between 0-20.
- Click OK.
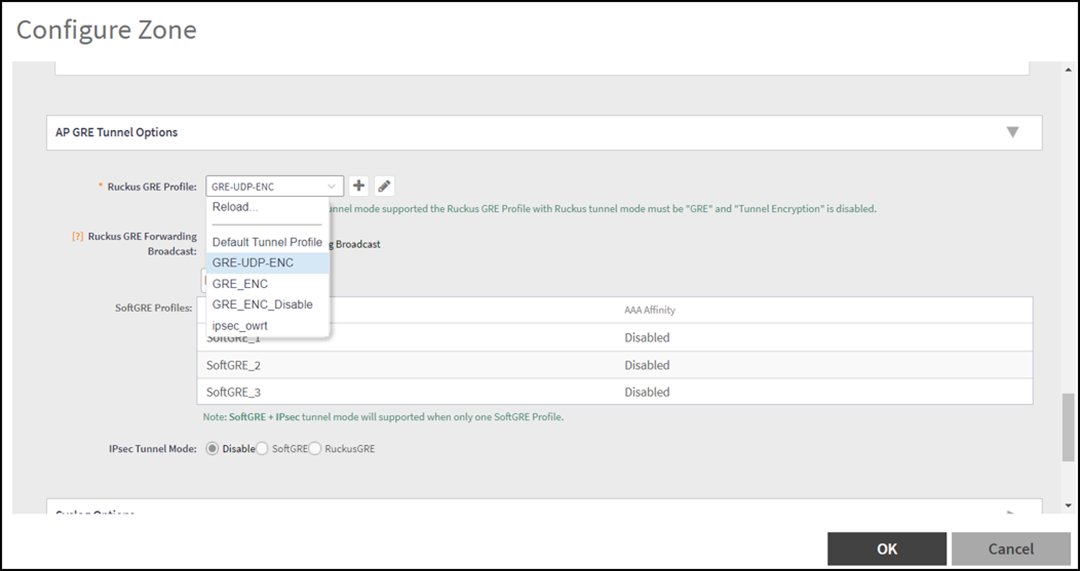
- Using the created GRE profile in an AP Zone and WLAN
- From the main menu go to profile to use the created GRE profile.
- Select the GRE profile from the drop down list. Enable or disable the RUCKUS GRE forwarding broadcast. By default the option is turned OFF. Select the SoftGRE profiles and IPSec Tunnel Mode.
- From the main menu go to profile to use the created GRE profile.
- Another option is navigate to the Zone level configuration and find AP GRE Tunnel.
- Click
 to create a new profile.
- Go to the required WLAN to use the GRE profile.