Creating Bridge Forwarding Profiles
A Bridge Forwarding profile forwards
decapsulated AP traffic to the core network as IEEE 802.1Q frames and, when DHCP
Relay
parameters are configured, relays DHCP messages to designated servers. When you
set the Core
Network to Bridge in the WLAN Data Plane Options, a factory-default Bridge Forwarding
profile is selected automatically; you can also create a custom forwarding
profile.
Note: This
feature is applicable for the vSZ-H platform.
- In the controller web UI, select .
- Click Create.
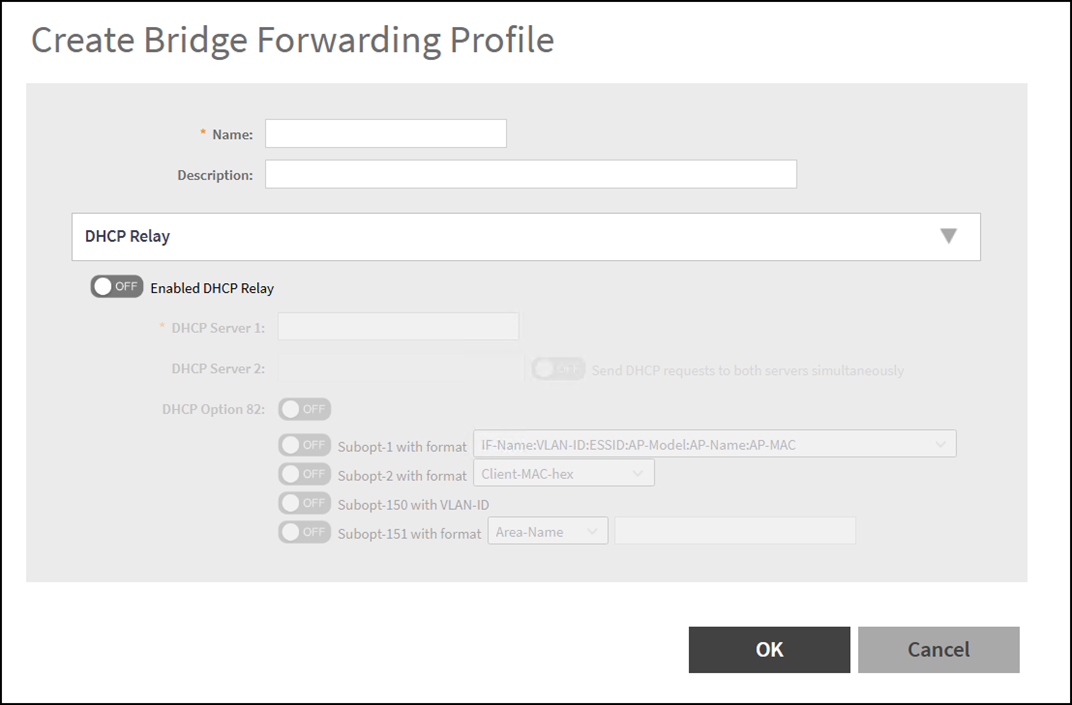
- In Name, enter a unique profile name.
- (Optional) In Description, enter a brief purpose statement.
- (Optional) Set Enabled DHCP Relay to ON and do one of the
following:
- Configure a single DHCP server:
- In DHCP Server 1, enter the server IPv4 address.
- (Optional) Enable DHCP Option 82, then configure any required
sub‑options.
- Subopt‑1 with format: Choose a string format from the drop-down menu to define how relay agent information is encoded in DHCP requests. Typical formats combine interface name, VLAN ID, ESSID, AP model, AP name, and AP MAC address. This helps the DHCP server identify where the request originated and apply location-based policies.
- Subopt‑2 with format: Choose the identifier from the drop-down menu. This option specifies how the client’s MAC address is presented to the DHCP server, enabling more granular tracking or filtering of client devices.
- Subopt‑150 with VLAN‑ID: Turn ON if your DHCP server requires this vendor-specific option. When enabled, the relay agent includes the VLAN ID in DHCP requests, allowing the DHCP server to assign IP addresses or policies based on VLAN membership.
- Subopt‑151 with format: Choose a format from the drop-down menu and enter the value. This option lets you include additional location or area information in DHCP requests. The DHCP server can use this data for advanced assignment or reporting.
-
- In DHCP Server 1 and DHCP Server 2, enter both server IPv4 addresses.
- (Optional) Enable Send DHCP requests to both servers
simultaneously. This can improve reliability and reduce
client wait times in environments where multiple DHCP servers are
available, ensuring that clients receive an IP address even if one
server is slow or unreachable.
Attention: Use this feature only if your network design supports parallel DHCP responses and your DHCP servers are configured to handle simultaneous requests without causing conflicts.
- Configure a single DHCP server:
- Select OK to save the profile.