Configuring ZoneDirector & 200.5 Unleashed Behind NAT Server

ZoneDirector and 200.5 Unleashed do not support SSH tunnels. Therefore for these devices behind the NAT server, it is recommend to enable the Management Interface, add one 443 port mapping on the NAT server and then configure the external port to the Unleashed Multi-Site Manager.
  1. Upload the Unleashed license as described in Uploading a License File.
    There are two types of Unleashed Multi-Site Manager licenses files; one for ZoneDirector and the other for Unleashed. Ensure you select the correct file.
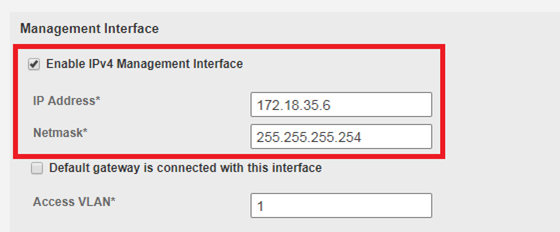
  2. Enable and configure the management interface according to your network from ZoneDirector web interface:
    1. Go to Configure > System > Network Management.
    2. In FlexMaster Management, select the Enable IPv4 Management Interface check-box.
      Configure the following:
      • IP Address: enter IP address of the software server.
      • NetMask: enter the netmask IP address.

    Enabling and Configuring the Management Interface on ZD

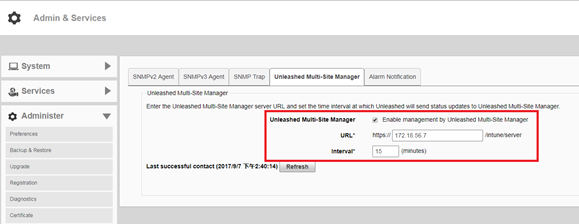
  3. Enable and configure the management interface according to your network from 200.5 Unleashed web interface:
    1. Go to Admin & Services > System > IP Setting > Management Interface.
    2. Select the Enable management by Unleashed Multi-Site Manager check-box.
      Configure the following:
      • URL: The IP address or URL of the software server.
      • Interval: the time interval (in minutes) within which the Unleashed device sends the TR069 information to Unleashed Multi-Site Manager. It is recommended that you configure this interval according to your network capacity.

    Enabling Unleashed Multi-Site Manager Management

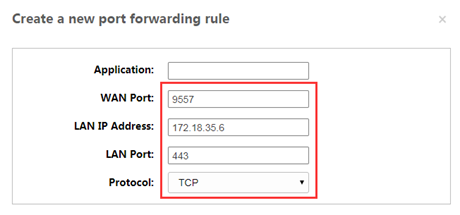
  4. Log in to the NAT server and map the LAN port to 443. Create a port forwarding rule: TCP: management IP: 443

    Sample Port Mapping

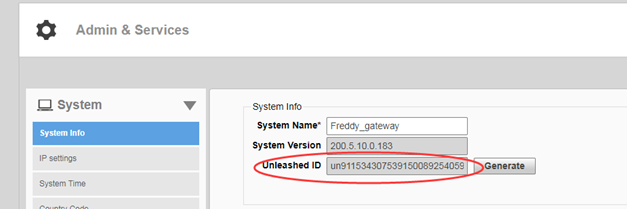
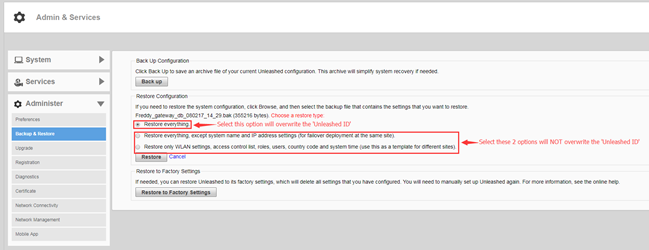
  5. Generate and Apply the Unleashed ID: Each unleashed network has an ID which is automatically generated by the system. You can renew this ID by clicking Generate from the Unleashed web interface and then apply it to the network. The 'Unleashed ID' is reset during set factory, and overwritten when the configuration is restored (when you choose the restore option as Restore everything). Unleashed Multi-Site Manager uses the 'Unleashed ID' to identify the unleashed network, and whenever the 'Unleashed ID' is renewed or reset, Unleashed Multi-Site Manager regards it as a new unleashed device.

    Generating Unleashed ID

    Unleashed - Restore Configuration

  6. Enable Unleashed Multi-Site Manager management from Unleashed web interface:
    1. Go to Admin & Services > Administer > Network Management > Unleashed Multi-Site Manager Management.
    2. Select the Enable management by Unleashed Multi-Site Manager check-box.
      Configure the following:
      • URL: The IP address or URL of the software server.
      • Interval: the time interval (in minutes) within which the Unleashed device sends the TR069 information to Unleashed Multi-Site Manager. It is recommended that you configure this interval according to your network capacity.

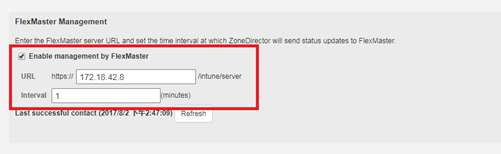
    Enabling Unleashed Multi-Site Manager Management

  7. Enable Unleashed Multi-Site Manager management from ZoneDirector web interface:
    1. Go to Configure > System > Network Management.
    2. In FlexMaster Management, select the Enable management by FlexMaster check-box.
      Configure the following:
      • URL: The IP address or URL of the software server.
      • Interval: the time interval (in minutes) within which the ZoneDirector device sends the TR069 information to the Unleashed Multi-Site Manager. It is recommended that you configure this interval according to your network capacity.

    Enabling Unleashed Multi-Site Manager Management on ZD

    Login to the Unleashed Multi-Site Manager web interface and go to Devices. You will see the ZD and Unleashed devices.
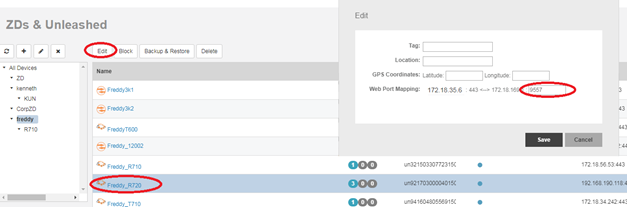
  8. In the Unleashed Multi-Site Manager web interface, go to Devices. Select the device which is behind the NAT server, and click Edit. Configure the values.

    Configuring External Ports

  9. Click Save. The external port which you configured in step 3 is submitted.