Setting Up Unleashed Multi-Site Manager as a Virtual Machine
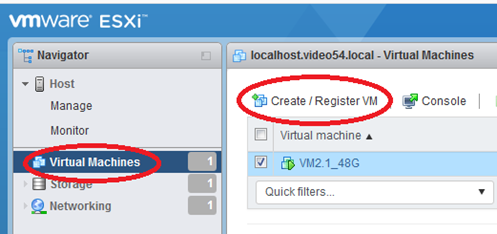
- Login to the VMware ESXI interface and go to Virtual Machines.
- Click Create/Register VM.
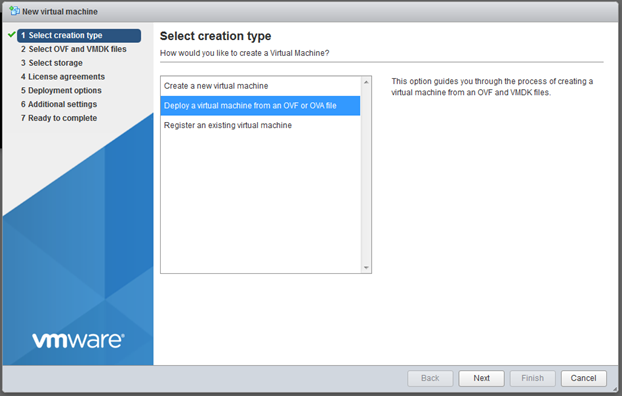
- Select Deploy virtual machine from an OVF or OVA file and click Next.
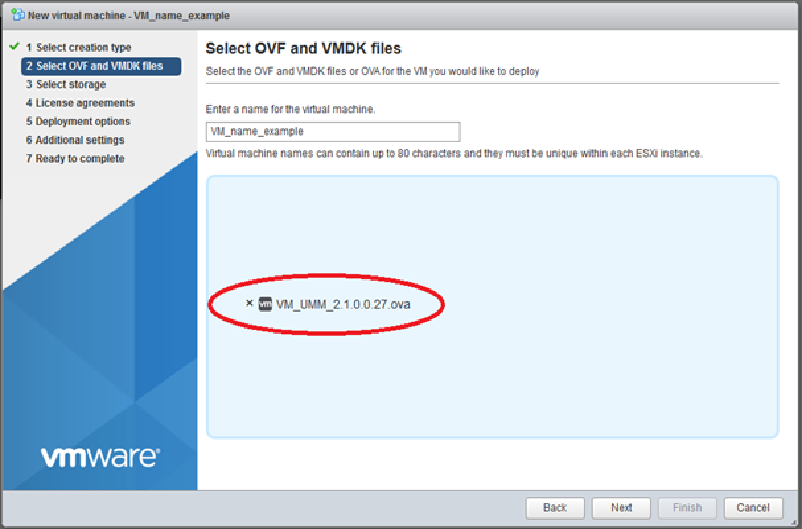
- Type the name virtual machine and select the VM_UMM_2.2.0.0.40.ova file.
- Click Next.
- Power on the VM and wait several minutes to login to
Unleashed Multi-Site Manager.
After you login, you can do the following:
- Change the root password for your Linux account. See Changing the Linux Password for more information.
- Change the login credential for Unleashed Multi-Site Manager. See Changing the Login Information for the Virtual Machine for more information.
- Change the login credentials for the database. See Changing the Login Credentials to Access the Database for more information.
- Using SSH, establish a connection with
Unleashed Multi-Site Manager to change the time zone and date. See the following example.
Please identify a location so that time zone rules can be set correctly.
Please select a continent or ocean.
11) none - I want to specify the time zone using the Posix TZ format.
1) Afghanistan 18) Israel 35) Palestine
2) Armenia 19) Japan 36) Philippines
3) Azerbaijan 20) Jordan 37) Qatar
4) Bahrain 21) Kazakhstan 38) Russia
5) Bangladesh 22) Korea (North) 39) Saudi Arabia
6) Bhutan 23) Korea (South) 40) Singapore
7) Brunei 24) Kuwait 41) Sri Lanka
8) Cambodia 25) Kyrgyzstan 42) Syria
10) Cyprus 27) Lebanon 44) Tajikistan
11) East Timor 28) Macau 45) Thailand
12) Georgia 29) Malaysia 46) Turkmenistan
13) Hong Kong 30) Mongolia 47) United Arab Emirates
14) India 31) Myanmar (Burma) 48) Uzbekistan
15) Indonesia 32) Nepal 49) Vietnam
Please select one of the following time zone regions.
The following information has been given:
Therefore TZ='Asia/Shanghai' will be used.
Local time is now: Fri Jun 29 16:14:59 CST 2018.
Universal Time is now: Fri Jun 29 08:14:59 UTC 2018.
You can make this change permanent for yourself by appending the line
			  TZ='Asia/Shanghai'; export TZ
			 to the file '.profile' in your home directory; then log out and log in again.
Here is that TZ value again, this time on standard output so that you can use the
/usr/bin/tzselectcommand in shell scripts: Asia/Shanghai[root@localhost ~]# vi /etc/sysconfig/clock //change to ZONE="Asia/Shanghai"
[root@localhost ~]# rm -rf /etc/localtime
[root@localhost ~]# ln -s /usr/share/zoneinfo/Asia/Shanghai /etc/localtime
[root@localhost ~]# cat /etc/sysconfig/clock
[root@localhost ~]# date -s 7/12/2018
[root@localhost ~]# date -s 11:34:30
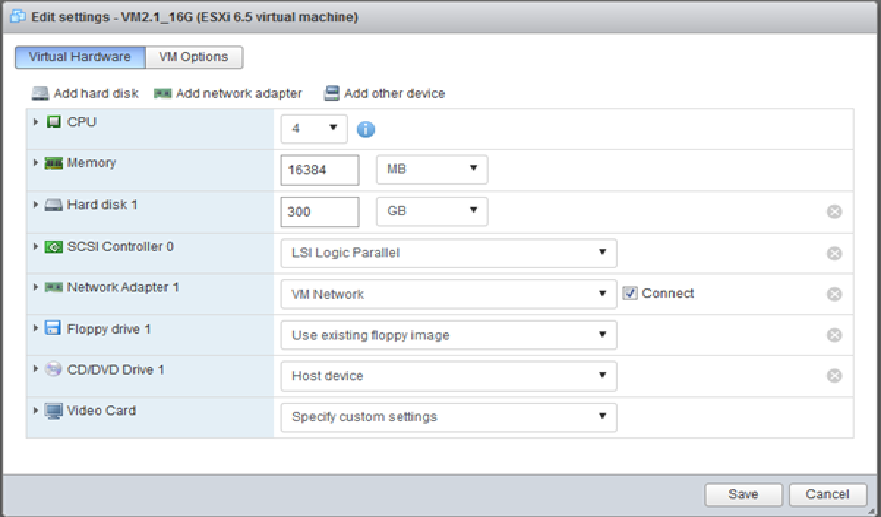
- If you have modified the VM settings (refer Step 6), then you can change the size
of the linux hard disk as well. See the following example.
Filesystem Size Used Avail Use% Mounted on
/dev/mapper/VolGroup-lv_root 44G 7.5G 35G 19% /
/dev/sda1 485M 32M 428M 7% /boot
Disk /dev/sda: 322.1 GB, 322122547200 bytes
255 heads, 63 sectors/track, 39162 cylinders
Units = cylinders of 16065 * 512 = 8225280 bytes
Sector size (logical/physical): 512 bytes / 512 bytes
I/O size (minimum/optimal): 512 bytes / 512 bytes
Device Boot Start End Blocks Id System
/dev/sda1 * 1 64 512000 83 Linux
Partition 1 does not end on cylinder boundary.
/dev/sda2 64 6528 51915776 8e Linux LVM
Disk /dev/mapper/VolGroup-lv_root: 47.8 GB, 47789899776 bytes
255 heads, 63 sectors/track, 5810 cylinders
Units = cylinders of 16065 * 512 = 8225280 bytes
Sector size (logical/physical): 512 bytes / 512 bytes
I/O size (minimum/optimal): 512 bytes / 512 bytes
Disk /dev/mapper/VolGroup-lv_swap: 5368 MB, 5368709120 bytes
255 heads, 63 sectors/track, 652 cylinders
Units = cylinders of 16065 * 512 = 8225280 bytes
Sector size (logical/physical): 512 bytes / 512 bytes
I/O size (minimum/optimal): 512 bytes / 512 bytes
[root@localhost ~]# fdisk /dev/sda
WARNING: DOS-compatible mode is deprecated. It's strongly recommended to
			  switch off the mode (command 'c') and change display units to
			  sectors (command 'u').
First cylinder (6528-39162, default 6528):
Last cylinder, +cylinders or +size{K,M,G} (6528-39162, default 39162):
Hex code (type L to list codes): 8e
Changed system type of partition 3 to 8e (Linux LVM)
The partition table has been altered!
Calling ioctl() to re-read partition table.
WARNING: Re-reading the partition table failed with error 16: Device or resource busy.
The kernel still uses the old table. The new table will be used at
			  the next reboot or after you run partprobe(8) or kpartx(8)
Syncing disks.
Disk /dev/sda: 322.1 GB, 322122547200 bytes
255 heads, 63 sectors/track, 39162 cylinders
Units = cylinders of 16065 * 512 = 8225280 bytes
Sector size (logical/physical): 512 bytes / 512 bytes
I/O size (minimum/optimal): 512 bytes / 512 bytes
Device Boot Start End Blocks Id System
/dev/sda1 * 1 64 512000 83 Linux
Partition 1 does not end on cylinder boundary.
/dev/sda2 64 6528 51915776 8e Linux LVM
/dev/sda3 6528 39162 262139965 8e Linux LVM
Disk /dev/mapper/VolGroup-lv_root: 47.8 GB, 47789899776 bytes
255 heads, 63 sectors/track, 5810 cylinders
Units = cylinders of 16065 * 512 = 8225280 bytes
Sector size (logical/physical): 512 bytes / 512 bytes
I/O size (minimum/optimal): 512 bytes / 512 bytes
Disk /dev/mapper/VolGroup-lv_swap: 5368 MB, 5368709120 bytes
255 heads, 63 sectors/track, 652 cylinders
Units = cylinders of 16065 * 512 = 8225280 bytes
Sector size (logical/physical): 512 bytes / 512 bytes
I/O size (minimum/optimal): 512 bytes / 512 bytes
Broadcast message from root@localhost.localdomain
The system is going down for reboot NOW!
root@172.18.42.209's password:
Last login: Fri Jun 29 16:19:13 2018 from 172.18.169.4
Warning: the kernel failed to re-read the partition table on /dev/sda (Device or resource busy). As a result, it may not reflect all of your changes until after reboot.
[root@localhost ~]# partprobe /dev/sda3
[root@localhost ~]# pvcreate /dev/sda3
Physical volume "/dev/sda3" successfully created
Filesystem Size Used Avail Use% Mounted on
/dev/mapper/VolGroup-lv_root 44G 7.5G 35G 19% /
/dev/sda1 485M 32M 428M 7% /boot
[root@localhost ~]# vgextend VolGroup /dev/sda3
Volume group "VolGroup" successfully extended
--- Volume group —
Alloc PE / Size 12674 / 49.51 GiB
Free PE / Size 63998 / 249.99 GiB
VG UUID 5YlcZA-1N5n-M1kd-cK2c-8UNP-Losa-DPKyst
[root@localhost ~]# lvresize -L +249.99G /dev/VolGroup/lv_root
Rounding size to boundary between physical extents: 249.99 GiB
Extending logical volume lv_root to 294.50 GiB
Logical volume lv_root successfully resized
[root@localhost ~]# resize2fs /dev/VolGroup/lv_root
resize2fs 1.41.12 (17-May-2010)
Filesystem at /dev/VolGroup/lv_root is mounted on /; on-line resizing required
old desc_blocks = 3, new_desc_blocks = 19
Performing an on-line resize of /dev/VolGroup/lv_root to 77201408 (4k) blocks.
The filesystem on /dev/VolGroup/lv_root is now 77201408 blocks long.
Filesystem Size Used Avail Use% Mounted on
/dev/mapper/VolGroup-lv_root 290G 7.6G 268G 3% /
- Restart Unleashed Multi-Site Manager. Issue the commands as shown in the following example.