Creating Your Property Management System
Creating your property management system consists of these main steps:
- Generating an API Key
- Creating An External DPSK Pool for the Property
- Creating the Property
- Adding Units to the Property
- Setting up the Look and Feel of the Tenant Portal UI
- Creating a Management Portal - A management portal can be created to allow property personnel such as front-desk workers to perform various actions on specified properties or units.
Generating an API Key
An API key is required to enable the tenant REST API, which also enables the tenant portal, so this should be the first item you configure. Follow these steps to generate the key:
Creating An External DPSK Pool for the Property
Because one (and only one) eDPSK pool must be assigned to a property, you must create the pool before you configure the property. For every unit that you add to a property, a DPSK is assigned from this eDPSK pool to that unit. (One guest DPSK is also assigned to each unit if you configure the property to include Guest DPSKs, described later). Also, if you assign more than one SSID to the pool, the tenant portal will not include a button that displays the QRCode for either the wi-fi passphrase or the guest wi-fi passphrase.
For instructions on creating an eDPSK pool, refer to the Cloudpath Enrollment System RUCKUS External Dynamic Pre-Shared Key (eDPSK) Configuration Guide.
Creating the Property
Once you have created an eDPSK pool to assign to your property, follow these steps to configure the property:
- In the Cloudpath UI, go to Managed Access > Properties.
- Click Add Property.
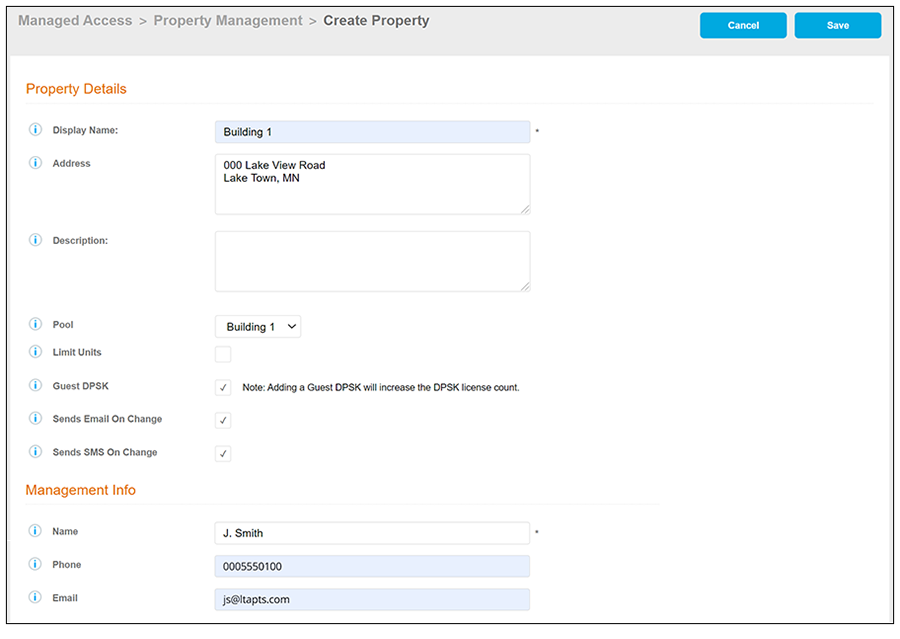
- Configure the property, as shown
and described in the following example.
- Display Name: A meaningful name for the property (visible to you, as an administrator, and visible on the tenant portal).
- Address: Address of the property.
- Description (optional): Description of the property (visible only to you, as an administrator).
- Pool: The eDPSK pool assigned to this property (selected from the drop-down list). In this example, a pool called "Building 1" has already been created specifically to be assigned to this property. For information about creating an eDPSK pool with all its options, refer to the Cloudpath Enrollment System RUCKUS External Dynamci Pre-Shared Key (eDPSK) Configuration Guide.
-
new for 5.9R3Network Segmentation Group (applicable for network segmentation only): A drop-down list to choose a network segmentation group is displayed only if you have configured a network segmentation profile in vSZ release 6.1 or later, and have added the vSZ system to Cloudpath as an integrated system. That is outside the scope of this manual. For information on configuring network segmentation, refer to the RUCKUS Network Segmentation Configuration Guide. If you are not adding this property to a network segmentation group, but the "Network Segmentation Group" drop-down appears, select "None."
- Limit Units: You can check this box if you want to limit the number of units that can be assigned to this property. If you check the box, a "Max Units" pop-up field appears where you can enter the desired number.
- Guest DPSK: Checking this
box assigns a guest DPSK to every unit that you add to the property.
This field cannot be set on individual units, nor can this selection be
changed once units have been assigned to the property.
Note: Checking this box also increases the DPSK license count for each unit. Refer to Licensing Information.
- Sends Email On Change:
Checking this box means that the contact person for a unit gets notified
by email whenever the DPSK of the unit or the unit's guest DPSK (if
guest DPSKs are being used) changes, or if the access token to the
tenant portal is changed.
Note: If this box is checked, the contact person of the unit also gets notified by email as soon as you have added that unit to the property and saved the configuration.
- Sends SMS On Change:
Checking this box means that the contact person for a unit gets notified
by text whenever the DPSK of the unit or the unit's guest DPSK (if guest
DPSKs are being used) changes, or if the access token to the tenant
portal is changed.
Note: If this box is checked, the contact person of the unit also gets notified by text as soon as you have added that unit to the property and saved the configuration.
- Management Info section: As the property manager, this should be your contact information that you want displayed in all communications with your tenants.
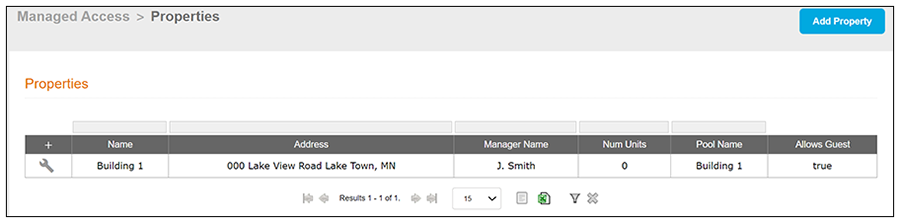
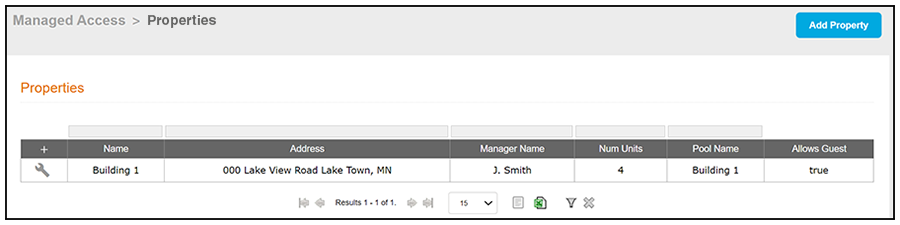
- Click Save. You are returned to the main Properties screen where your newly configured property is now displayed, as shown in the example below:
Adding Units to the Property
Once you have configured a property, you can add units to the property, as shown with these steps:
- From the main Properties screen, click the wrench icon.
- On the ensuing screen, click the
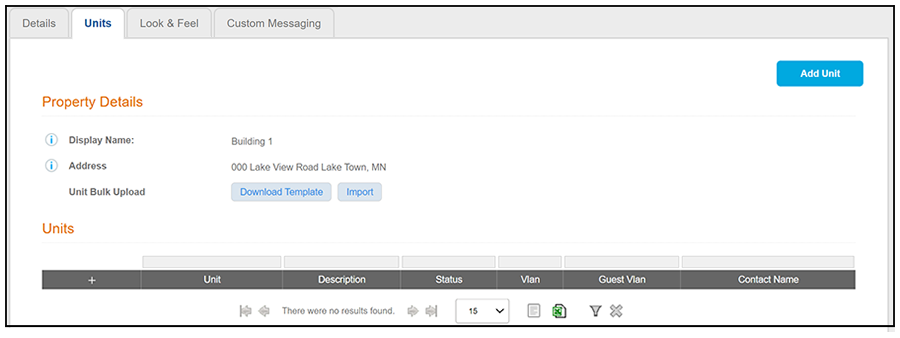
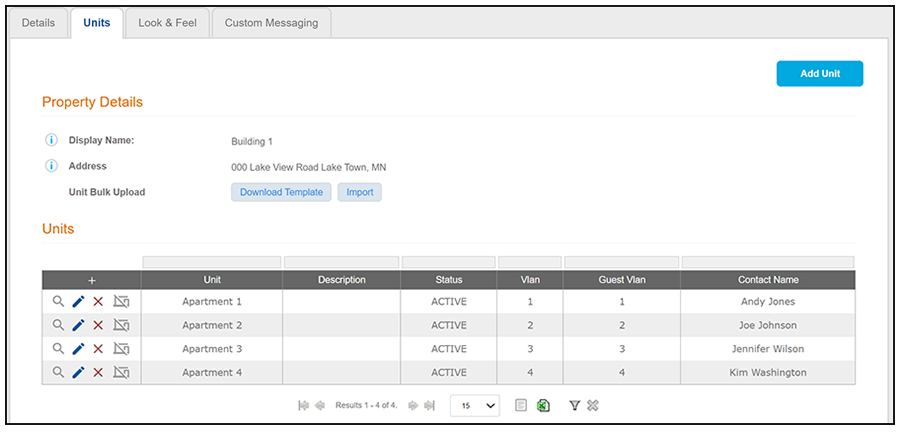
Units tab to invoke the following screen:
Note: If you have a lot of units to add, you can use the Download Template and Import buttons to add units by bulk (field descriptions are provided in the following steps). For more information about bulk uploads, refer to Bulk Upload Considerations. To add units individually, proceed to the next step.
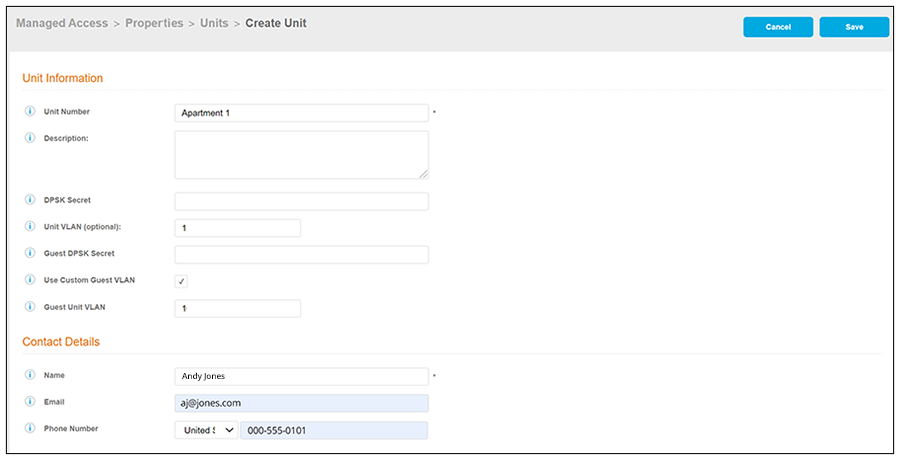
- Add the first unit to your
property, as shown and described in the following example:
- Unit Number: Number or name of the unit you are adding.
- Description (optional): Description of the unit.
- DPSK Secret (optional):
This is the secret that all devices connecting to this unit will need
for wi-fi access. On the tenant portal, this secret is called the "Wi-Fi
Passphrase." In the Cloudpath UI, you do not need to enter a value here
because the secret is automatically generated. However, you can enter a
value if you wish, and you can also change the unit secret at a later
time.
Note: If, when you created the property, you checked the "Guest DPSK" box, a separate "Guest DPSK Secret" gets generated that all guest devices connecting to this unit will need for wi-fi access.
- Unit VLAN (optional): You can assign a VLAN to all devices in this unit. If no VLAN is specified here, the values defined in the DPSK pool that has been assigned to the property are used here.
- Guest DPSK Secret (optional): This field is present in unit configuration only if you checked the "Guest DPSK" box when you configured the property. This is the secret that all guest devices connecting to this unit need for wi-fi access. On the tenant portal, this secret is called the "Guest Passphrase." In the Cloudpath UI, you do not need to enter a value here because the secret is automatically generated. However, you can enter a value if you wish, and you can also change the guest secret at a later time.
- Use Custom Guest VLAN:
This field is present in unit configuration only if you checked the
"Guest DPSK" box when you configured the property. You can then check
the "Use Custom Guest VLAN" box to invoke a popup where you can assign a
VLAN to all guest devices in the unit that is different from the unit
VLAN. If you leave this box unchecked, the guest VLAN is the same as the
unit VLAN. (If you enter the same VLAN that is being used as the Unit
VLAN, the "Use Custom Guest VLAN box does not remain checked once you
exit the configuration screen.)
Note: In Adding a Unit to Your Property, the "Use Custom Guest VLAN" is checked to show the "Guest Unit VLAN" popup for illustrative purposes only.
- Contact Details: Enter
the contact information for the tenant of this unit. The email and
mobile phone information that you enter will be used to notify the
tenant about how to access the tenant portal and what the pass phrases
are for unit and guest wi-fi access.
Note: The name you enter here will appear near the top of the home page on this person's tenant portal.
- Click Save.
Note:New for 5.9R3Once you save the configuration of a new unit, you have the option of resending the assignment SMS/Email to the phone number and/or email defined for this unit, provided that sending SMS/Email has been enabled in the configuration of the applicable property. To resend this information (for example, if you have changed a wi-fi passphrase), you can enter edit mode for the unit, and enable the "Resend SMS/Email" check box in the "Unit Contact Details" section of the screen, then click Save. Another method of resending this information is to click the magnifying glass for the unit (in the grid view of all configured units), then click the Resend Unit Assignment SMS/Email button in the "Unit Contact Details" section of the screen (refer to Unit-Specific Informationnew screen shows new Send button for 5.9R3).
- Using the Add Unit button (or the
+ button above the
Units grid), continue to add as many units to the property as you want. The
following screen shows four units have been added to the "Building 1"
property:
When you are finished adding units, you can go to the main Properties screen (Managed Access > Properties in the UI) for the following view, which shows the four units added to the "Building 1" example property:
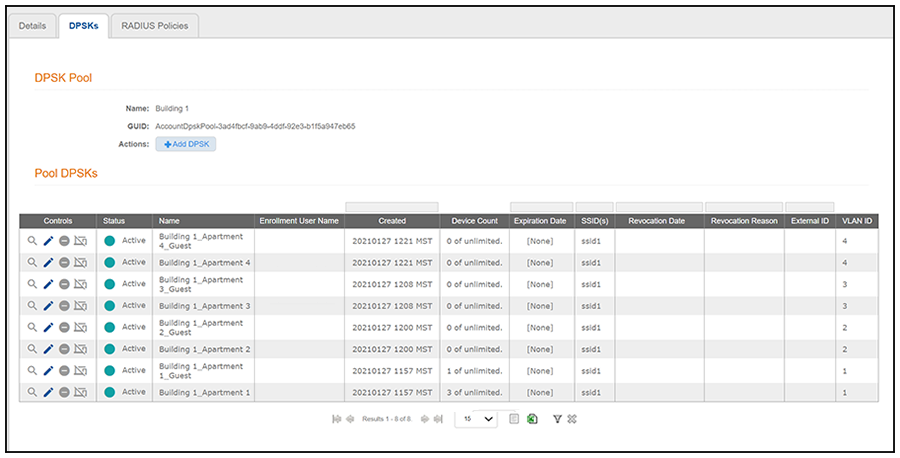
To view the correlation between the units and the DPSKs assigned from the pool in the "Building 1" example, the following is a screen shot of all the DPSKs in "Building 1:"
Note: DPSK names are managed at the unit level; therefore, if you change the name of a unit, Cloudpath updates the name of the corresponding DPSK. You should not attempt to change the name of the DPSK itself once it has been associated with a unit in your property.
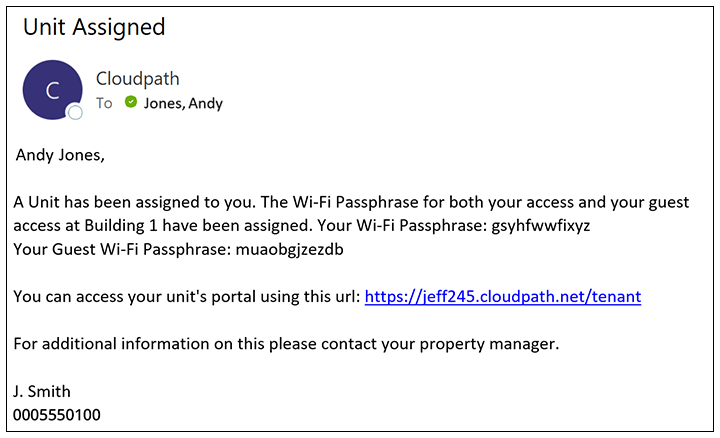
The email contains the link to the person's tenant portal as well as the wi-fi pass phrases for the unit and the guests in the unit. A separate guest wi-fi pass phrase is included because the initial property configuration was set up that way (see the "Guest DPSK" field in Creating the Property Configuration).
If you wish to make any changes to the default information provided in any of the notifications, go to the Custom Messaging tab of the applicable property (Managed Access > Properties, click Wrench icon for property).
Setting up the Look and Feel of the Tenant Portal UI
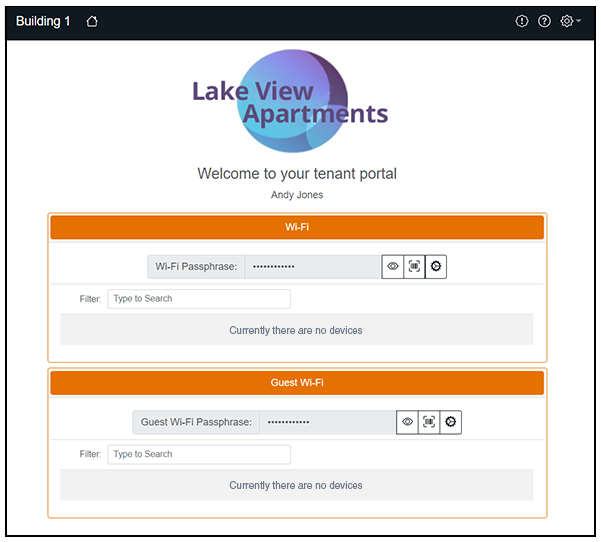
You can use the Look & Feel tab from within a property to add a logo, color scheme, and announcements to your tenants. This basic look and feel takes effect on all units within the property. The following steps describe setting up the look and feel for the example property that was configured in Creating the Property Configuration:
- From the main Properties screen, click the wrench icon.
- On the ensuing screen, click the Look & Feel tab.
- From within the Look & Feel tab, click Edit.
- Configure the look and feel as
desired, as shown and described in the following example:
Creating the Look and Feel for the Tenant Portal
new screen for 5.9R3 to show new "Manual DPSK Secret Allowed" field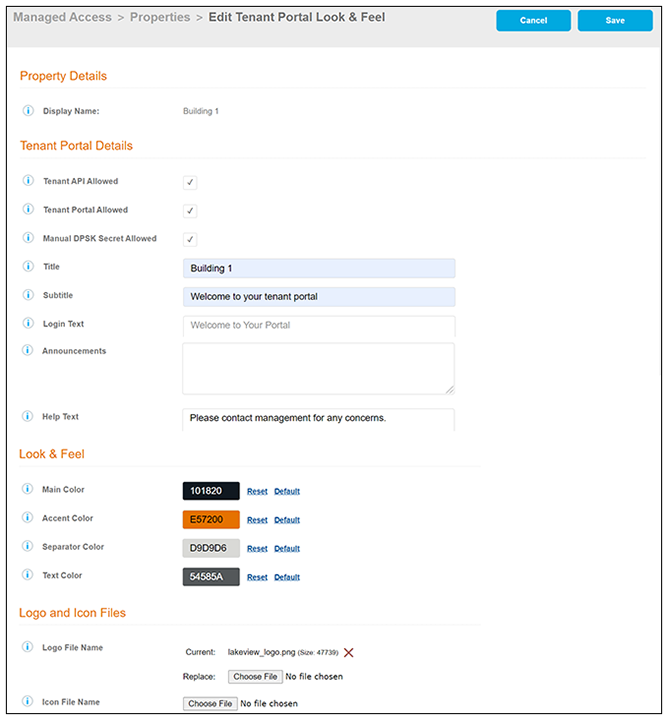
- Display Name (optional): Name of the property (visible only to you, as an administrator).
- Tenant API Allowed:
Allows access to the tenant REST API for units on this property. Enabled
by default.
Note: If you disable Tenant API Allowed, the tenant portal also becomes disabled. If you re-enable Tenant API Allowed, you can then also enable the tenant portal.new for 5.9R3
- Tenant Portal Allowed: Allows access to the tenant portal for units on this property. Enabled by default.
- Manual DPSK Secret
Allowed: Enabling this field allows the tenant to manually set the DPSK
Secret(s) on the tenant portal. If enabled, this setting applies to all
units/tenants in the property. If you disable this field, tenants can
reset the DPSK Secret(s) on the tenant portal only by creating randomly
generated DPSKs.
new info for 5.9R3
- Title: Title of the property that you want displayed on the home page of the tenant portal.
- Subtitle: A subtitle, if desired, that provides a welcome-type message to the tenant and appears underneath a logo that you can also add to the tenant portal.
- Login Text: Text to display on the tenant portal when the login screen is presented.
- Announcements: Enter any
announcement that you want displayed on the tenant portal if the tenant
clicks the Information icon:

- Help Text: Enter any help
information that you want displayed on the tenant portal if the tenant
clicks the Help icon:

- Color buttons: Use the various color buttons to create the desired look for the tenant portal.
- Logo File Name: You can
upload an image file to display the logo of your property on the tenant
portal. In this example, the name of the property is "Lake View
Apartments," which is why the imported file is named accordingly.
Note: It is recommended that the image for the logo be no larger than 440 x 119 pixels.
- Icon File Name: Sets the favicon that is displayed in the tenant portal UI browser tab.
- Click Save.
Note: As soon as you save any changes that you made in the Look & Feel tab of the Cloudpath UI, these changes will be reflected on the tenant portal once you refresh the tenant portal page in your browser.

Bulk Upload Considerations
If you have many units to add, you may want to consider using the "Unit Bulk Upload" option instead of adding each unit individually. Be aware of the following information pertaining to the bulk upload feature:
- The file could potentially take several minutes to upload, depending on its size.
- If the file contains errors, it may still upload and add some of the units in the spreadsheet, but will not upload units whose entries contains errors such as duplicate unit numbers, guest secrets being the incorrect length, and so on.
- Any unit without a unit number or contact name will not upload, and an error message will indicate the missing information.
Licensing Information
Each active DPSK (incuding active guest DPSKs) counts as one license being used. Therefore, if you have 50 units in your building, and you checked the "Guest DPSK" box during property configuration, you could have as many as 100 licenses being used. To check the number of licenses being utilized, go to Support > Licensing > Details tab in the UI, and see the number of "Total Active Dpsks."