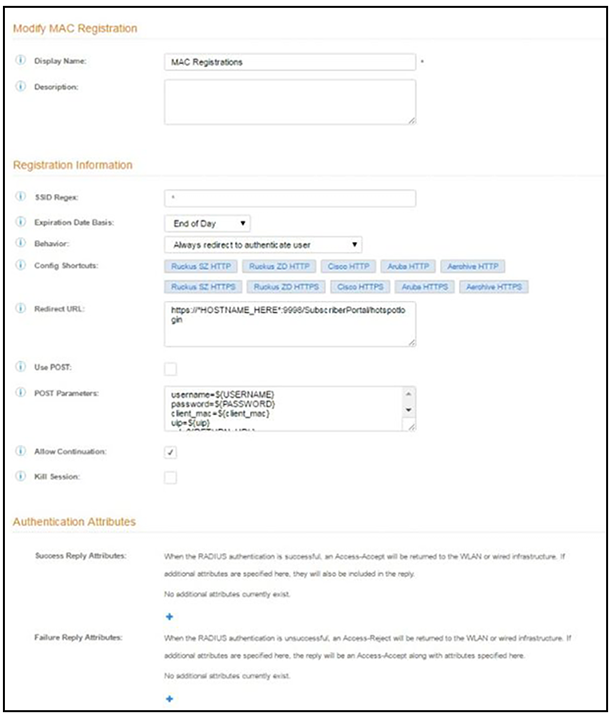
How to Add a MAC Registration Step to the Workflow
- On the workflow page, click the Insert arrow to create a step Enter the values in the Registration Information section:in the enrollment workflow.
- Select Register device for MAC-based authentication.
- Create a new registration configuration. The Create MAC Registration page opens.
- Enter the Name and Description for the MAC Registration step.
- Enter the values in the
Registration Information section:
- SSID Regex - This is the SSID to which MAC registered devices are assigned.
Note: This field is case sensitive. Separate multiple SSIDs by a vertical pipe (|). The default (*) is any SSID that is pointed at the RADIUS server.
- Expiration Date Basis - The basis for calculating the default validity period for MAC registration.
-
added some additional explanation for "Offset" since it's not depicted in the screen shot.Offset - The number of hours/days/months/etc to be offset from the event date when calculating the registration validity period. If Specified Date is selected, this should be the date in YYYY/MM/DD format.Note: This field may disappear, depending on your selection for Expiration Date Basis. For example, in the screen shown above, "End of Day" has been selected for Expiration Date Basis, which makes the "Offset" field unnecessary.
- Behavior - Specifies the prompt and redirect settings for the MAC registration configuration. Use the Web Page Information section to configure the user prompt or redirect URL. Behavior settings include:
- Use the Config Shortcuts buttons to populate the Redirect URL and POST Parameters according to your controller vendor and preferred protocol.
- Allow Continuation - If checked, the submit-redirect call is processed, if unchecked, the submit- redirect call is ignored.
- Kill Session - If checked, the user's session will be killed as they are redirected and, if they return, they will be forced to start over.
- SSID Regex - This is the SSID to which MAC registered devices are assigned.