Configuring Policies
Policies can be used with EAP-TLS certificate-based authentications through configuration of the certificate template that generated the client certificate.
The following procedure guides you first through creating RADIUS attribute groups for your policies, then creating the policies themselves. You must create at least one RADIUS attribute group before you can configure a policy because a policy needs to have at least one RADIUS attribute group available for selection.
- In the Cloudpath UI, go to Configuration > Policies.
- Select the RADIUS Attribute Groups tab, then click the Add RADIUS Attribute Group button.
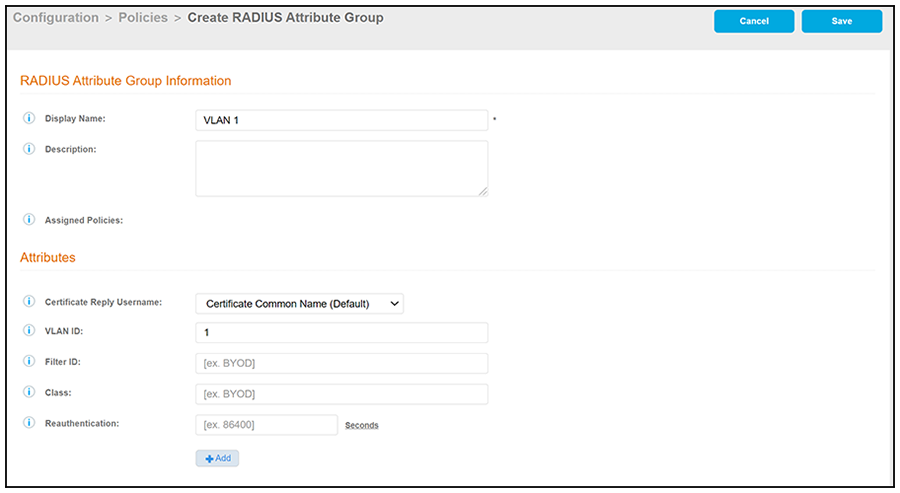
- In the ensuing Create Radius Attribute Group screen,
enter the information to create the group, then click Save.
Note: You can configure as many RADIUS Attribute groups as you want. One RADIUS Attribute group will later be assigned to each policy you create.An example screen and field descriptions follow:new screen shot below for the new certificate related field
- Display Name: The name of the RADIUS attribute group. This should be a descriptive name. It is visible only to Cloudpath administrators
- Description: Optionally, enter a description of this RADIUS attribute group. It is visible only to Cloudpath administrators.
- Assigned Policies: This field lists the names of all the policies that are using this RADIUS attribute group. There will be no policies listed here during the initial configuration of the group.
- Certificate Reply Username: For certificate
authentications, the RADIUS server replies by default with the username
based on the command name (CN) of the certificate. This username is used by
some WLAN infrastructures as the username displayed within the WLAN UI.
Options you can select for this field are:
- Certificate Common Name (default): Returns the certificate CN as the username.
- Enrollment Username: Returns the username from the enrollment record as the username.
- Enrollment Username + Device Name: Returns the username and device name from the enrollment record as the username.
- Certificate Unique ID: Returns the unique ID of the certificate as the username. This option provides anonymity but is traceable.
- Certificate Common Name + ID: Returns the CN of the certificate plus the unique ID of the certificate as the username.
newly added for 5.8 - VLAN ID: If this field is populated, the VLAN ID
is included in the RADIUS reply to the controller for successful
authentications. Cloudpath sends Tunnel-Type, Tunnel-Medium-Type, and
Tunnel-Private-Group-ID. If your network policy is wireless, the Tunnel-Type
value is VLAN, the Tunnel-Medium-Type value is 802 (this includes all 802
media plus Ethernet canonical format), and the Tunnel-Private-Group-ID is
the integer that represents the VLAN number to which group members will be
assigned.
If the VLAN ID field is left blank, Cloudpath will not return a VLAN ID in the RADIUS reply; therefore the controller assigns the VLAN ID based on its own configuration.
- Filter ID: If this field is populated, the Filter ID is included in the RADIUS reply for successful authentications. If this field is left blank, Cloudpath will not return a Filter ID in the RADIUS reply.
- Class: If this field is populated, the Class is included in the RADIUS reply for successful authentications. If this field is left blank, Cloudpath will not return a Class in the RADIUS reply.
- Reauthentication: The number of seconds included in the RADIUS reply for successful authentications. If the device stays connected for longer than this period, the WLAN or switch requires that the device be reauthenticated. In wireless devices, this causes the encryption keys to rotate.
- Additional Attributes: You can add other attributes in the "Attributes" section of the screen by clicking the + button, and selecting the desired fields and values. These attributes will be returned to the controller in an access-accept RADIUS server packet.
- Configure your policies:
- In the Configuration > Policies area of the UI, select the Policies tab, then click Add Policies.
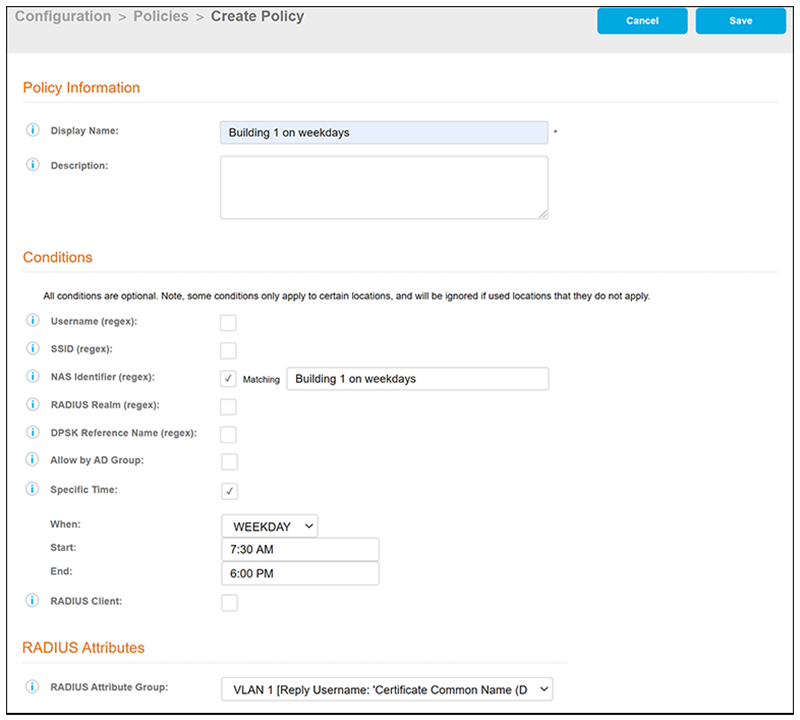
- In the ensuing Create Policy screen, enter the
information to create the policy, then click Save.
Note: You can configure as many policies as you want.An example screen and field descriptions follow:new screen for 5.8 - new fields described below
- Display Name: The name of the policy. This should be a descriptive name. It is visible only to Cloudpath administrators
- Description: Optionally, enter a description of this policy. It is visible only to Cloudpath administrators.
- "Conditions": In the
Conditions section, use any or all of these fields to create the
matching criteria you desire so that the appropriate policy gets
applied to each user.
Note: You can use the asterisks that appear in some of the Conditions fields, when selected, to denote that any value is acceptable in the place of the asterisk.
- Username Regex:
When the user is prompted for credentials, the username
specified by the user will be verified against this regular
expression for proper format. For example, ^d{8}$ will
ensure that the user enters an 8-digit id.
Note: Due to the complexity of regular expressions, it is recommended to use this field only if you are experienced with regular expressions. If you need assistance creating a regular expression to match your needs, contact support.
- SSID (regex): A regular expression that lists any Wi-Fi SSID(s) to which you want to limit this policy.
- NAS Identifier:
The Network access server (NAS) identifier to limit the
policy.
Note: If you use this field, and no NAS Identifier is provided in the response, the policy will be "false" and will not get applied to a user.
- RADIUS Realm (regex): The RADIUS realm to use in this policy, in the form of @company.com or company.com
- DPSK Reference
Name (regex): A regular expression to test against the DPSK
Reference Name.
Note: This field is applicable only when the policy is applied to a DPSK pool.
- Allow by AD Group: A regular expression that defines the usernames within the Active Directory that this policy allows.
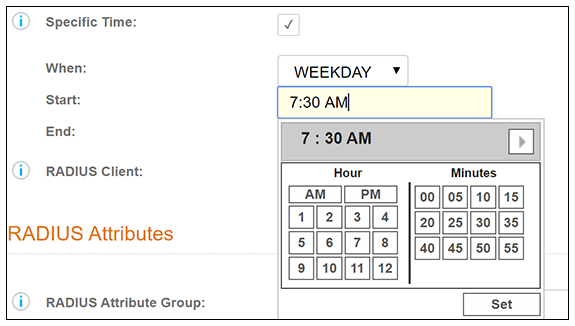
- Specific Time: If checked, drop-downs appear where you can specify the days and times that this policy allows enrollment. Be sure to click the Set button to set the desired time (see the following illustration):
- RADIUS Client: If you check this box, you are presented with a drop-down where you can then select a RADIUS client if you have already configured this client in the Configuration > RADIUS Server > Clients tab. This RADIUS client would then be associated with this policy.
- RADIUS Attribute Group: From this drop-down,
select the attribute group that you want associated with
this policy.
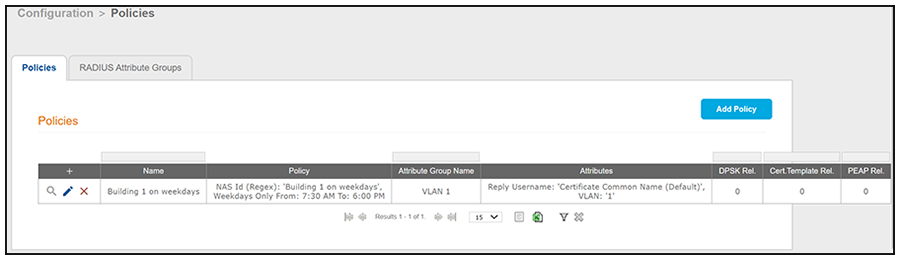
The following illustration shows the Policies tab after one policy has been added. The information shown in the table represents the policy configuration shown in the example in Create Policy Screen. The attribute group name and its attributes come from the attribute group name selected in the Create Policy Screen drop-down list. The RADIUS attribute information shown below comes from the example in Create RADIUS Attribute Screen.
- Username Regex:
When the user is prompted for credentials, the username
specified by the user will be verified against this regular
expression for proper format. For example, ^d{8}$ will
ensure that the user enters an 8-digit id.