Creating Configuration Profiles
Configuration Steps
You can add one or more configuration profiles to your TACACS+ configuration. However, only one profile can be in effect at any given time.
Follow these steps to add a configuration profile:
- In the Cloudpath UI, go to TACACS+ > TACACS+ Configuration Profiles.
- Highlight the Configuration Profiles tab.
- Click Add Configuration Profile.
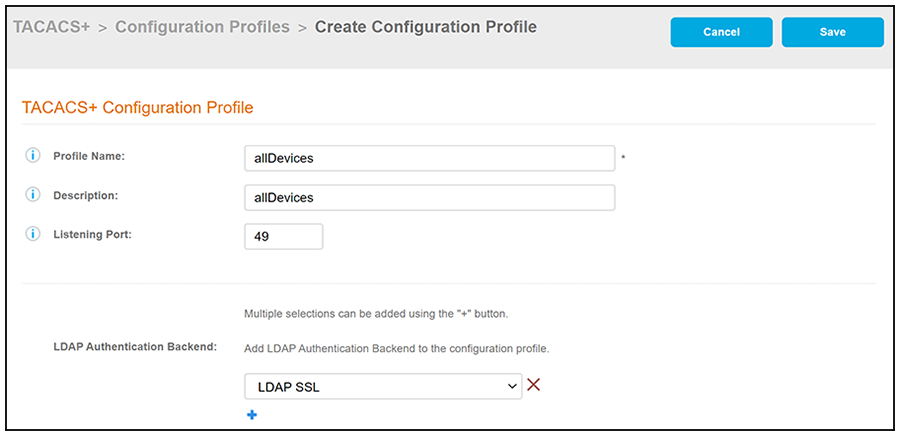
- The following screen shots each
show a portion of the Configuration Profile screen, along with descriptions and
examples for each field.
- Profile Name: A descriptive name for the the configuration profile. No spaces are allowed in the name. In this example, the profile is named "allDevices" because it will be used to provide access to all devices that have been configured for TACACS+ server authentication.
- Description: (Optional) Description of the configuration profile.
- Listening Port: TCP port number to use when connecting to the TACACS+ daemon. The default port is 49.
- LDAP Authentication Backend: Drop-down list from which you can select an already configured LDAP authentication backend to apply to this configuration profile. Any user groups that you want to allow access to any of the configured devices must exist in the LDAP server selected.
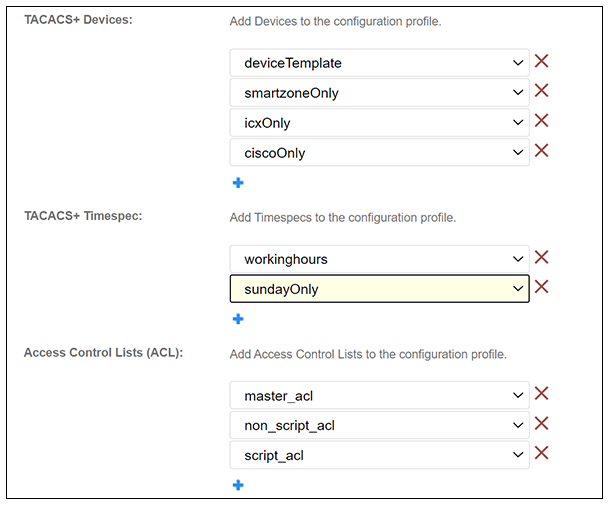
- Tacacs Devices: Drop-down
lists from which you select already-configured devices to apply to this
configuration profile. You can add additional devices by clicking the + button and
selecting another device.
Note: If you are adding a device template to this list, and you want that template to be applied to all devices, you must select the template in the first drop-down, as shown in the example with "deviceTemplate."
- Tacacs Timespec: Drop-down lists from which you select one or more time specs that were already configured in the TACACS+ > Access Control area of the UI to apply to this configuration profile. You can add additional time specs by clicking the + button and selecting another time spec.
- Access Control Lists
(ACL): Drop-down lists from which you select one or more ACLs that were
already configured in the TACACS+ > Access
Control area of the UI to apply to this configuration profile.
You can add additional ACLs by clicking the + button and
selecting another ACL.
Note: Any ACLs that are referenced by an acl statement from a group or user configuration must be selected from the ACL drop-down list (unless the group or user itself will not be part of the configuration profile). Otherwise, an error message will result. Any ACLs that are referenced by an acl statement from different ACLs must be selected prior to the selections of the ACLs referencing them.
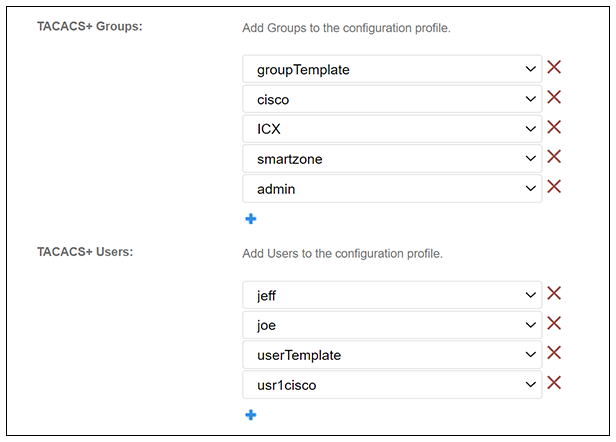
- Tacacs Groups: Drop-down
list from which you select groups that were already configured in the TACACS+ >
Users area of the UI to apply to this configuration profile. You
can add additional groups by clicking the + button and
selecting another group.
Note: If you are adding a group template to this list, and you want that template to be applied to all groups, you must select the template in the first drop-down, as shown in the example with "groupTemplate."
- Tacacs Users: Drop-down
list from which you select users that were already configured in the TACACS+ >
Users area of the UI to apply to this configuration profile. You
can add additional users by clicking the + button and
selecting another user.
Note: You only need to add individuals users who are not part of one of the groups in the configuration profile.
- Click Save.
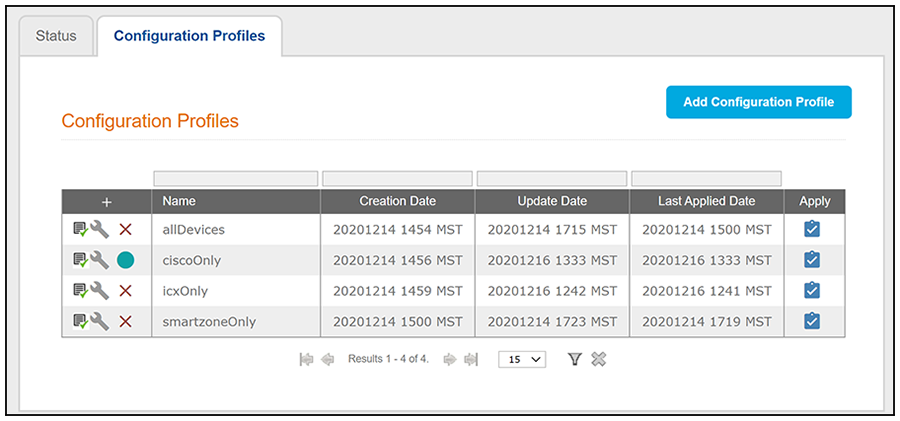
- Add and configure any additional configuration profiles. The following screen is an example of the main Configuration Profiles screen and its information after several configuration profiles have been created.
Verifying a Configuration Profile
To verify that a configuration profile is set up properly, such as making sure that
all necessary components (time specs, ACLs, devices, and so on) have been added to
the profile, click the  icon. If successful, the following message will be displayed:
Configurations have been verified.
Following that message is the complete configuration file that has been generated by all the information you entered to create the profile. A portion of this file - the time specs and ACLs - is shown below as an example.
 timespec = workinghours {
         	"* 8-22 14-23 Dec 1-5"   # or: "* 8-17 14-23 Dec-Jan Mon-Fri"

         	"* 8-12 * * 6"     # or: "* 8-12 * * * Sat"

         }


         acl = master_acl {
         	nas = 192.168.0.0/16}

         acl = non_script_acl {
         	nac regex = "10.*"

         	nas regex = "192.*"

         	time = workinghours

         	acl = master_acl #Failed to parse with this comment

         	port regex = "[0-9]+"}

         acl script = script_acl {
         	if ( nac == 192.168.4.237 ) deny}
In the above example the timespec called "workinghours" has been referenced by the ACL called "non_script_ACL" with the statement: time = workinghours
If workinghours was not selected from the TACACS+ Timespec drop-down, the verification would fail with the following message:
Invalid Configurations: Line 70: timespec 'workinghours' not found
Therefore, it is strongly recommended to verify your configuration profiles to be sure they return a successful verification message before you proceed further.
Other Actions You Can Perform From Main Configuration Profiles Screen
Some of the actions you can take from the main Configuration Profiles screen (Configuration Profiles Screen Example After Adding Several Configuration Profiles) include:
- Deleting a configure profile: Click the X in the column to the left of the name of the profile, then confirm the deletion when prompted.
- Applying a configure profile:
This refers to selecting only one of the existing profiles as the profile for
the TACACS+ server to use at this particular time. Click the check mark (
 ) next to the profile that
you want applied to the TACACS+ server, then confirm this selection when
prompted. A green circle to the left of the profile name indicates the profile
that is currently being applied to the TACACS+ server. The currently applied
configuration profile can also be referred to as the active profile.
Note: If you edit the active configuration profile, you need to "apply" it again in order for your changes to take effect.
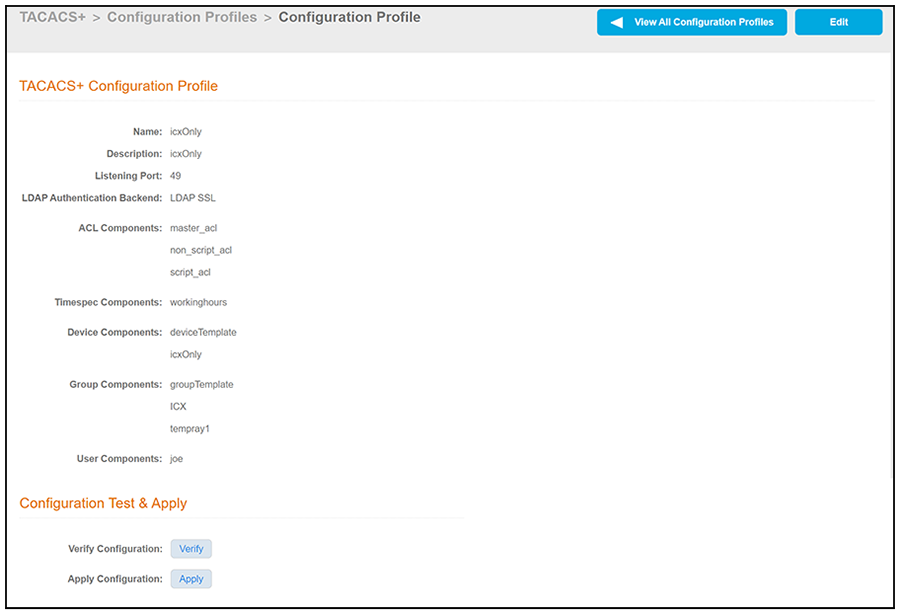
- Managing a configuration profile: Click the wrench icon (
 ) to view or edit the
configuration profile. The following screen is an example view of a
configuration file called "icxOnly" with its currently selected components
shown.
From the above screen, you can cliek Edit to make any desired changes to the profile.
Testing a Configuration Profile
You can test a profile to make sure it works as you expect. For example, a few examples of ways to test the active profile could include:
- Try to log in to a device that is not part of the active profile. You should receive an error messsage. For example, in Configuration Profiles Screen Example After Adding Several Configuration Profiles, the profile called "ciscoOnly" is the active file, denoted by the green circle. This profile is named accordingly because the only device selected in the profile is a Cisco device. If you tried to log in to an ICX switch while the "ciscoOnly" profile was active, you would receive an error that the login credentials are not correct.
- Try logging in to a device that is part of the active profile, but attempt to do so outside the hours of a timespec that has been applied. For example, if a "workinghours" timespec is in effect for the device, and you are attempting to log in outside of the time range specififed in "workinghours," you should also be denied access.
- Try logging in to a device as a user who is part of a group that has not been added to the active profile; you should again be denied access.
- Try logging in to a device where all criteria in the profile is met, and be sure that you are successful. Then, you can test to be sure that any defined services are working as expected, such as privilege levels and permission levels. For example, if a "read-only" service has been applied, you can test to make sure that the user can only run show commands.