Configuring TACACS+ Devices
Configuration Steps
Follow these steps to add a device:
- In the Cloudpath UI, go to TACACS+ > TACACS+ Devices.
- Click Add Device.
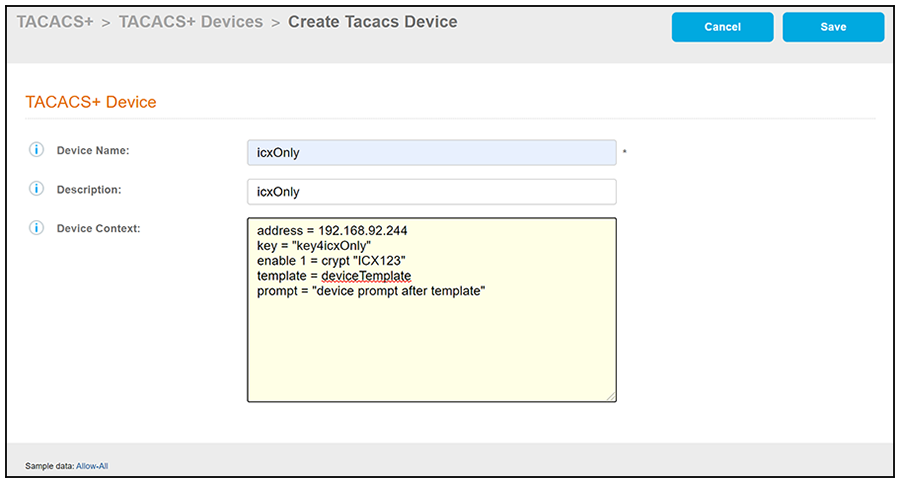
- Configure the values to create a
TACACS+ device, as shown in the following example.
- Device Name: A descriptive name for the device; this is used for reference when building the configuration profile. No spaces are allowed in the name.
- Description: (Optional) Description of the device.
- Device Context: Many
statements are available to add. Some common ones that are shown in the
example screen above are:
- Address: An address statement is used to enter the host IP address of the device. In the example, the host IP address is 192.168.92.244.
- Key: A key
statement is used to enter the shared key between the device
network and the Cloudpath system that is acting as the TACACS+
server. In the example, the shared key is: key4icxOnly. This string must be an exact match of the
corresponding key that is configured in the AAA server
configuration on the device.
Note: The value of the key must be in quotation marks.
- Enable: An enable
statement is used to enable the password and set the privilege
level. enable passwords may be specified at the host, user, or
group level, in that order of precedence.
enable [ level ] = ( permit | deny | login | ( clear | crypt ) "password" )
This statement may be used to set user or group-specific enable passwords, to use the login password, or to permit (without password) or deny any enable attempt. enable passwords defined at the group or user level are given precedence over those defined at the host level. The default for the level is 15.
Note: The value of the password must be in quotation marks.The default privilege level for an ordinary user on the NAS is typically 1. A user can reset this level to a value between 0 and 15 by using the nas enable statement. If the user does not specify a level, the default level is 15.
The enable statement in the example screen above sets the the privilege level to 1, and encrypts the password on the device while setting the password to ICX123. This is the password that is requested when logging in to the device.
- Template: A template
statement is used to pull in another device configuration into
this device configuration. In the example, the device
configuration called deviceTemplate is being called in. deviceTemplate is not actually defined as a template
itself; however a template statement is needed to call in
another device configuration.
An example of the content contained in deviceTemplate is:
prompt = "Welcome\n"
This statement means that the user receives a "Welcome" message upon successful login.
- Prompt: A prompt
statement is used to display text to the user. In the example,
the string "device prompt after template" is shown for testing
purposes only and should be replaced by the actual device
prompt.
Note: The value of the prompt must be in quotation marks.
Allow-All: If you want to quickly perform a simple device configuration that allows access for any device and creates an entry for you to edit a shared-key value, click Allow-All in the lower-left portion of the screen to populate the Device Context field with the following values:
address = 0.0.0.0/0
key = "mysecretsharedkey"
Note: A network address of 0.0.0.0/0 allows access to any device from anywhere. - Click Save.
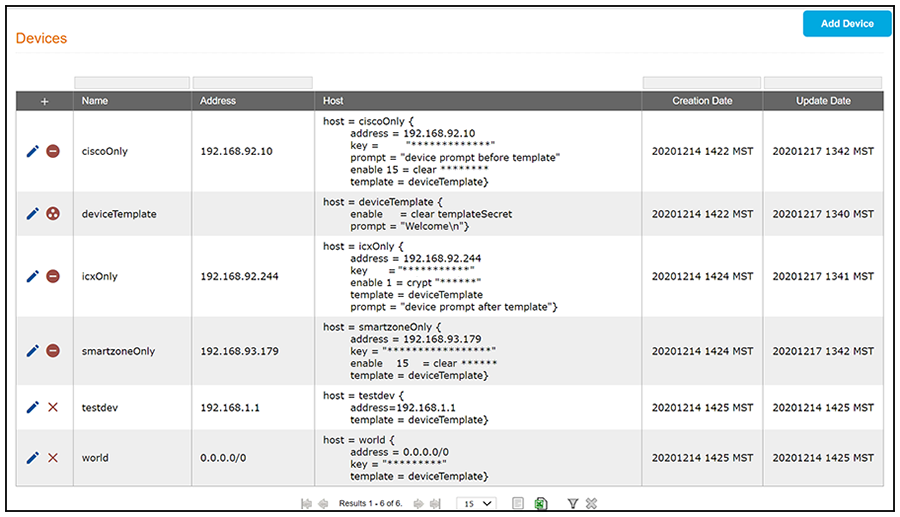
- Add and configure any additional devices. The following screen is an example of the main Devices configuration screen and its information after several device configurations have been performed.
Other Actions You Can Perform From Main Device Configuration Screen
Some of the actions you can take from the main Device Configuration screen (Devices Screen Example After Adding Several Devices) include:
- Deleting a device configuration:
Click the X in the column
to the left of the name of the configuration, then confirm the deletion when
prompted.
Note: A minus sign indicates that the device configuration cannot be deleted because it is being referenced by a configuration profile. You would have to first remove the configuration from the configuration profile if you want to be able to delete it from the main Device Configuration screen.
- Editing a device configuration: Click the pencil icon in the column to the left of the name of the configuration, then make and save any edits in the ensuing screen.
 icon denotes that the
configuration is being referenced by another device configuration. You would
have to first remove the configuration from the device configuration if you
want to be able to delete it from the main Device Configuration
screen.