Configuring Access Control Lists
You can add one or more access control
lists (ACLs) to your TACACS+ configuration. ACLs allow you to further manage control
of the
various devices that can use the TACACS+ server by applying ACLs to user groups and
individual users.
Configuration Steps
Follow these steps to add an ACL:
- In the Cloudpath UI, go to TACACS+ > Access Control .
- Highlight the Access Control Lists tab.
- Click Add ACL.
- Configure the values to create an
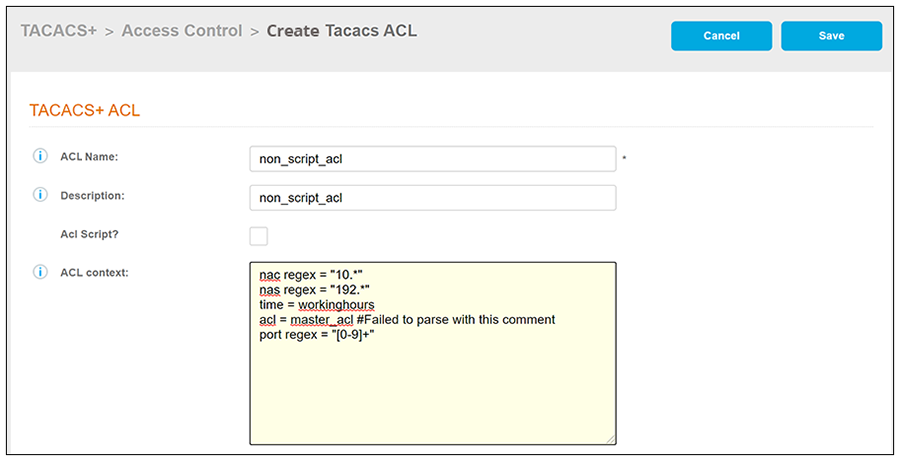
ACL, as shown in the following example.
- ACL Name: A descriptive name for the ACL; this is used for reference when building the configuration profile. No spaces are allowed in the name.
- Description: (Optional) Description of the ACL.
- ACL Script?: This box should be checked if the ACL is a script.
- ACL Context: You can add
the access control expressions (ACEs) you desire to build the ACL. The
following list describes the ACEs that are shown in the example screen
above:
- nac regex =
"10.*" - Network Access Client (NAC) device IP address begins
with "10."
Note: A network access client is the source host of a telnet connection.
- nas regex =
"192.*" - Network Access Server (NAS) device whose IP address
begins with "192."
Note: A network access server, such as a Cisco box, makes TACACS+ authentication and authorization requests, or generates TACACS+ accounting packets.
- time = workinghours - Client attemping to connect must do so during the time period allowed in the time spec called workinghours configured in the Time Specs tab.
- acl = master_acl - The ACL called "master_acl" is being called in.
- port regex = "[0-9]+" - Can be any port number; port is used to access the device.
- nac regex =
"10.*" - Network Access Client (NAC) device IP address begins
with "10."
- Click Save.
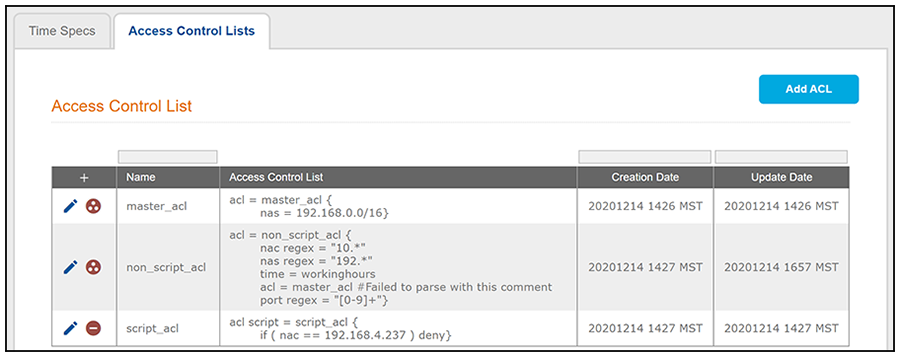
- Add and configure any additional
ACLs. The following screen is an example of the main ACL configuration screen
and its information after several ACLs have been configured.
Note: You can reference one or more configured ACLs when you configure user groups or individual users.
Other Actions You Can Perform From Main ACL Configuration Screen
Some of the actions you can take from the main ACL Configuration screen (Services Screen Example After Adding Several ACLs) include:
- Deleting an ACL configuration:
Click the X in the column
to the left of the name of the configuration, then confirm the deletion when
prompted.
Note: A minus sign indicates that the configuration cannot be deleted because it is being referenced by a configuration profile. You would have to first remove the ACL from the configuration profile if you want to be able to delete it from the main ACL Configuration screen.Note: The
 icon denotes that the
ACL configuration is being referenced with the use of an acl statement by
either a user group, individual-user configuration, or another ACL. You
would have to first remove the corresponding acl statement from
the applicable configuration if you want to be able to delete the ACL
configuration from the main ACL Configuration screen.
- Editing an ACL configuration: Click the pencil icon in the column to the left of the name of the configuration, then make and save any edits in the ensuing screen.