Managing Switch Ports
The Ports Detail tab
displays information on the overall switch status such as the number of ports used,
number
of ports available and Power over Ethernet (PoE) power budget usage. Individual
switch ports
can be managed by selecting the specific port from the switch port diagram on the
Unleashed
web interface, or from the port list table below the diagram.
- From the main menu, select . In the Switches page, click a connected switch. By default, the Overview page is displayed.
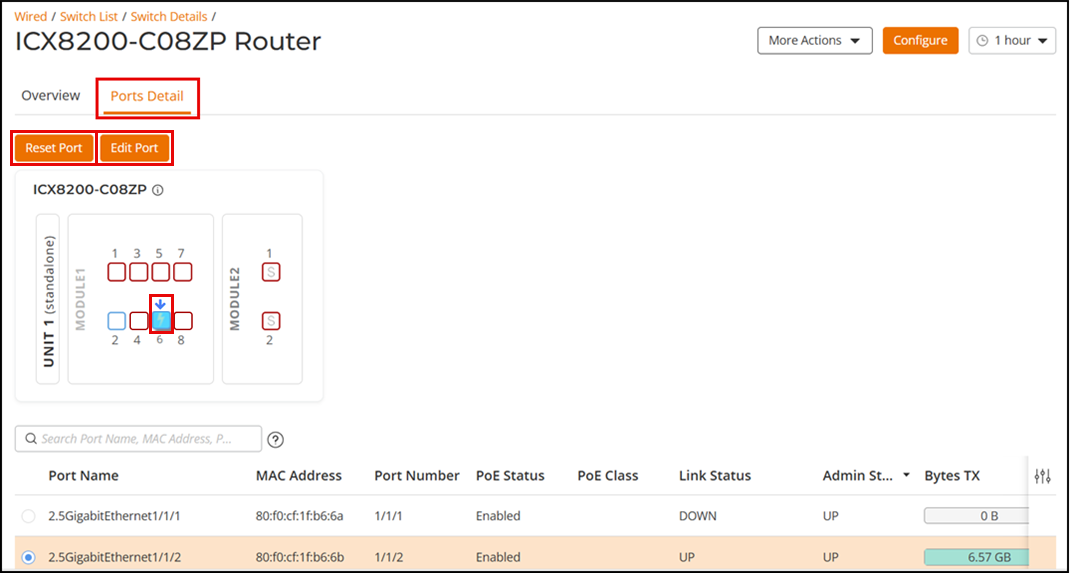
- Click the Ports Detail tab to view the port summary information and per-port details.
- Select an individual port from the port diagram and the corresponding row in the Ports Detail table is selected. Alternatively, you can first select a port from the Ports Detail table and the corresponding port in the port diagram is automatically highlighted with an arrow.
- Review the port information displayed in the Ports Details table for the selected port.
- (Optional) Click Reset Port (located above the port diagram) to reboot a device connected to a PoE switch port. The Reset Port option is used to power cycle a connected device by powering down then powering up a PoE port.
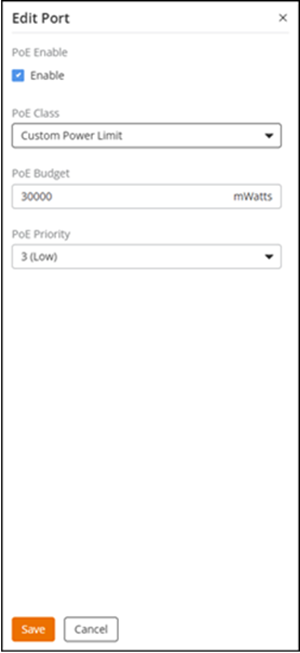
- (Optional) Click Edit Port
(located above the port diagram) to update the PoE settings. The Edit
Port sidebar is displayed. Configure the following fields:Note: All the ICX switch models with a "P" suffix support PoE (for example, 7550-48P, 7150-48ZP, 8200-24P, and 8200-C08PF).Note: Stack ports and Management ports do not support PoE.Note: The following RUCKUS ICX switches and associated ports support PoE classes from 5 through 8 (High Power, PoE++):Note: The PoE setting is supported only on ICX devices running RUCKUS FastIron 08.0.95 or later versions. Refer to PoE Support Matrix in the RUCKUS FastIron Management Configuration Guide.
- PoE Enabled: Activating PoE on a switch port enables the switch to supply power to devices such as IP phones, wireless access points, and cameras using an Ethernet cable. By default, PoE is enabled.
- PoE
Class: PoE classes define the amount of power a connected
PoE-enabled device can receive from a switch. Select a value from the
drop-down list.
- Custom Power Limit: Customize the power
limit and configure PoE
Budget.
PoE Budget is configurable only when you select PoE Class as Custom Power Limit. A PoE budget is the total power a PoE switch can supply to all connected devices. It ensures the switch can power all devices without exceeding its capacity. It is measured in mWatts.
Enter a value ranging from 1000 through 30,000, supports PoE Classes from 1 through 4. - Negotiate (default): This class provides up to 15.4 watts of power. It is the default classification for devices that do not specify a power class.
- Class 1 (Low Power): This class supplies up to 4.0 watts of power and is suitable for low-power devices such as certain sensors.
- Class 2 (Medium Power): This class delivers up to 7.0 watts of power which is used for devices like basic IP phones.
- Class 3 (Full Power): This class offers up to 15.4 watts of power for more demanding devices such as advanced IP phones and some wireless access points.
- Class 4 (High Power, PoE+): This class provides up to 30 watts of power for high-power devices such as cameras and more advanced wireless access points.
- Class 5 (High Power, PoE++): This class provides up to 45 watts of power for high-power devices such as cameras and more advanced wireless access points.
- Class 6 (High Power, PoE++): This class provides up to 60 watts of power for high-power devices such as cameras and more advanced wireless access points.
- Class 7 (High Power, PoE++): This class provides up to 75 watts of power for high-power devices such as high-definition camera, advanced wireless access points, and other power-intensive devices.
- Class 8 (High Power, PoE++): This class provides up to 90 watts of power for high-power devices such as high-definition camera, advanced wireless access points, and other power-intensive devices.
- Custom Power Limit: Customize the power
limit and configure PoE
Budget.
- PoE Priority: PoE priority determines the order in which devices receive power from a PoE switch when the power budget is exceeded. Select a number (1 (High), 2 (Medium), or 3 (Low)) from the drop-down list.
- Click Save to exit the Edit Port sidebar.
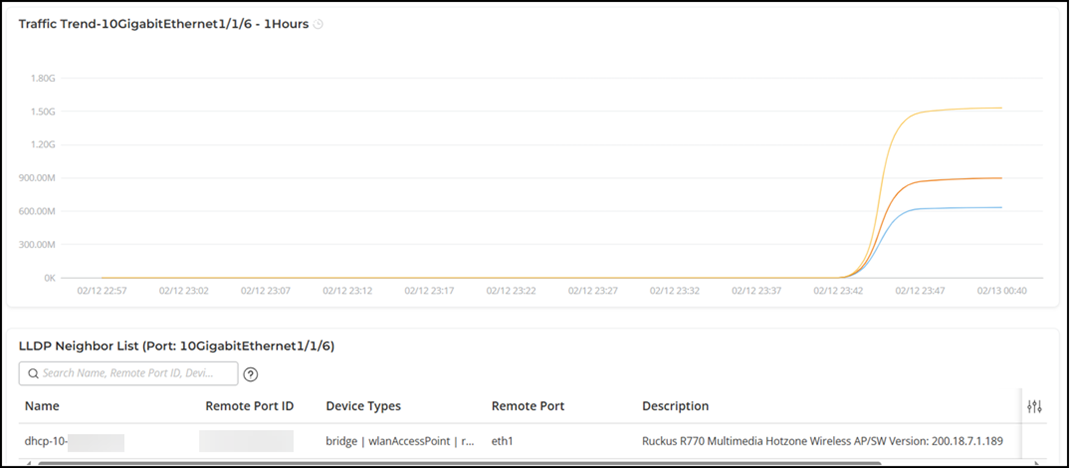
- In the Ports Detail page, scroll down to view the Traffic Trend and LLDP Neighbor List charts for the selected port.