Creating an AV Profile on an ICX Switch
You can use an AV profile created in the
RUCKUS Unleashed web interface to enable the ICX AV switch to effectively handle
audio‑visual traffic by prioritizing latency‑sensitive traffic, enabling time
synchronization, and optimizing multicast delivery.
- If a RUCKUS Unleashed AP is directly connected to an ICX switch port and the ICX credentials have not been changed, the Unleashed network automatically manages the ICX switch.
- If the credentials have changed, click Manage ICX and enter the username and password.
- If a RUCKUS Unleashed AP is not connected, add the ICX switch manually by entering the IP address, admin username, and password.
- Ensure that the required AV profile template is available before creating an AV profile.
- In the navigation bar, select
.The Switches page is displayed.
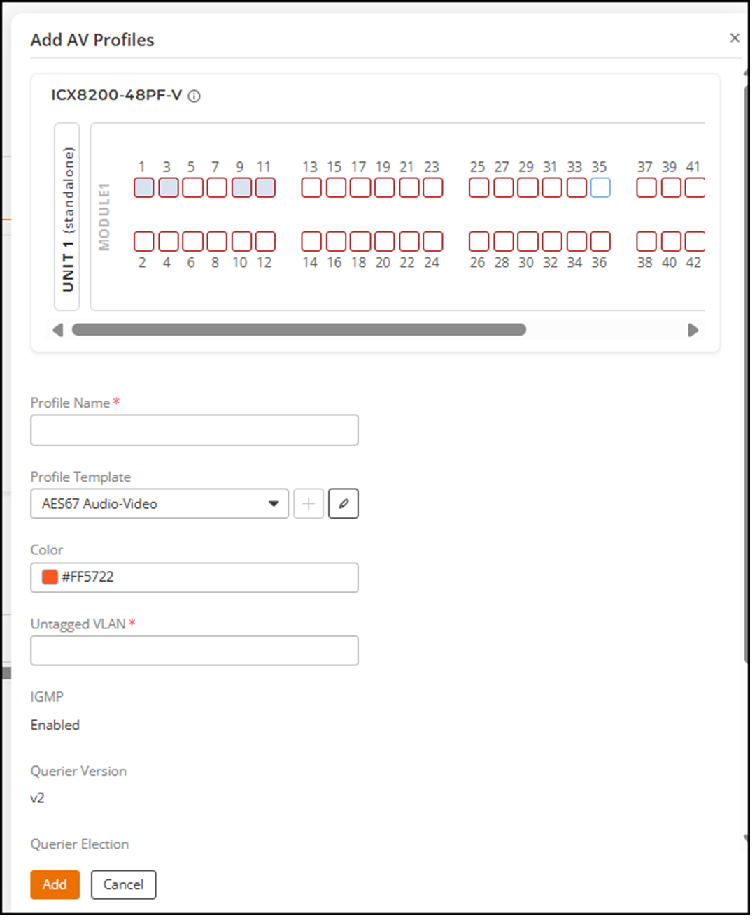
- Select an ICX switch that supports AV profiles and click the AV Profiles tab.
- Click Add.
- Select the ports to which you want to bind the AV profile.Each port can be associated with only one AV profile.
- Enter the AV profile name.
- Select the AV Profile
Template from the drop-down list. The options include the
predefined templates: AES67 Audio-Video, Dante
Audio-Video, NDI5-Video,
Q_SYS-Video, Video, Voice, Data, and
Custom.Alternatively, create a custom template to define QoS, PTP, and multicast behavior for specific AV deployment requirements (you may create up to eight custom templates).
- Click the
 icon to create a new AV profile
template.Note: A maximum of eight AV profiles per ICX switch is supported.The Add Profile Template sidebar is displayed. Complete the following to add a new AV profile template:
icon to create a new AV profile
template.Note: A maximum of eight AV profiles per ICX switch is supported.The Add Profile Template sidebar is displayed. Complete the following to add a new AV profile template: - Click Save.
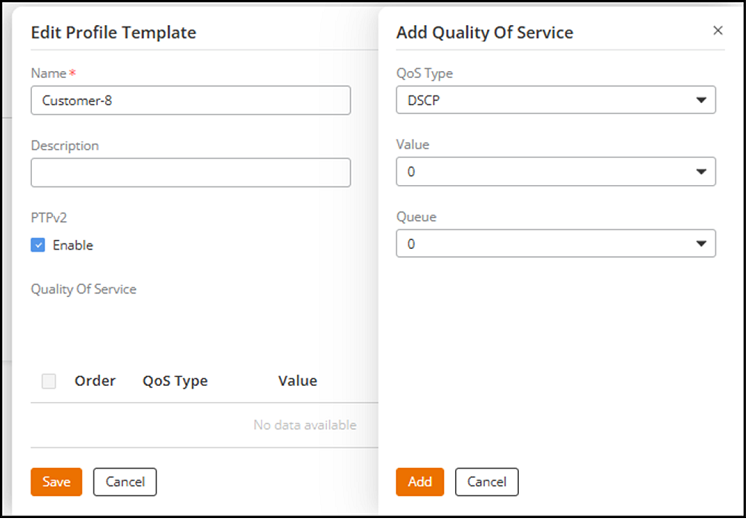
- (Optional) Click the
 icon to modify the profile template. You
can modify the template name and description, enable or disable PTPv2,
and add Quality of Service (QoS) configurations.
icon to modify the profile template. You
can modify the template name and description, enable or disable PTPv2,
and add Quality of Service (QoS) configurations.
- Click the
- Select a Color for the AV profile.
- Enter the Untagged VLAN.
- Enable IGMP and complete the following steps:
- Enable Fast Leave to allow immediate removal of multicast group membership.
- Enable DHCP Relay and configure the following fields:
- Click Add.