Creating a Hotspot (WISPr) Portal
Before creating a hotspot, you need to create a user defined interface.
- Go to .
- Select the Hotspot (WISPr) tab, and then select the zone for which you want to create the portal.
- Click Create.
- Under General Options, enter portal name and portal description.
- Under
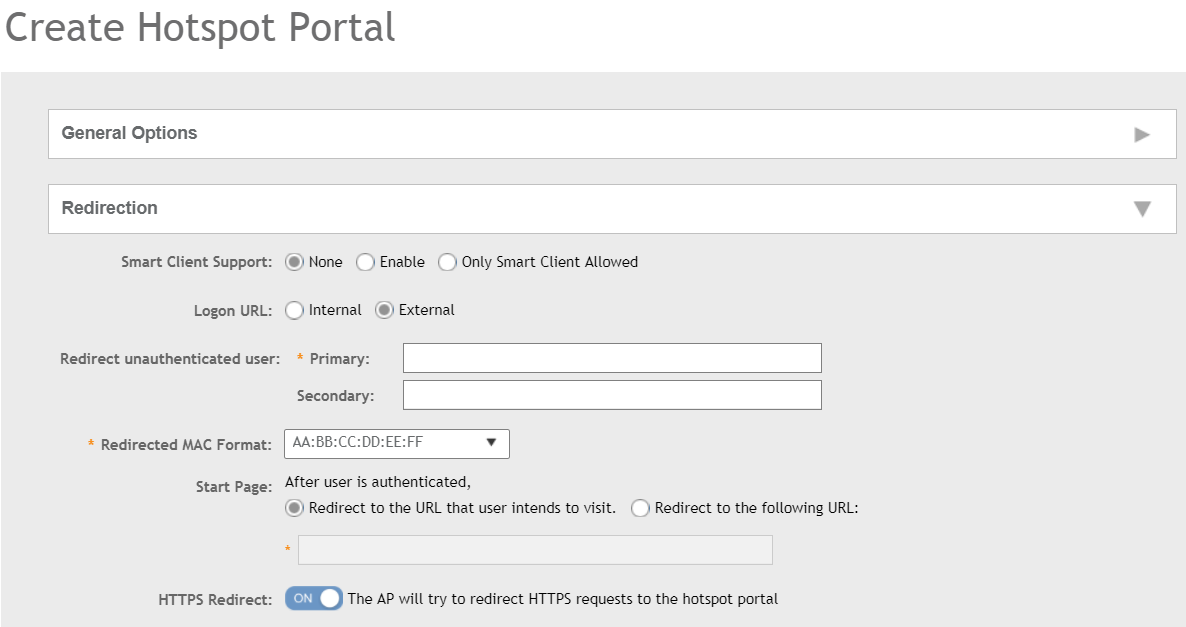
Redirection, select where to redirect the user after successful authentication.
- For Smart Client Support, select one of the following options:
- For
Logon URL, select one of the following options:
- Internal: Indicates the internal URL of the subscriber portal (where hotspot users can log in to the service).
- External: Indicates the external URL of the subscriber portal.
Selecting External provides an option to reroute an unauthorized user to a primary location. You can set the primary location in Redirect unauthenticated user. If an unauthorized user is rerouted, the AP redirects the UE to a backup portal.
The AP subscriber portal supports ZD-style API to login and logout. A customer can use AP IP address to submit the login or logout request.
- Redirect unauthenticated user: APs can perform WISPr redirection. Native WISPr support is available on SZ-managed
APs even if access to SZ is not available. It supports external portal redirection
with survivability when APs cannot reach the centralized SZ. It also supports backup
portal redirection if primary portal is down. The WISPr authentication load can be
distributed to AP or use an AP as a WISPr authentication backup.
WISPr redirection and survivability is supported only on Ruckus 11AC Wave 1 and later APs. Only ZD-style external WISPr is supported. No NBI is supported for backup.
- Primary: Redirects an unauthenticated user to a specified URL for authentication.
- Secondary: Redirects an unauthenticated user to
the backup external portal if the primary URL is down.
The AP periodically accesses the primary portal URL to
detect and check the availability of the primary URL.
Note: The AP uses the secondary portal when the AP cannot access the primary portal.
- In the Redirected MAC Format field, enter the format of the redirection MAC address.
- For Start Page, select one of the following options:
- Enable HTTPS Redirect if you want the AP to redirect HTTPS requests to the hotspot portal. HTTPS requests are dropped if this option is disabled.
- Under User Session, set the session timeout and grace period.
- Under
Location Information, set the location ID and location name.
- In
Location ID, enter the ISO and ITU country and area code that the AP includes in accounting and
authentication requests. The code includes the following requirements:
- isocc (ISO-country-code): The ISO country code that the AP includes in RADIUS authentication and accounting requests.
- cc (country-code): The ITU country code that the AP includes in RADIUS authentication and accounting requests.
- ac (area-code): The ITU area code that the AP includes in RADIUS authentication and accounting requests.
- network: Name of the network.
The following example illustrates a proper location ID entry: isocc=us,cc=1,ac=408,network=Ruckus
- For Location Name, enter the name of the location of the hotspot service.
- In
Location ID, enter the ISO and ITU country and area code that the AP includes in accounting and
authentication requests. The code includes the following requirements:
- Under Walled Garden, click Add to add a user to a walled garden and provide access.
- Click Import CSV to import the CSV file with the user information.
- Select Traffic Class Profile and click + to create a traffic class profile. Refer to Creating a Traffic Class Profile section in the Administration guide.
- Under Advanced Options, select the required options:
- Click OK.